

Headlight switching circuit
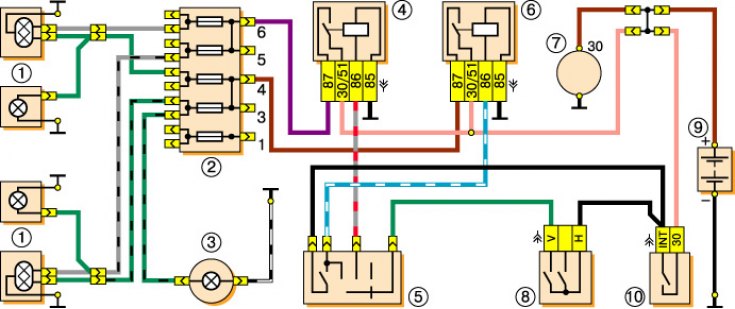
1 - headlights; 2 - fuse block; 3 - speedometer with signaling device for switching on the main beam of headlights; 4 – the relay of inclusion of a passing beam of headlights; 5 - headlight switch; 6 – the relay of inclusion of a high beam of headlights; 7 - generator; 8 - outdoor lighting switch; 9 - storage battery; 10 - ignition switch.
Headlight adjustment scheme
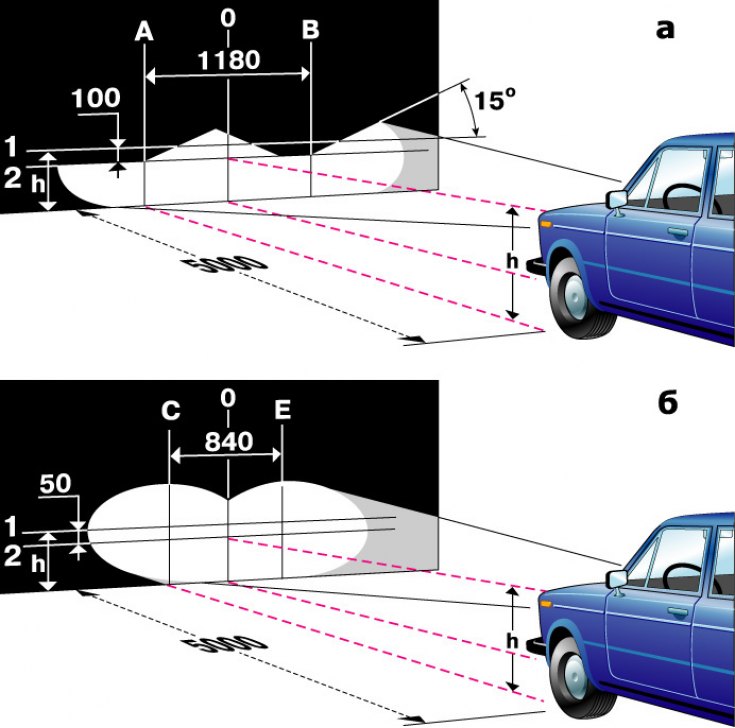
a - external headlights; b - internal headlights; 1 - a horizontal line corresponding to the centers of the headlights; 2 - line passing through the centers of light spots; A and B are vertical lines corresponding to the centers of the outer headlights; C and E - vertical lines corresponding to the centers of the internal headlights; O - center line; h is the distance of the headlight centers from the floor.
We check the correctness of the headlight adjustment by the location of the light spots on the screen (see picture).
We check and adjust the headlights on a flat horizontal platform. A sheet of plywood can serve as a screen (approximately 1.0 m high and 1.7–2.0 m long), light building wall, gate, etc. A fully refueled car with a jack, a tool and a spare wheel fixed in regular places, we put it perpendicular to the screen at a distance of 5 m between it and the headlights. Check and, if necessary, adjust the tire pressure to normal. We put the assistant in the driver's seat. In order for the body to take the correct position relative to the wheels, we swing the car by the wing. Let's start with the headlights. We mark the screen with chalk, as shown in Figure a. The distance between the marks applied on the screen, corresponding to the centers of the outer headlights, must be 1180 mm.
We close one of the external headlights with a piece of cardboard or cloth and turn on the dipped beam.
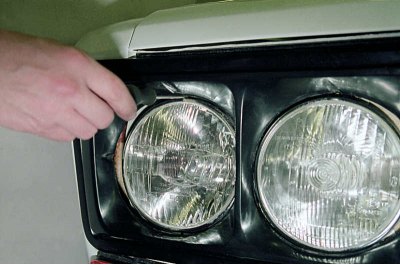
Using a Phillips screwdriver, turning the adjusting screw located above the headlight, we combine the horizontal border of the light beam with the bottom line on the screen.
The headlight frames have special recesses for access to the adjusting screws. If one of the screws is closed, remove the frame (see Radiator Grille Replacement).
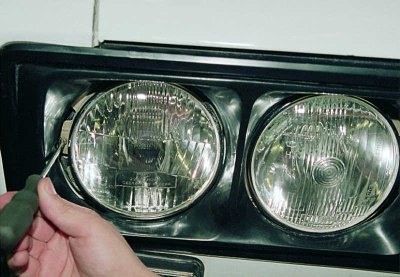
Turning the second adjusting screw, located, when viewed along the vehicle, to the right of the right headlight (to the left of the left), combine the break point of the light beam (intersection of horizontal and sloping boundaries) with a vertical headlight center line on the screen.
We also adjust the outer headlight on the other side of the car.
We mark the screen, as shown in Figure b. The distance between the marks on the screen corresponding to the centers of the internal headlights is 840 mm. We close the external headlights with cardboard or cloth and turn on the high beam headlights. Alternately closing the internal headlights and turning the adjusting screws, we set the center of the light beams, as shown in the figure. The screw above the headlight changes the position of the beam vertically...
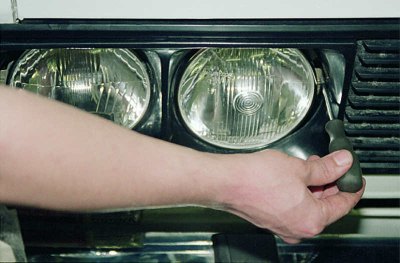
... and on the left - horizontally.
It is better to adjust the headlights at night or in cloudy weather.