
English Русский
Български
Беларускі
Український
Српски
Hrvatski
Română
Polski
Slovenský
Magyar
| Articles | Contacts | Sitemap |   
Repair and maintenance Lada Repair and maintenance Mazda Repair and maintenance Mitsubishi Repair and maintenance Toyota Repair and maintenance Land Rover Repair and maintenance Hyundai Repair and maintenance Nissan
VAZbook.ru


Main     1111   2101   2105   2106   2107   2109   2110   2115   2121  
VAZ-2107 (1982-2012)
  • Main
  • «Zhiguli»
  • VAZ-2107
  • Electrical equipment
  • Engine electrics
  • Distributor Cap and Rotor — Check and Replace

Distributor Cap and Rotor — Check and Replace (VAZ-2107)

            0

To complete the work you will need a multimeter.

1. Prepare the vehicle for operations (see "Preparing a car for maintenance and repair").

2. Disconnect the wire from the negative terminal of the battery (see "Battery - Removal and Installation").

3. Using a screwdriver or other suitable tool, disconnect the spring clips of the cover.
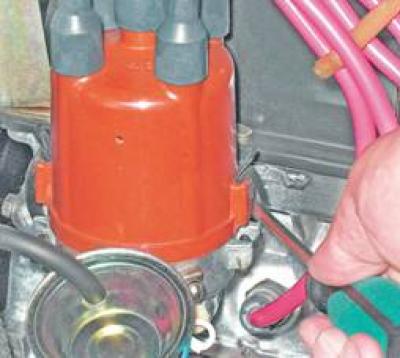
3. Using a screwdriver or other suitable tool, disconnect the spring clips of the cover.


4. Remove the cover from the distributor.
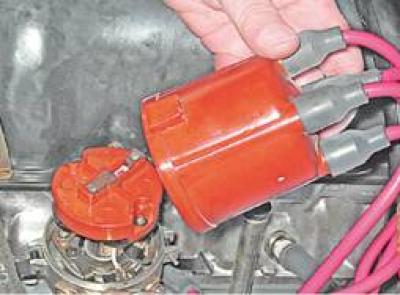
4. Remove the cover from the distributor.


5. By pressing on the carbon electrode, we check its mobility and visually assess its condition.

5. By pressing on the carbon electrode, we check its mobility and visually assess its condition.
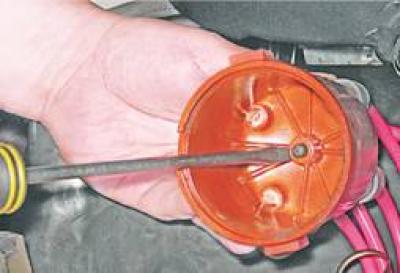

Damage and excessive wear of the electrode is not allowed.


6. Wash the surface of the cover with white spirit, clean the carbon deposits from the contacts of the side electrodes with fine-grained sandpaper.

Cracks and burnouts in the cover body are not allowed. If necessary, disconnect the high-voltage wires and replace the cover with a new one.

7. Wash the surface of the runner with white spirit, clean the central and side contacts with fine-grained sandpaper. Cracks, burnouts and excessive wear of the side electrode are not allowed.

8. Connect the ohmmeter probes to the contacts of the runner and measure the resistance of the resistor. It should be within 5.0-6.0 kOhm.
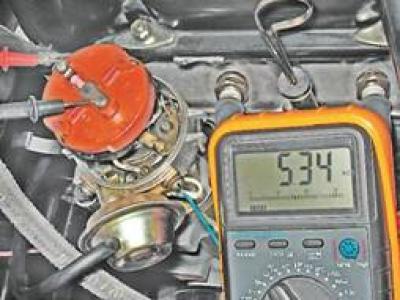
8. Connect the ohmmeter probes to the contacts of the runner and measure the resistance of the…


Otherwise, we replace the faulty runner.

9. Using a slotted screwdriver, unscrew the two screws securing the runner to the ignition timing regulator support plate and remove the runner.
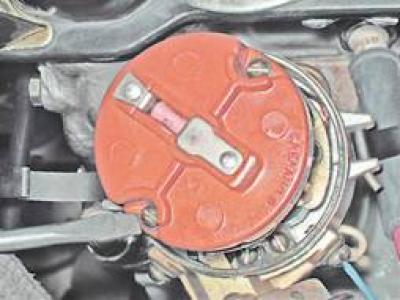
9. Using a slotted screwdriver, unscrew the two screws securing the runner to the ignition timing…


10. Using a screwdriver or other suitable tool, press the regulator weights, checking their mobility.
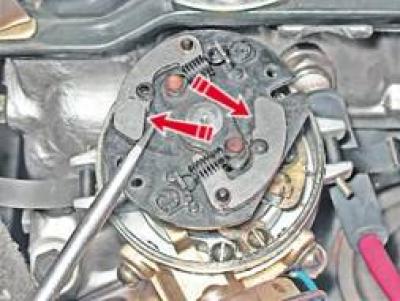

10. Using a screwdriver or other suitable tool, press the regulator weights, checking their…


If necessary, lubricate their axles with penetrating lubricant.

Installation


1. Install the runner on the movable plate, orienting it with the rectangular protrusion into the shaped cutout.
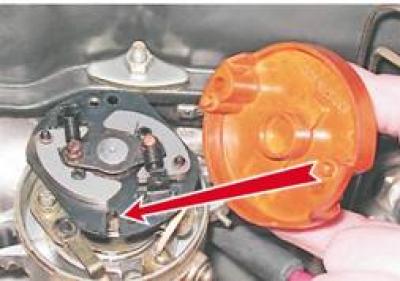
1. Install the runner on the movable plate, orienting it with the rectangular protrusion into the…


2. Using a rag soaked in white spirit, clean the high-voltage wires from dirt and connect them to the cover according to the markings next to the side electrodes.

3. Installation of all other parts is carried out in reverse order.


This article is available at russian, bulgarian, belarusian, ukrainian, serbian, croatian, romanian, polish, slovak, hungarian
The text was reviewed by the specialist: Grigory Vologodtsev

Share with friends:

Previous articles
VAZ-2107: Engine electrics
Next articles

Ignition distributor
Ignition coil — checking, removal and installation
Ignition coil
Ignition switch (lock) — removal and installation, checking and replacing the contact group
Spark plugs — checking condition and replacement
Ignition distributor — lubrication
Closed state angle of breaker contacts — checking and adjustment
Ignition timing — checking and adjustment
Ignition distributor — removal and installation
Ignition distributor — disassembly

More articles from other manuals on VAZ cars:
➠ Distributor Cap and Rotor — Check and Replace VAZ-2104 (1984-2012)
➠ Distributor Cap and Rotor — Check and Replace VAZ-2106 (1976-2006)
➠ Ignition distributor — check VAZ-21011 (1974-1983)
➠ Removal the ignition distributor sensor rotor VAZ-21214 (1994-2006)
➠ Thermoregulator — check and repair VAZ-2108 (1984-2003)
Link in different formats to this page


Visitor comments

No comments yet


How much will 12 + 45 ?


VAZ-2107 (1982-2012) 
  • General information
  • User manual
  • Maintenance
  • Operation and maintenance
  • Power unit
  • Engine repair
  • Fuel system (carburetor)
  • Fuel system (injector)
  • Control system
  • Cooling system
  • Exhaust system
  • Transmission
  • Clutch
  • Car gearbox
  • Cardan gear
  • Rear axle
  • Chassis
  • Front suspension
  • Rear suspension
  • Wheels and tires
  • Steering
  • Brake system
  • Body
  • Exterior
  • Interior
  • Doors and glass
  • Electrical equipment
  • Equipment and devices
  • Headlights and lighting
  • Engine electrics


VAZbook.ru © 2017 · Mobile version · Contact with administration · Sitemap: EN BG BY UA RS HR RO PL SK HU · Site search · News and articles VAZ-1111 · VAZ-11113 · VAZ-2101 · VAZ-21011 · VAZ-2104 · VAZ-2105 · VAZ-21051 · VAZ-2106 · VAZ-21061 · VAZ-2107 · VAZ-21099 · VAZ-2109 · VAZ-2108 · VAZ-2110 · VAZ-2112 · VAZ-2114 · VAZ-2115 · VAZ-2121 · VAZ-21213 · VAZ-21214 ·
The site stores technical data using cookies to improve the service.