




Angle of longitudinal inclination of the axis of rotation (caster) is the angle between the vertical and the axis of rotation of the wheel when viewed from the side. The angle is adjusted by changing the number of adjusting washers on the bolts of the lower arm axle, suspension, which ensures stabilization of the wheels when the car is moving in a straight line.
Wheel camber angle - is the angle between the plane of rotation of the wheel and the vertical line passing through the center of the tire contact patch with the road surface. The angle is adjusted by simultaneously changing the number of adjusting washers of the same thickness on both bolts of the lower arm axle, which ensures the correct position of the wheel when the suspension is operating
Wheel alignment - the difference in distances between the front and rear points of the inner part of the rims of the right and left wheels.
It is recommended that the front wheel alignment angles be checked and adjusted on a stand in a specialized workshop, however, the checking operation (except for checking the longitudinal tilt angle of the steering axis) can be done with sufficient accuracy independently.
Attention! If the bodywork was repaired after an accident or suspension parts were changed, it is necessary to check the wheel alignment angles.
More accurate results are obtained by checking the angles on a loaded vehicle under a static load of 320 kgf, which approximately corresponds to the weight of four people placed on the seats and a load of 50 kg in the trunk. The fuel tank must be completely filled.
After the first maintenance and subsequent operation, the angle values should correspond to the following values:
|
- longitudinal tilt angle of the rotation axis |
4°+30'(3°+30')*; |
|
- camber angle |
4°30' +20'(0°5'+20')*; |
|
- wheel alignment |
2-4(3-5)* mm. |
* The values in brackets are the angles on a vehicle without load.
Before checking the wheel alignment angles, we check the air pressure in the tires, the absence of axial and radial runout of the tires, play in the hub bearings, play in the upper ball joints of the suspension and the free play of the steering wheel. If necessary, we eliminate the detected faults. Before checking the angles, we set the steering wheel to the straight-ahead position. We "squeeze" the car's suspension by applying a vertical force of 40-50 kgf 2-3 times, first to the rear bumper, and then to the front one.
We check the wheel alignment angles in the following order:
- longitudinal tilt angle of the pivot axis (checking and adjustment is only possible in a specialized workshop);
- camber angle (you can check it yourself, but adjustment is only possible in a specialized workshop);
- convergence (you can check and adjust it yourself).
Checking the camber angle
1. Prepare the vehicle for operations (see "Preparing a car for maintenance and repair").
2. Perform the preparatory work required before checking the wheel alignment angles (see above).
3. Using a caliper, measure the distance from the plumb line to the top and bottom points of the rim and determine the difference in distances.
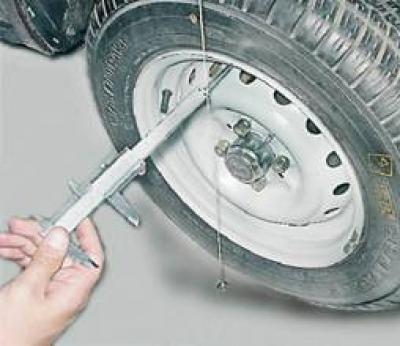
A difference of 3mm corresponds approximately to a camber angle of 30'.
Checking the convergence
The toe-in is adjusted by changing the length of the steering rods by rotating their threaded couplings. This ensures the correct position of the front wheels of the car at different speeds and turning radii.
1. Prepare the vehicle for operations (see "Preparing a car for maintenance and repair").
2. Perform the preparatory work required before checking the wheel alignment angles (see above).
3. To do the job, use a strong thread with wire hooks tied to the ends. Hook the hooks onto the tread at the level of the rear and front wheel axles. Since the rear wheel track is 44 mm smaller than the front track, place a 22 mm thick block under the thread to the side of each rear wheel.
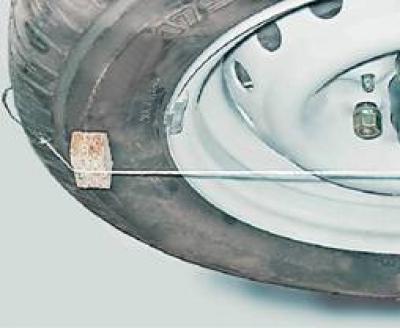
4. Set the steering wheel in such a position that the thread touches the sidewall of the front wheel tire at diametrically opposite points.
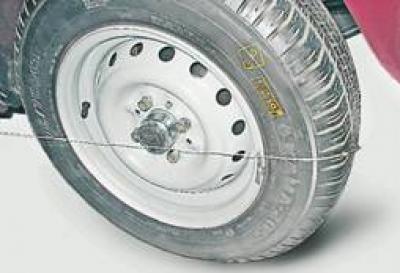
5. We fix the thread on the protectors on the opposite side of the car and place a 6 mm thick block under the thread on the side of the rear wheel.
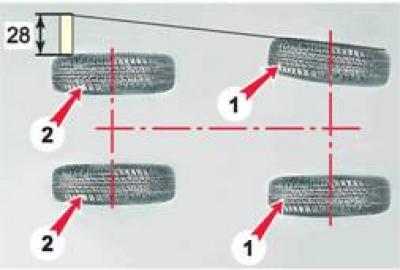
1 - front wheels; 2 - rear wheels
Thus, the total thickness of the bars on one side of the rear wheel will be 28 (22+6) mm. With a toe-in of 1 mm for one front wheel, the thread should lightly touch the sidewall of its tire at diametrically opposite points.
Otherwise, adjust the wheel alignment.
To do this:
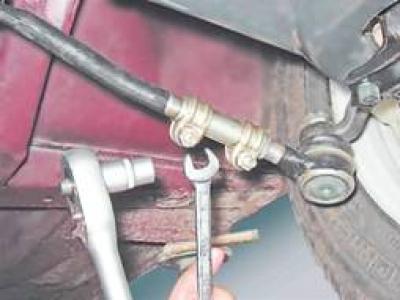
a) Using two 13 mm wrenches, loosen the outer steering rod coupling clamps.
The information can be read on the website [VAZBOOK]
b) Using sliding pliers, rotate the coupling and adjust the length of the rod until the gaps between the thread and the sidewall of the front wheel tire disappear.
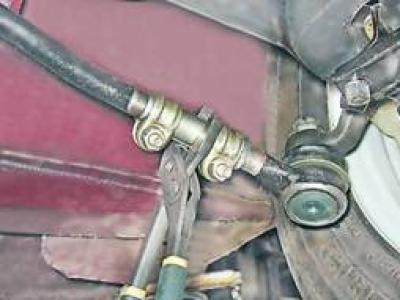
c) Tighten the clamps.
We carry out similar work with the other wheel and achieve a total toe-in of the front wheels of 2 mm.
To set the toe-in of one wheel equal to 1.5 mm, it is necessary to place a block 31 (22+9) mm thick under the thread, for a toe-in of 2 mm - 34 (22+12) mm, respectively.