
English Русский
Български
Беларускі
Український
Српски
Hrvatski
Română
Polski
Slovenský
Magyar
| Articles | Contacts | Sitemap |   
Repair and maintenance Lada Repair and maintenance Mazda Repair and maintenance Mitsubishi Repair and maintenance Toyota Repair and maintenance Land Rover Repair and maintenance Hyundai Repair and maintenance Nissan
VAZbook.ru


Main     1111   2101   2105   2106   2107   2109   2110   2115   2121  
VAZ-2104 (1984-2012) VAZ-2105 (1979-2010) VAZ-21051 (1979-2010)
  • Main
  • «Zhiguli»
  • VAZ-21051
  • Body
  • Doors and windows
  • Disassembling the front doors

Disassembling the front doors (VAZ-21051)

            0

View of the inside of the front door
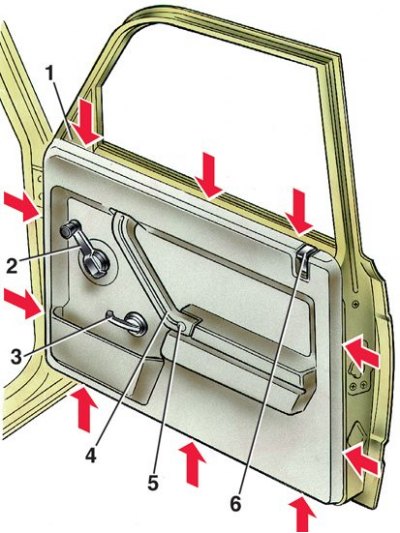


1 – window plug; 2 – window lift handle; 3 – internal handle of the lock drive; 4 – armrest handle;…

1 – window plug; 2 – window lift handle; 3 – internal handle of the lock drive; 4 – armrest handle; 5 – decorative plug; 6 – door lock button.


The arrows show the location of the door trim holders.

Front window drive
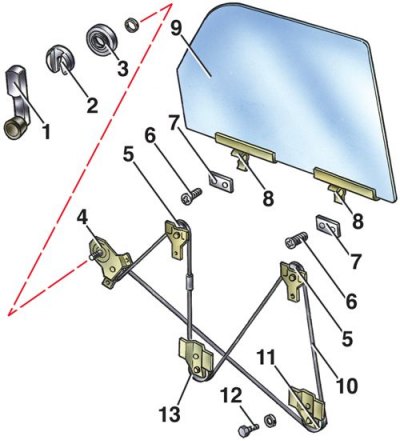


1 – window lift handle; 2 – window lift handle trim; 3 – socket; 4 – window lift mechanism; 5 –…

1 – window lift handle; 2 – window lift handle trim; 3 – socket; 4 – window lift mechanism; 5 – upper rollers; 6 – screws; 7 – pressure plates; 8 – brackets for the drop glass; 9 – drop glass; 10 – cable; 11 – lower roller; 12 – bolt; 13 – tension roller


Window lift mechanism
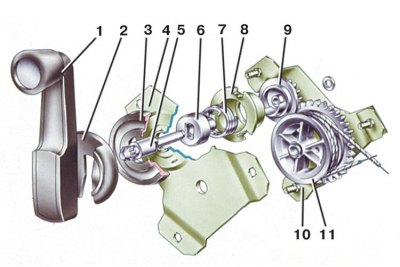


1 – window lift handle; 2 – handle lining; 3 – socket; 4 – housing cover; 5 – drive roller; 6 –…

1 – window lift handle; 2 – handle lining; 3 – socket; 4 – housing cover; 5 – drive roller; 6 – spring brake leash; 7 – brake spring; 8 – drive shaft support; 9 – leading gear; 10 – window lifter housing; 11 – drum with driven gear


Front left door lock
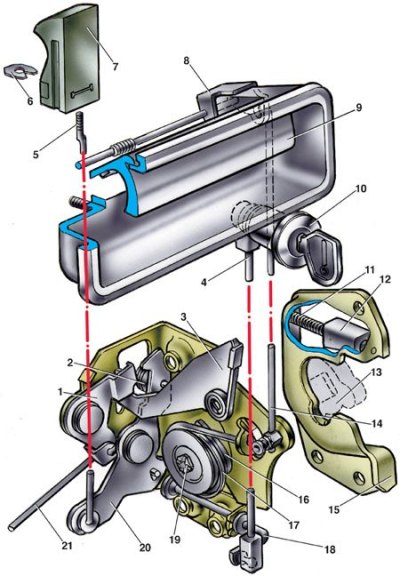


1 – internal lock drive lever; 2 – spring of the lock lever; 3 – external drive lever; 4 – lock…

1 – internal lock drive lever; 2 – spring of the lock lever; 3 – external drive lever; 4 – lock switch rod; 5 – lock button pull; 6 – bracket; 7 – Lock button; 8 – external drive rod leash; 9 – outer handle of the lock; 10 – lock switch; 11 – cracker spring; 12 – retainer cracker; 13 – lock rotor; 14 – external drive rod; 15 – lock retainer housing; 16 – ratchet; 17 – central roller spring; 18 – lock release roller; 19 – central roller; 20 – lock lever; 21 – internal lock drive rod


When replacing door parts and mechanisms, it must be disassembled.

1. Remove decorative plug 5 (see fig. View of the inside of the front door) 4 armrest handles, unscrew the fastening screw and remove the handle.

2. Slightly recessing the socket 3 (see fig. Front window drive) under the trim 2 window lift handles, move the trim along the handle until it exits the annular groove on the axis and remove the handle.

3. Remove the lock button by first removing the button cap with a sharp tool and taking out the bracket connecting it to the rod.

4. Use a screwdriver to pry up the inner handle trim 3 (see fig. View of the inside of the front door) opening the door and remove it.


5. Overcoming the resistance of spring plastic holders (in Fig. View of the inside of the front door is marked with arrows), remove the door trim.

6. Remove the lower seal of the sliding glass.

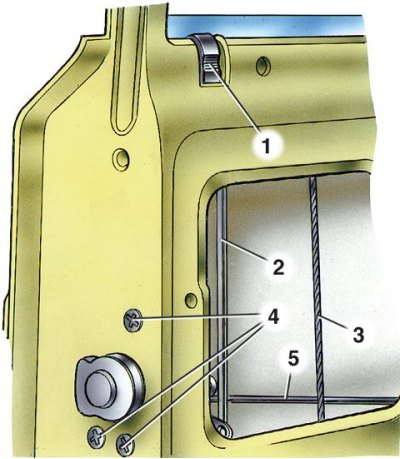
7. Loosen the nut, remove the fastening screw and remove the front guide groove of the drop-down glass.

8. Remove the mounting screws and take out the rear channel of the drop-down window.

9. Unscrew the fastening screws and remove both halves of the window plug 1.

10. Loosen the tension roller mounting bolts 13 (see fig. Front window drive) window lifter, unscrew the four screws 6 securing the cable to the brackets 8 of the glass and remove the cable from the rollers.

11. Remove the drop glass from the top 9 (see fig. Front window drive).

12. Unscrew the three nuts securing the window lift mechanism (see fig. Window lift mechanism) and take it out.
12. Unscrew the three nuts securing the window lift mechanism (see fig. Window lift mechanism) and…


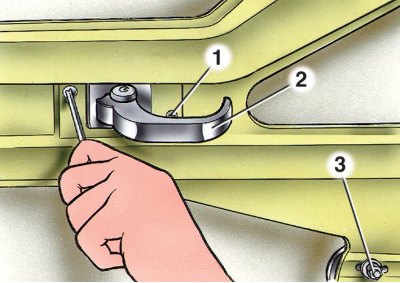
13. Unscrew the two screws 1 securing the bracket of the inner handle 2 and remove it together with the bracket (3 – nut securing the axle of the tension roller of the window lifter cable).

14. Remove the rubber bumper from the window.

15. Loosen the nuts securing the outer handle (see fig. Front left door lock) lock drive and remove the handle by disconnecting rod 14.
15. Loosen the nuts securing the outer handle (see fig. Front left door lock) lock drive and remove…


16. Unscrew the 4 screws securing the lock and remove it, having first disconnected the lock locking rod.


This article is available at russian, bulgarian, belarusian, ukrainian, serbian, croatian, romanian, polish, slovak, hungarian
The text was reviewed by the specialist: Grigory Vologodtsev

Share with friends:

Previous articles
VAZ-21051: Doors and windows
Next articles

Removal and installation doors
Assembly of front doors
Disassembly and assembly of rear doors
Adjusting the door position
Adjusting door locks
Adjusting the stroke of the lowering glass

More articles from other manuals on VAZ cars:
➠ Disassembling the front doors VAZ-21011 (1974-1983)
➠ Front doors — removal, disassembly and adjustment VAZ-1111 (1988-1996)
➠ Front doors of the car VAZ-2109 (1984-1997)
➠ Disassembling the front axle VAZ-21213 (1994-2006)
➠ Front suspension device VAZ-2106 and VAZ-2103 VAZ-2106 (1976-2006)
Link in different formats to this page


Visitor comments

No comments yet


How much will 44 + 35 ?


VAZ-2104 (1984-2012) 
  • General information
  • Operation and maintenance
  • Power unit
  • Engine repair
  • Fuel system (carburetor)
  • Fuel system (injector)
  • Control system
  • Cooling system
  • Exhaust system
  • Transmission
  • Clutch
  • Car gearbox
  • Cardan gear
  • Rear axle
  • Chassis
  • Front suspension
  • Rear suspension
  • Wheels and tires
  • Steering
  • Brake system
  • Body
  • Exterior
  • Interior
  • Doors and glass
  • Ventilation and heating
  • Electrical equipment
  • Equipment and devices
  • Headlights and lighting
  • Engine electrics
  • Electrical circuits


VAZ-2105 (1979-2010) 
  • General information
  • Vehicle description
  • Vehicle device
  • Vehicle operation
  • Maintenance
  • Power unit
  • Engine repair
  • Cooling and lubrication system
  • Supply system
  • Transmission
  • Clutch
  • Car gearbox
  • Cardan gear
  • Rear axle
  • Chassis
  • Suspension and shock absorbers
  • Steering
  • Brake system
  • Body
  • Body elements
  • Electrical equipment
  • Engine electrics
  • Equipment and devices


VAZ-21051 (1979-2010) 
  • General information
  • Introduction to guide
  • User manual
  • Troubleshooting
  • Power unit
  • Engine repair
  • Engine repair VAZ-2103
  • Cooling system
  • Lubrication system
  • Power and exhaust system
  • Fuel injection
  • Transmission
  • Clutch
  • Car gearbox
  • Cardan gear
  • Rear axle
  • Chassis
  • Suspension and shock absorbers
  • Steering
  • Brake system
  • Body
  • Exterior
  • Interior
  • Doors and windows
  • Electrical equipment
  • Equipment and devices
  • Engine electrics
  • Ignition system
  • Electrical circuits


VAZbook.ru © 2017 · Mobile version · Contact with administration · Sitemap: EN BG BY UA RS HR RO PL SK HU · Site search · News and articles VAZ-1111 · VAZ-11113 · VAZ-2101 · VAZ-21011 · VAZ-2104 · VAZ-2105 · VAZ-21051 · VAZ-2106 · VAZ-21061 · VAZ-2107 · VAZ-21099 · VAZ-2109 · VAZ-2108 · VAZ-2110 · VAZ-2112 · VAZ-2114 · VAZ-2115 · VAZ-2121 · VAZ-21213 · VAZ-21214 ·
The site stores technical data using cookies to improve the service.