
English Русский
Български
Беларускі
Український
Српски
Hrvatski
Română
Polski
Slovenský
Magyar
| Articles | Contacts | Sitemap |   
Repair and maintenance Lada Repair and maintenance Mazda Repair and maintenance Mitsubishi Repair and maintenance Toyota Repair and maintenance Land Rover Repair and maintenance Hyundai Repair and maintenance Nissan
VAZbook.ru


Main     1111   2101   2105   2106   2107   2109   2110   2115   2121  
VAZ-1111 (1988-1996) VAZ-11113 (1996-2003)
  • Main
  • «Oka»
  • VAZ-1111
  • Body
  • Exterior
  • Front doors — removal, disassembly and adjustment

Front doors — removal, disassembly and adjustment (VAZ-1111)

            0

Contents: Removal and installation ↓ Disassembly and assembly of the…↓ Adjusting the front door lock ↓

Removal and installation


Open the door until it stops, unscrew the screws securing the eye of the limiter 3 (figure 181) door opening to the front pillar and bolts 2 fastening hinges 1 (the assistant must support the door). They are removing the door.
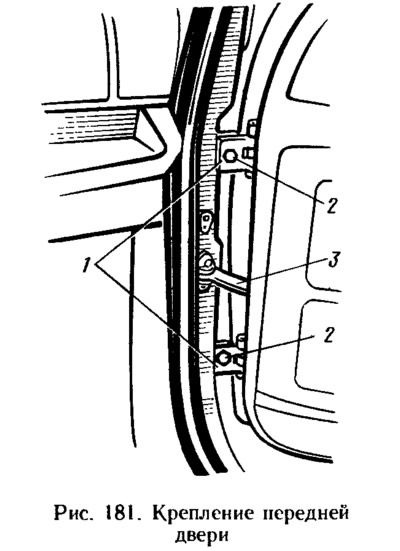
Open the door until it stops, unscrew the screws securing the eye of the limiter 3 (figure 181)…


The door is installed in the reverse order. Before the final tightening of the hinge bolts 1, the uniformity of the gaps between the door and the body is checked and adjusted using the enlarged holes in the hinges.

Disassembly and assembly of the front door


Remove the front door trim (see section. "Removal and installation the front door trim"), the outside rearview mirror adjustment handle and the mirror, having unscrewed the mounting screws. Using the window lifter handle, lower the glass down to the stop, remove the lower seals of the lowering glass from the door. Unscrew the mounting screws and remove the guide grooves of the lowering glass downwards and take it out through the top. Unscrew the seven nuts securing the window lifter to the door panel, remove the washers from the studs and take out the window lifter.


Unscrew button 1 (see figure 170) of the lock, remove the bracket 3 of the outer drive of the lock and the drive itself. Unscrew the two screws of the bracket 16 of the inner handle and three screws 3 (figure 182) lock fastenings, disconnect the lock switch rod and remove the lock assembly with rod 2 and rod of lock button 1. If necessary, unscrew the fastening screws and remove the door opening limiter.
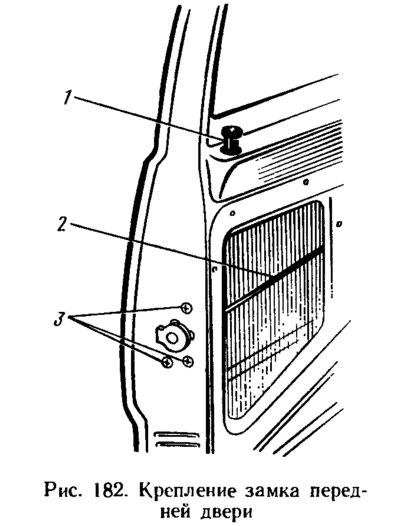
Unscrew button 1 (see figure 170) of the lock, remove the bracket 3 of the outer drive of the lock…


The door assembly is performed in the reverse order. Before assembly, lubricate the moving parts of the window lifter and the door lock with CIATIM-201 grease. After assembly, check the operation of the locks and the window lifter.

Adjusting the front door lock


Before adjustment, outline the contours of the retainer 9 (see figure 170) of the lock on the body pillar. If the door closes too tightly, loosen the screws securing the latch 9, move it outward and tighten the screws. If the door closes weakly, move the latch inward. In this case, the door should not sink or protrude relative to the body. If the door rises when closing, (sag in open position), the retainer is lowered.

If the lock does not open well with the internal handle 17, then adjust the position of the bracket 16 assembled with the handle. To do this, loosen the bracket mounting screws and move it to the desired position. Check the operation of the lock and tighten the screws.


This article is available at russian, bulgarian, belarusian, ukrainian, serbian, croatian, romanian, polish, slovak, hungarian
The text was reviewed by the specialist: Grigory Vologodtsev

Share with friends:

Previous articles
VAZ-1111: Exterior
Next articles

Replacing the rear panel
Roof panel replacement
Removal and installation the front wing
Repair of deformed surfaces
Checking and repairing the body frame and plumage
Tailgate — Removal and Installation
Removal and installation the hood
Removal and installation bumpers
Removal and installation the radiator grille
Removal and installation the outside rearview mirror

More articles from other manuals on VAZ cars:
➠ Disassembling the front doors VAZ-21011 (1974-1983)
➠ Assembly of front doors VAZ-21051 (1979-2010)
➠ Front Wheel Hub Bearings — Adjustment VAZ-2106 (1976-2006)
➠ Front Wheel Hub Bearings — Adjustment VAZ-2107 (1982-2012)
➠ Front doors of the car VAZ-2109 (1984-1997)
Link in different formats to this page


Visitor comments

No comments yet


How much will 45 + 34 ?


VAZ-1111 (1988-1996) 
  • General information
  • Vehicle description
  • Vehicle device
  • Vehicle operation
  • Maintenance
  • Applications
  • Power unit
  • Engine repair
  • Cooling system
  • Lubrication system
  • Supply system
  • Transmission
  • Clutch
  • Transmission
  • Chassis
  • Front suspension and wheels
  • Rear suspension
  • Steering
  • Brake system
  • Body
  • Exterior
  • Interior
  • Electrical equipment
  • Engine electrics
  • Equipment and devices


VAZ-11113 (1996-2003) 
  • General information
  • Introduction to the guide
  • User manual
  • Maintenance
  • Power unit
  • Engine repair
  • Cooling and lubrication system
  • Fuel system
  • Exhaust system
  • Transmission
  • Car gearbox
  • Clutch and drive shafts
  • Chassis
  • Front suspension
  • Rear suspension
  • Steering
  • Brake system
  • Body
  • Exterior
  • Interior
  • Doors and locks
  • Electrical equipment
  • Equipment and devices
  • Lighting and signaling
  • Engine electrics
  • Ignition system


VAZbook.ru © 2017 · Mobile version · Contact with administration · Sitemap: EN BG BY UA RS HR RO PL SK HU · Site search · News and articles VAZ-1111 · VAZ-11113 · VAZ-2101 · VAZ-21011 · VAZ-2104 · VAZ-2105 · VAZ-21051 · VAZ-2106 · VAZ-21061 · VAZ-2107 · VAZ-21099 · VAZ-2109 · VAZ-2108 · VAZ-2110 · VAZ-2112 · VAZ-2114 · VAZ-2115 · VAZ-2121 · VAZ-21213 · VAZ-21214 ·
The site stores technical data using cookies to improve the service.