
English Русский
Български
Беларускі
Український
Српски
Hrvatski
Română
Polski
Slovenský
Magyar
| Articles | Contacts | Sitemap |   
Repair and maintenance Lada Repair and maintenance Mazda Repair and maintenance Mitsubishi Repair and maintenance Toyota Repair and maintenance Land Rover Repair and maintenance Hyundai Repair and maintenance Nissan
VAZbook.ru


Main     1111   2101   2105   2106   2107   2109   2110   2115   2121  
VAZ-2107 (1982-2012)
  • Main
  • «Zhiguli»
  • VAZ-2107
  • Power unit
  • Fuel system (injector)
  • Throttle body — removal and installation

Throttle body — removal and installation (VAZ-2107)

            0

We remove the throttle body to replace the idle speed controller, sealing gasket or the body itself.

Caution! To avoid burns, start work only after the engine has cooled down.


Removal

1. Prepare the vehicle for operations ("Preparing the vehicle for maintenance and repair").

2. Disconnect the wire from the negative terminal of the battery (see "Battery - Removal and Installation").

Attention! When replacing only the throttle body sealing gasket, there is no need to disconnect the hoses, pads and air duct from it; it is enough to perform - items 10 and 11 (see below). In other cases, perform all the operations below.


3. Disconnect the throttle cable from the sector (see "Throttle Cable Replacement").

4. Disconnect the wiring harness from the throttle position sensor (see "Throttle Position Sensor - Checking and Replacing").

5. After pressing the lock, disconnect the wiring block from the idle speed controller (see "Idle speed control valve - checking, removal and installation").

Caution: When performing the following operation, a small amount of coolant will leak from the fittings and hoses.


The original can be seen on the website (vazbook)

6. Having loosened the clamp, we remove the coolant outlet hose from the fitting A of the throttle body. Similarly, we disconnect the liquid supply hose from the fitting B.
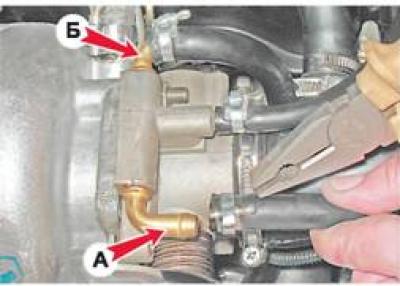
6. Having loosened the clamp, we remove the coolant outlet hose from the fitting A of the throttle…


7. After loosening the clamp, remove the crankcase ventilation hose from the housing fitting.
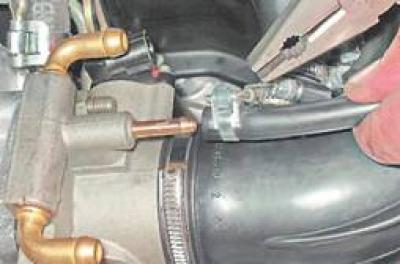


7. After loosening the clamp, remove the crankcase ventilation hose from the housing fitting.


8. Using a Phillips screwdriver, loosen the worm clamp of the air supply hose to the throttle body and remove it from the branch pipe.
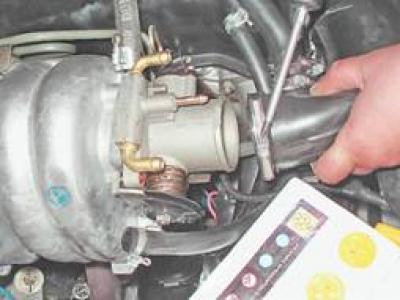
8. Using a Phillips screwdriver, loosen the worm clamp of the air supply hose to the throttle body…


9. Using the same tool, loosen the worm clamp of the fuel vapor supply hose to the throttle body fitting and remove the hose.
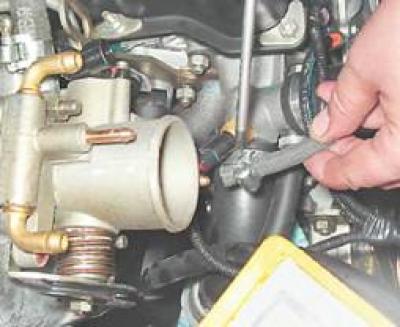
9. Using the same tool, loosen the worm clamp of the fuel vapor supply hose to the throttle body…


10. Using a 13 mm socket wrench, unscrew the two nuts securing the throttle body.
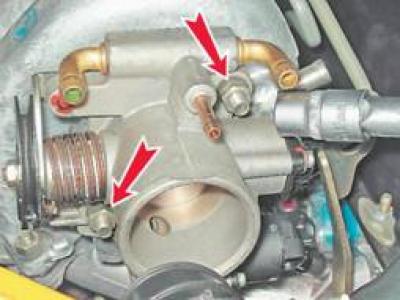

10. Using a 13 mm socket wrench, unscrew the two nuts securing the throttle body.


11. Remove the housing and sealing gasket from the receiver studs.
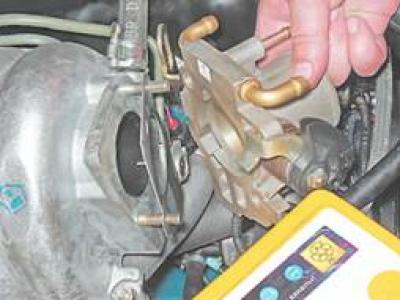
11. Remove the housing and sealing gasket from the receiver studs.


12. The air flow configuration in the receiver is formed by a plastic bushing. If replacement is necessary, remove the bushing.
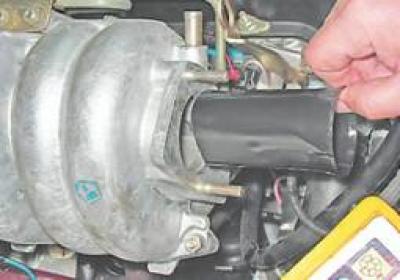
12. The air flow configuration in the receiver is formed by a plastic bushing. If replacement is…


Installation


1. Installation of all removed parts is carried out in reverse order.

2. Check the coolant level in the expansion tank and add liquid if necessary (see "Coolant - Checking Level and Replacing").


This article is available at russian, bulgarian, belarusian, ukrainian, serbian, croatian, romanian, polish, slovak, hungarian
The text was reviewed by the specialist: Grigory Vologodtsev

Share with friends:

Previous articles
VAZ-2107: Fuel system (injector)
Next articles

Idle speed control valve — checking, removal and installation
Fuel rail — removal, installation and testing of injectors
Electric fuel pump with fuel level indicator sensor — removal and installation
Pressure regulator — removal and installation
Fuel system pressure — check
Fuel tank — removal and installation
Air Filter Element — Replacement
Air filter housing — removal and installation
Throttle Cable Replacement
Adsorber — checking the purge valve, removal and installation

More articles from other manuals on VAZ cars:
➠ Throttle body — removal and installation VAZ-2104 (1984-2012)
➠ Disassembly and repair of the throttle body VAZ-21061 (1976-2006)
➠ Body frame and attachments VAZ-1111 (1988-1996)
➠ The structure of the car body and its parts VAZ-2101 (1970-1983)
➠ Car body structure VAZ-2109 (1984-1997)
Link in different formats to this page


Visitor comments

No comments yet


How much will 11 + 11 ?


VAZ-2107 (1982-2012) 
  • General information
  • User manual
  • Maintenance
  • Operation and maintenance
  • Power unit
  • Engine repair
  • Fuel system (carburetor)
  • Fuel system (injector)
  • Control system
  • Cooling system
  • Exhaust system
  • Transmission
  • Clutch
  • Car gearbox
  • Cardan gear
  • Rear axle
  • Chassis
  • Front suspension
  • Rear suspension
  • Wheels and tires
  • Steering
  • Brake system
  • Body
  • Exterior
  • Interior
  • Doors and glass
  • Electrical equipment
  • Equipment and devices
  • Headlights and lighting
  • Engine electrics


VAZbook.ru © 2017 · Mobile version · Contact with administration · Sitemap: EN BG BY UA RS HR RO PL SK HU · Site search · News and articles VAZ-1111 · VAZ-11113 · VAZ-2101 · VAZ-21011 · VAZ-2104 · VAZ-2105 · VAZ-21051 · VAZ-2106 · VAZ-21061 · VAZ-2107 · VAZ-21099 · VAZ-2109 · VAZ-2108 · VAZ-2110 · VAZ-2112 · VAZ-2114 · VAZ-2115 · VAZ-2121 · VAZ-21213 · VAZ-21214 ·
The site stores technical data using cookies to improve the service.