




Contents: Removal ↓ Installation ↓
Instrument panel and its accessories
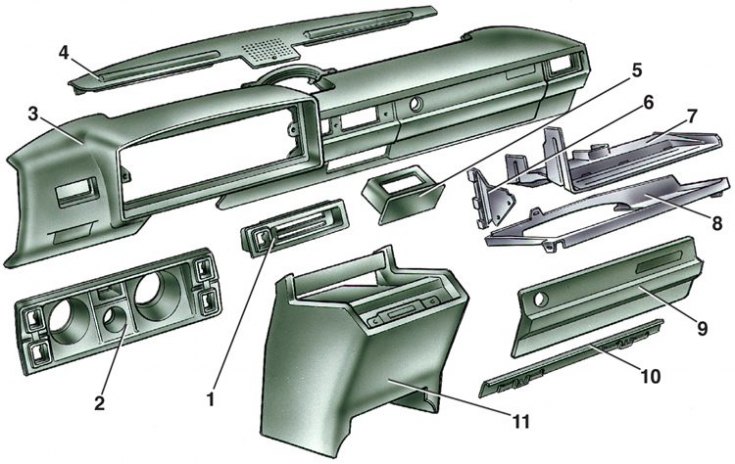
1 – heater control lever trim; 2 – instrument panel; 3 – instrument panel; 4 – insert; 5 – ashtray; 6 – side shield; 7 – glove box body; 8 – shelf; 9 – glove compartment lid; 10 – glove box lid loop; 11 – radio receiver mounting panel
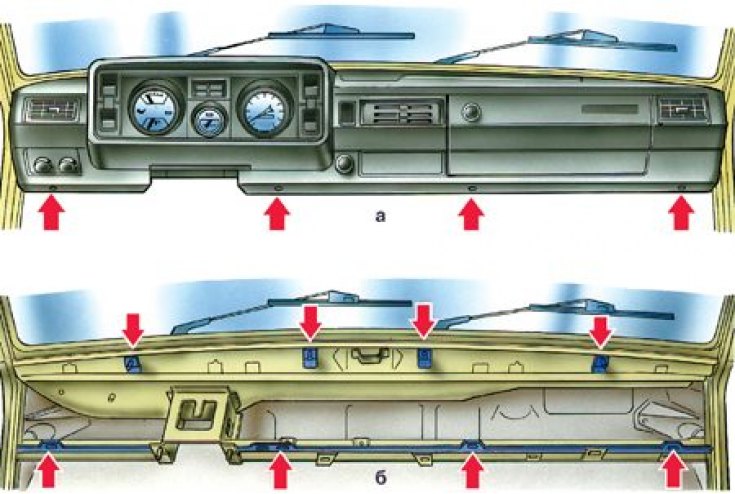
Instrument cluster mounting points
Removal
1. To remove the instrument panel (see fig. Instrument panel and its accessories) perform the following operations: Disconnect the ground wire from the battery.
2. Loosen the mounting screws and remove the steering shaft cover.
3. After removing two plugs and unscrewing the mounting screws, remove the instrument panel 2.
4. Disconnect the connectors and wire plugs from the instruments.
5. If there is a headlight range control, remove the handle from it, unscrew the mounting nut and remove it from the instrument panel.
6. Remove the mounting screws and remove shelf 8.
7. Remove the side panel and the body of the glove box.
8. Remove the handles from the heater control levers, for which, at the junction of the handle with the lever, bend back the lower part of the upper and middle handles with a thin, sharp tool, and the upper part of the lower handle.
9. Remove the trim 1 of the heater control levers.
10. Remove the mounting screws and remove panel 11 of the radio receiver.
11. Remove the four screws of the lower mount (see fig. Instrument panel mounting points) panels to the front cross member.
12.Through the openings of the instrument panel and the glove compartment, unscrew the four nuts of the upper instrument panel mount.
13. Disconnect insert 4 (see fig. Instrument panel and its accessories), by unscrewing the fastening screws.
14. Unscrew the three mounting nuts and remove the speaker if it is installed on the vehicle.
15. Remove panel 3 and disconnect the wires from the cigarette lighter.
Installation
The installation of the instrument panel is carried out in reverse order.
The article is taken from an online resource vazbook