




Contents: Device ↓ Removal and installation the…↓
Device
The instrument panel design meets safety requirements. The metal frame of the panel is covered with a layer of foamed energy-absorbing polyurethane foam and finished with a polyvinyl chloride film. The instrument panel is attached to the body with four nuts at the top and four screws to the crossbar along the lower edge. Access to the nuts of the upper fastening is provided through the openings of the cover 2 (Fig. 198) of the glove compartment and the instrument cluster. The lower part of the instrument panel is lined with plastic metallized overlays 1.
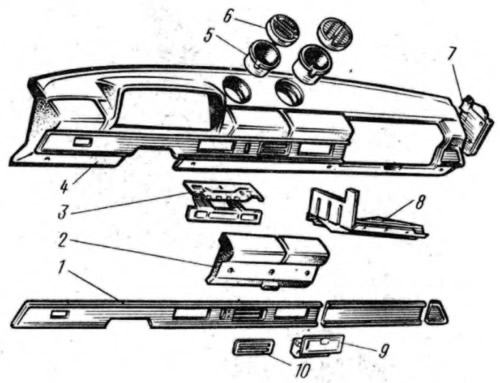
Fig. 198. Instrument panel and its accessories:
1 - facing strips; 2 - glove compartment lid; 3 - glove box lid hinge; 4 - instrument panel; 5 - deflector pipe; 6 - deflector; 7 - side of the glove compartment; 8 - glove box body; 9 - ashtray; 10 - heater control lever trim frame.
The instrument panel is equipped with a combination of instruments and two air blowers (deflector) 6 air directions to the windshield or into the passenger compartment, light and windshield wiper switches, ashtray 9, heater control handles, glove box, socket for radio and windshield washer pump (on the first releases of cars). The cigarette lighter, air damper control handle and interior heater are located under the instrument panel.
Removal and installation the instrument panel
Disconnect the ground wire from the battery, unscrew the mounting screws and remove the windshield pillar trims and the steering column trim. Remove the instrument cluster (see section. "Electrical equipment"), three-key switch and interior heater switch. Disconnect the wires from the glove compartment light and unscrew the screws securing the side panel 7 to the instrument panel. Remove the handles from the heater control levers, for which purpose bend the lower part of the upper handle and the upper part of the lower handle with a flat thin tool at the junction of the handle and the lever.
The text is published on the portal VazBook.ru
Unscrew the four screws of the lower fastening of the instrument panel to the front crossmember. Through the openings of the glove compartment, unscrew the four nuts of the upper fastening of the panel to the front and remove the instrument panel.
The installation of the instrument panel is carried out in the reverse order.