
Heater parts
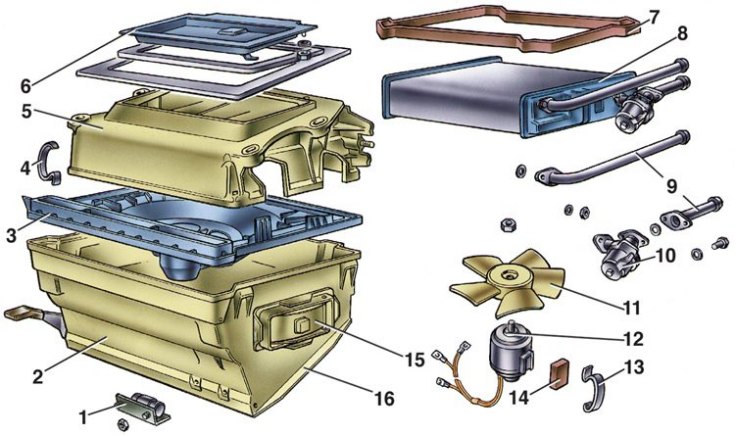
1 - additional resistor; 2 - fan casing; 3 - fan guide casing; 4 - spring brackets; 5 - radiator casing; 6 - air intake cover; 7 - radiator gasket; 8 - radiator; 9 - branch pipes; 10 - crane; 11 - impeller; 12 - electric motor; 13 – fan spring bracket; 14 – pillow of the electric motor; 15 - damper; 16 - air distribution cover
Heater control levers
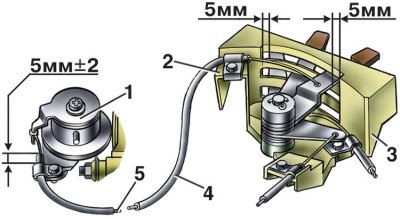
1 - crane; 2 - bracket for fastening the shell of thrust; 3 – an arm of control levers; 4 - shell of flexible traction; 5 - flexible traction
Disassembly
1. Remove two spring clips 13 (see fig. Heater parts) and remove the fan from the casing 3.
2. Unscrew the impeller fastening nut 11 and remove it from the electric motor 12.
3. Turn away nuts of fastening of brackets and remove the air-distributing cover 16 of a casing 2 of the fan.
4. Having pressed the latches of the damper housings 15 of the side window heating air ducts from the inside of the casing, remove the housings complete with dampers and disconnect the rods from the damper levers.
5. Loosen the bolts securing the brackets clamping the shells of the flexible rods of the crane drives and the damper of the windshield heating air duct, and remove the rods.
6. Unscrew the nut of the fastening bracket for the inlet and outlet pipes 9, remove the bracket and remove the radiator 8 from the casing 5. Having unscrewed the fastening nuts, disconnect the outlet pipe and the valve 10 with the inlet pipe from the radiator.
7. Loosen the bolt of the fastening bracket of the shell of the flexible rod of the cover 6 of the air inlet and remove the rod.
8. Loosen the fastening nuts, remove the air intake cover bracket and remove the cover.
Assembly
1. Assemble the heater in reverse order.
2. When assembling, check that the gaskets are installed correctly.
3. When installing flexible rods, keep the installation dimensions 5±2 mm (as shown in fig. Heater control levers) the ends of the shells of the rods behind the brackets of their fastening on the crane, the radiator casing and the fan guide casing.