




- flat horizontal area (preferably near the wall of a house, fence or gate);
- 5m tape measure;
- sheet of cardboard (to cover the headlight when adjusting).
Recommendation. It is advisable to adjust the headlights at night. The car must be in running order (fully fueled and without additional cargo). Since it is not easy to find a suitable surface as a screen, it is easier to use a plywood board measuring 1-2 m with markings applied to it. In this case, it is necessary to prepare a support or stand to install the board vertically.
Headlight adjustment sequence
1. Place the car on a flat horizontal surface perpendicular to the surface selected as a screen and at a distance of 5 m from it.
You can install a sheet of plywood in front of the car, subject to the same conditions.
2. Mark the screen according to the drawing.
Note: There are marks on the headlight lenses indicating the centers of the low and high beam sections. Using these marks, you can take the necessary measurements with a tape measure.
3. Check the tire pressure and, if necessary, bring it up to normal.
4. Turn the headlight range control handle to the position corresponding to the minimum vehicle load.
5. We seat the assistant in the driver's seat. Then we vigorously rock the car from the side to self-adjust the suspension.
6. Turn on the low beam headlights and cover one of the headlights, for example the right one, with a sheet of cardboard.
7. By turning the handle of the adjusting screw (1) of the left headlight, we bring the horizontal boundary of the light beam to line C, and then, by turning the adjusting screw (2), we align the break in the boundary of the light beam with line A.
We adjust the right headlight in the same way.
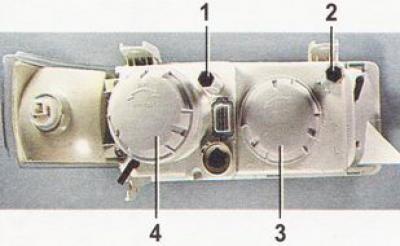
Location of adjustment screws and sections on the left headlight: 1 - screw for adjusting the light beam in the vertical plane; 2 - screw for adjusting the light beam in the horizontal plane; 3 - cover of the high beam section of the headlights; 4 - low beam section cover of the headlights
Note: On the right headlight all elements are arranged symmetrically.
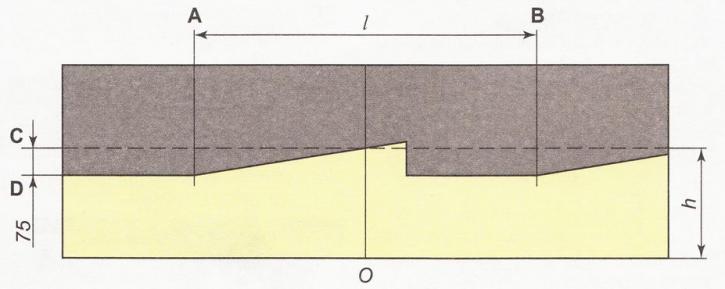
Screen layout diagram for headlight adjustment: A - vertical line indicating the location of the low beam lamp of the left headlight; B - vertical line indicating the location of the low beam lamp of the right headlight; C - horizontal line indicating the location of the low beam headlights; D - line indicating the height of the rise of the horizontal boundary of the light beams; O - center line; l - distance between low beam headlights; A - the distance from the surface of the platform on which the car is installed to the low beam headlights