
English Русский
Български
Беларускі
Український
Српски
Hrvatski
Română
Polski
Slovenský
Magyar
| Articles | Contacts | Sitemap |   
Repair and maintenance Lada Repair and maintenance Mazda Repair and maintenance Mitsubishi Repair and maintenance Toyota Repair and maintenance Land Rover Repair and maintenance Hyundai Repair and maintenance Nissan
VAZbook.ru


Main     1111   2101   2105   2106   2107   2109   2110   2115   2121  
VAZ-2110 (1995-2007) VAZ-2112 (1999-2007)
  • Main
  • «Lada»
  • VAZ-2112
  • Body
  • Tailgate
  • Tailgate — Removal and Installation

Tailgate — Removal and Installation (VAZ-2112)

            0

Contents: Removal ↓ Installation ↓
Note. Power is supplied to the door electrical equipment via two wire harnesses laid along the rear pillars. To remove the door from the car, it is necessary to remove both wire harnesses from its internal cavities. To do this, you will have to remove the tips of all the wires from the connecting blocks. It is more convenient to remove part of the luggage compartment trim and disconnect the harnesses from the vehicle's on-board network, and then disassemble the removed door.


An assistant is needed to complete the work.

Removal


1. Prepare the car for work (see "Preparing the car for maintenance and repair").

2. Remove the luggage compartment shelf.

3. Using a Phillips screwdriver, unscrew the four screws securing the right trim of the luggage compartment and remove the trim.
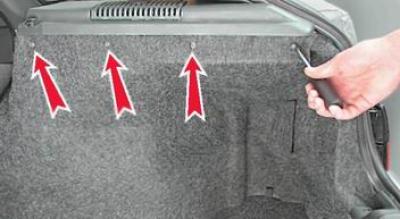
3. Using a Phillips screwdriver, unscrew the four screws securing the right trim of the luggage…


4. Using the same screwdriver, unscrew the three screws of the lower mount...
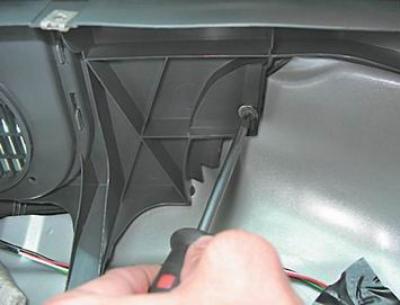
4. Using the same screwdriver, unscrew the three screws of the lower mount...


...and one self-tapping screw for the front fastening of the luggage compartment shelf support.
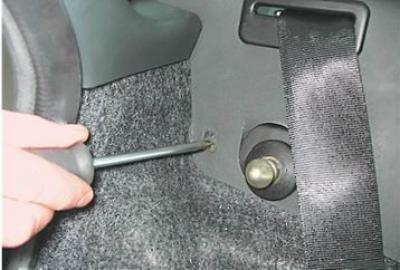


...and one self-tapping screw for the front fastening of the luggage compartment shelf support.


5. Using a Phillips screwdriver, unscrew the screw securing the luggage compartment opening pillar trim.
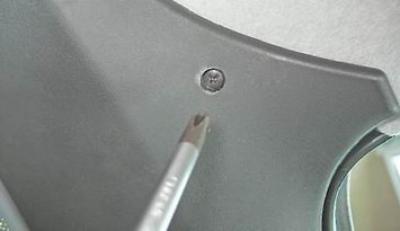
5. Using a Phillips screwdriver, unscrew the screw securing the luggage compartment opening pillar…


6. Remove the door seal from the top of the rear pillar.
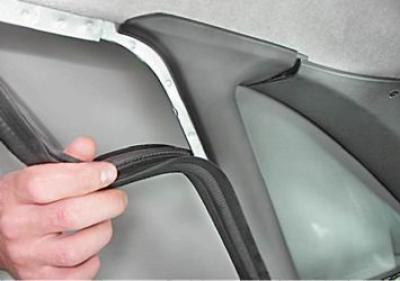
6. Remove the door seal from the top of the rear pillar.


7. Using a slotted screwdriver, pry up and remove the rear pillar trim (it is fixed on two holders).
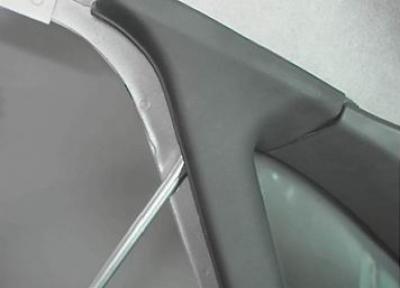
7. Using a slotted screwdriver, pry up and remove the rear pillar trim (it is fixed on two holders).


8. Using a puller or two slotted screwdrivers, remove the buttons of the three holders of the rear ceiling trim fastening.
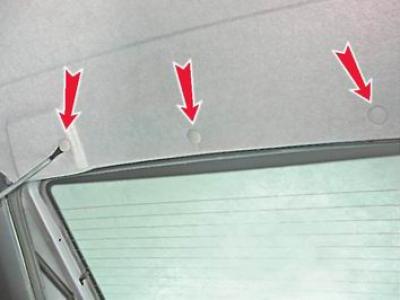

8. Using a puller or two slotted screwdrivers, remove the buttons of the three holders of the rear…


9. Using a slotted screwdriver, pry up and remove the luggage compartment opening pillar trim.
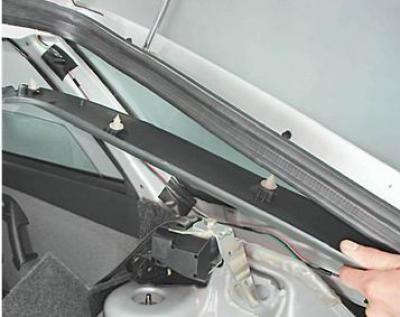
9. Using a slotted screwdriver, pry up and remove the luggage compartment opening pillar trim.


Tip: Remember or mark how the wire harness is routed.


10. Disconnect the wiring harness connectors.
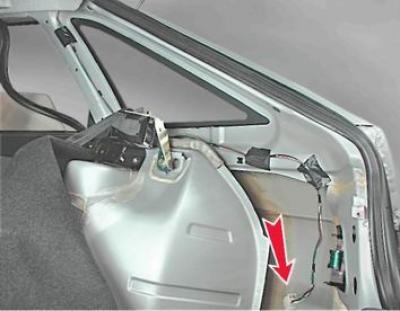
10. Disconnect the wiring harness connectors.


11. On the wiring harness block of the luggage compartment door, use a marker to mark the colors of the wires.
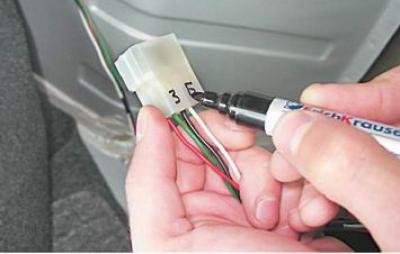
11. On the wiring harness block of the luggage compartment door, use a marker to mark the colors of…


12. Using a thin slotted screwdriver, press the locking tab of the terminal and pull the wire tip out of the block. Similarly, disconnect all the wires from the block.
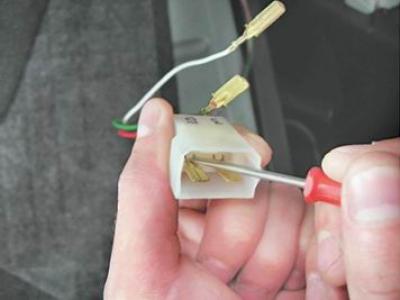
12. Using a thin slotted screwdriver, press the locking tab of the terminal and pull the wire tip…


13. Remove the protective cover of the right wiring harness from the hole in the roof panel. Trying not to damage the insulation of the wires with the edges of the hole, pull the wires out.
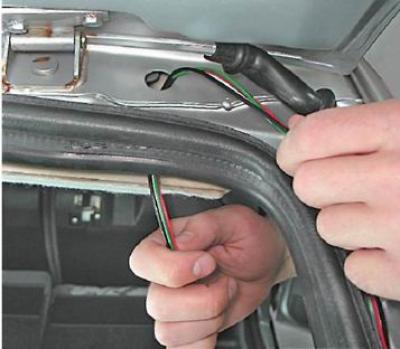
13. Remove the protective cover of the right wiring harness from the hole in the roof panel. Trying…


14. Similarly, remove the wiring harness from the left side of the car.

15. Using a slotted screwdriver, remove the washer hose cover.
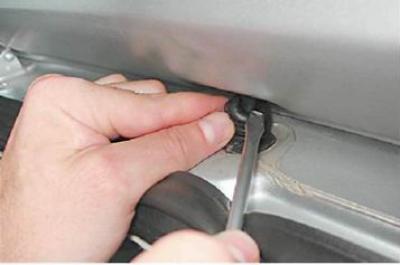
15. Using a slotted screwdriver, remove the washer hose cover.


16. Pressing the rear edge of the headlining, disconnect the washer nozzle hose from the plastic adapter.
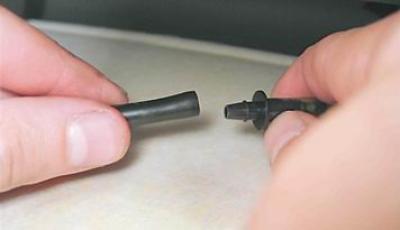
16. Pressing the rear edge of the headlining, disconnect the washer nozzle hose from the plastic…


Note: Further operations are carried out with an assistant, who must perform similar actions on the other side of the door with the same tool.


17. Hold the door with an open-end wrench by 13 mm we unscrew the ball pin of the upper gas strut mount and disconnect it from the door.

The original can be viewed on the portal: www.VazBook.ru
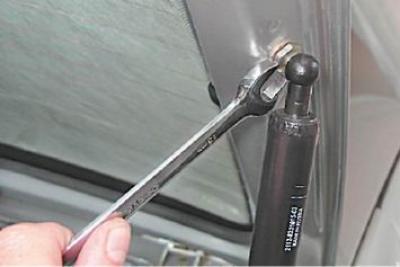
17. Hold the door with an open-end wrench by 13 mm we unscrew the ball pin of the upper gas strut…


18. Hold the door with a spanner by 13 mm we unscrew the two bolts securing the door to the hinge and remove the door from the car.
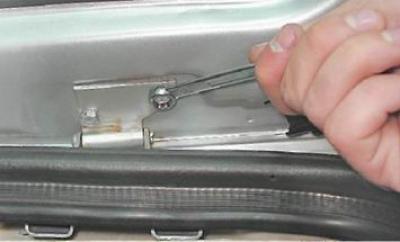
18. Hold the door with a spanner by 13 mm we unscrew the two bolts securing the door to the hinge…


19. If necessary, disassemble the door.

Installation


We install the door in reverse order.


This article is available at russian, bulgarian, belarusian, ukrainian, serbian, croatian, romanian, polish, slovak, hungarian
The text was reviewed by the specialist: Grigory Vologodtsev

Share with friends:

Previous articles
VAZ-2112: Tailgate
Next articles

Tailgate Lock — Removal and Installation
Tailgate Lock Switch (Cylinder) — Removal and Installation
Decorative trim for the luggage compartment door — removal and installation
Motor-reducer of the remote lock opening drive — removal and installation
Tailgate Trim — Removal and Installation

More articles from other manuals on VAZ cars:
➠ Tailgate — Removal and Installation VAZ-1111 (1988-1996)
➠ Gas spring for the tailgate — removal and installation VAZ-2104 (1984-2012)
➠ Car tailgate VAZ-2109 (1984-1997)
➠ Removal and installation the tailgate lock (hatchback) VAZ-2115 (1997-2012)
➠ Removal, installation and adjustment of the tailgate VAZ-21213 (1994-2006)
Link in different formats to this page


Visitor comments

No comments yet


How much will 40 + 33 ?


VAZ-2110 (1995-2007) 
  • General information
  • Vehicle description
  • Specifications
  • User manual
  • Maintenance
  • Operation and maintenance
  • Tips for car owner
  • Power unit
  • Engine repair
  • Supply system
  • Control system
  • Cooling system
  • Exhaust system
  • Transmission
  • Clutch
  • Car gearbox
  • Front wheel drives
  • Chassis
  • Suspension and wheels
  • Steering
  • Brake system
  • Body
  • Exterior
  • Interior
  • Doors and glass
  • Tailgate
  • Ventilation and heating
  • Electrical equipment
  • Equipment and devices
  • Headlights and lighting
  • Engine electrics
  • Electrical circuits


VAZ-2112 (1999-2007) 
  • General information
  • Operation and maintenance
  • Power unit
  • Engine repair
  • Supply system
  • Control system
  • Cooling system
  • Exhaust system
  • Transmission
  • Clutch
  • Car gearbox
  • Front wheel drives
  • Chassis
  • Wheels and tires
  • Car suspension
  • Steering
  • Brake system
  • Body
  • Exterior
  • Interior
  • Doors and glass
  • Tailgate
  • Ventilation and heating
  • Electrical equipment
  • Equipment and devices
  • Headlights and lighting
  • Engine electrics
  • Electrical circuits


VAZbook.ru © 2017 · Mobile version · Contact with administration · Sitemap: EN BG BY UA RS HR RO PL SK HU · Site search · News and articles VAZ-1111 · VAZ-11113 · VAZ-2101 · VAZ-21011 · VAZ-2104 · VAZ-2105 · VAZ-21051 · VAZ-2106 · VAZ-21061 · VAZ-2107 · VAZ-21099 · VAZ-2109 · VAZ-2108 · VAZ-2110 · VAZ-2112 · VAZ-2114 · VAZ-2115 · VAZ-2121 · VAZ-21213 · VAZ-21214 ·
The site stores technical data using cookies to improve the service.