




Contents: Disassembly and assembly ↓ Control ↓
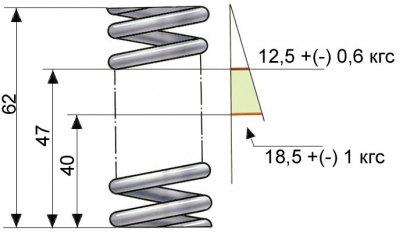
Basic data for checking the tensioner spring
Disassembly and assembly
1. To disassemble the chain tensioner, remove the cap locking nut 1 (see Fig. Section of chain tensioner), clamp cracker 9 and spring ring 4, then remove plunger 7, spring 5 and rod 3 together with spring 8 and washer 6.
2. Assemble in reverse order.
Control
1. Check for burrs 9 and rod 3, and for deep scratches on the mating surfaces of the shoe and plunger of the chain tensioner. Replace damaged parts.
[The article is copied from the website: VAZbook.ru]
2. The elasticity of the tensioner spring should be within the limits specified in Fig. Basic data for checking the tensioner spring; if the spring is less elastic, replace it.
3. Check for excessive wear on the shoe and guide; replace them if necessary.