

Rear axle of cars VAZ-21011 «Zhiguli»

Features of the rear axle device
Rear axle 1 - axle shaft; 2 – a bolt of fastening of a wheel; 3 - guide pin; 4 - oil deflector; 5 – brake drum; 6 - axle bearing; 7 - locking ring; 8 – rear axle beam flange; 9 -...
Rear axle 1 - axle shaft; 2 – a bolt of fastening of a wheel; 3 - guide pin; 4 - oil deflector; 5 – brake drum; 6 - axle bearing; 7 - locking ring; 8 – rear axle beam flange; 9 -...

Removal and installation of the rear axle
Removal and installation of the rear axle beam are described in subsection 8.2.2 . To remove the rear axle, it is enough to disconnect the suspension rods and shock absorbers only...
Removal and installation of the rear axle beam are described in subsection 8.2.2 . To remove the rear axle, it is enough to disconnect the suspension rods and shock absorbers only...

Disassembly and assembly of the rear axle
Pressing out the axle shaft using a puller 67.7801.9516 1 - axle shaft; 2 - impact puller Disassembly 1. Remove the pipeline with the tee of the brake system from the axle, while...
Pressing out the axle shaft using a puller 67.7801.9516 1 - axle shaft; 2 - impact puller Disassembly 1. Remove the pipeline with the tee of the brake system from the axle, while...

Checking the rear axle beam
Carefully check the technical condition of the beam, especially when repairing a car that has crashed. A deformed beam can cause rear axle noise and accelerated tire wear. The...
Carefully check the technical condition of the beam, especially when repairing a car that has crashed. A deformed beam can cause rear axle noise and accelerated tire wear. The...

Editing the rear axle beam
Rear axle beam straightening scheme 1 - hydraulic cylinder; 2 - clamping traverse; 3 - flange А.70172; 4 - square; 5 - press table; 6 - emphasis; 7 - indicator stand 1. Attach...
Rear axle beam straightening scheme 1 - hydraulic cylinder; 2 - clamping traverse; 3 - flange А.70172; 4 - square; 5 - press table; 6 - emphasis; 7 - indicator stand 1. Attach...
Removal and installation of semiaxes
1. Remove the wheel and brake drum. 2. Having unscrewed the nuts securing the brake shield to the axle beam, with a puller 67.7801.9516, holding the brake shield, remove the axle...
1. Remove the wheel and brake drum. 2. Having unscrewed the nuts securing the brake shield to the axle beam, with a puller 67.7801.9516, holding the brake shield, remove the axle...
Checking the technical condition of the semi-axes
Check the technical condition of the parts included in the axle shaft kit and make sure that: the ball bearing is not worn or damaged; if the axial clearance in it exceeds 0.7 mm,...
Check the technical condition of the parts included in the axle shaft kit and make sure that: the ball bearing is not worn or damaged; if the axial clearance in it exceeds 0.7 mm,...

Removal of a locking ring of semiaxes
It is only necessary to remove and install the locking ring of the axle shaft bearing using a hydraulic press. 1. Cover the bearing with half rings of tool A.74108/R and set the...
It is only necessary to remove and install the locking ring of the axle shaft bearing using a hydraulic press. 1. Cover the bearing with half rings of tool A.74108/R and set the...

Half shaft assembly
Pressing in the locking ring of the axle shaft bearing 1 - mandrel А.74107/2R; 2 – a locking ring of the bearing; 3 - bearing mounting plate and oil deflector assembly with...
Pressing in the locking ring of the axle shaft bearing 1 - mandrel А.74107/2R; 2 – a locking ring of the bearing; 3 - bearing mounting plate and oil deflector assembly with...

Measurement of the axial free play of the axle shaft on the car
Measurement of the axial play of the axle shaft with the removed wheel and brake drum 1 - indicator; 2 - tool 02.7834.9504 Axial free wheeling of the axle shaft can be measured on...
Measurement of the axial play of the axle shaft with the removed wheel and brake drum 1 - indicator; 2 - tool 02.7834.9504 Axial free wheeling of the axle shaft can be measured on...

Reducer — design description
Rear axle reducer, assy 1 - drive gear; 2 - driven gear; 3 - satellite; 4 - semi-axis gear; 5 - the axis of the satellites; 6 - differential box; 7 – bolts of fastening of a cover...
Rear axle reducer, assy 1 - drive gear; 2 - driven gear; 3 - satellite; 4 - semi-axis gear; 5 - the axis of the satellites; 6 - differential box; 7 – bolts of fastening of a cover...
Determination of gearbox faults by noise
Challenge #1 1. To clearly identify the nature of the noise, drive along the highway at a speed of approximately 20 km/h. 2. Then gradually increase the speed up to 90 km/h,...
Challenge #1 1. To clearly identify the nature of the noise, drive along the highway at a speed of approximately 20 km/h. 2. Then gradually increase the speed up to 90 km/h,...
Removing the gearbox
1. Drain the oil from the bridge beam. 2. Raise the rear of the car, put it on stands and remove the wheels. 3. Unscrew the nuts securing the brake shield to the beam and extend...
1. Drain the oil from the bridge beam. 2. Raise the rear of the car, put it on stands and remove the wheels. 3. Unscrew the nuts securing the brake shield to the beam and extend...
Installing the gearbox
Before installing the gearbox, thoroughly clean the axle beam from oil. 1. Place a sealing gasket on the mating surface, insert the reducer into the beam and fasten it with bolts....
Before installing the gearbox, thoroughly clean the axle beam from oil. 1. Place a sealing gasket on the mating surface, insert the reducer into the beam and fasten it with bolts....

Gearbox disassembly
Removing the inner ring of the rear bearing of the drive gear with a universal puller А.40005/1/7 1 - universal puller А.40005/1/7; 2 - drive gear; 3 - the inner ring of the...
Removing the inner ring of the rear bearing of the drive gear with a universal puller А.40005/1/7 1 - universal puller А.40005/1/7; 2 - drive gear; 3 - the inner ring of the...
Checking the technical condition of the gearbox parts
Rinse thoroughly before inspecting gearbox parts. This will make it easier to detect wear and damage to parts. 1. Check whether there are any damages on the teeth of the final...
Rinse thoroughly before inspecting gearbox parts. This will make it easier to detect wear and damage to parts. 1. Check whether there are any damages on the teeth of the final...

Gear Assembly
Rear axle gear parts 1 - drive gear flange; 2 - stuffing box; 3 - oil deflector; 4 - front bearing; 5 - rear bearing; 6 - adjusting ring of the drive gear; 7 - support washer of...
Rear axle gear parts 1 - drive gear flange; 2 - stuffing box; 3 - oil deflector; 4 - front bearing; 5 - rear bearing; 6 - adjusting ring of the drive gear; 7 - support washer of...
Differential Assembly
1. Lubricate with gear oil and install, through the windows in the differential box, the axle gears with support washers and satellites. Turn the satellites and gears of the axle...
1. Lubricate with gear oil and install, through the windows in the differential box, the axle gears with support washers and satellites. Turn the satellites and gears of the axle...

Installing and adjusting the differential drive gear
Scheme of taking measurements to determine the thickness of the adjusting ring of the drive gear 1 - mandrel A.70184; 2 - fixture A.95690 with an indicator; a1 and a2 - the...
Scheme of taking measurements to determine the thickness of the adjusting ring of the drive gear 1 - mandrel A.70184; 2 - fixture A.95690 with an indicator; a1 and a2 - the...

Differential gear bearing adjustment
Dynamometer 02.7812.9501 1 - movable pointer; 2 - torque limit indicator; 3 - body; 4 - handle; 5 - a rod with a tip inserted into the adapter sleeve of the nut of the pinion...
Dynamometer 02.7812.9501 1 - movable pointer; 2 - torque limit indicator; 3 - body; 4 - handle; 5 - a rod with a tip inserted into the adapter sleeve of the nut of the pinion...

Installing the differential box
Checking the preload of the bearings of the differential box with the tool A.95688 / R 1 - fastening screw; 2 - key A.55085; 3 - driven gear; 4 - adjusting nut; 5 - intermediate...
Checking the preload of the bearings of the differential box with the tool A.95688 / R 1 - fastening screw; 2 - key A.55085; 3 - driven gear; 4 - adjusting nut; 5 - intermediate...

Differential box bearing preload and backlash adjustment
Checking the lateral clearance in the gearing of the final drive gears using A.95688 / R 1 – bracket tightening screw; 2 - indicator for checking the side clearance in the meshing...
Checking the lateral clearance in the gearing of the final drive gears using A.95688 / R 1 – bracket tightening screw; 2 - indicator for checking the side clearance in the meshing...
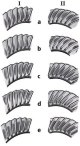
Checking the contact of the teeth of the gears of the final drive of the differential
The location of the contact patch in the gearing of the final drive gears I - forward side; II - reverse side; a and c - incorrect contact in the meshing of the gears: move the...
The location of the contact patch in the gearing of the final drive gears I - forward side; II - reverse side; a and c - incorrect contact in the meshing of the gears: move the...
Replacing the differential drive gear oil seal
The need to replace the oil seal is determined by a decrease in the oil level in the rear axle housing (due to oil leakage through the stuffing box) to a level that disrupts the...
The need to replace the oil seal is determined by a decrease in the oil level in the rear axle housing (due to oil leakage through the stuffing box) to a level that disrupts the...
Possible malfunctions of the rear axle
Cause Elimination Method Increased noise from the rear wheels Loose wheel mount Tighten the wheel bolts Wear or destruction of the ball bearing of the axle shaft Inspect axle...
Cause Elimination Method Increased noise from the rear wheels Loose wheel mount Tighten the wheel bolts Wear or destruction of the ball bearing of the axle shaft Inspect axle...
This section is available on russian, bulgarian, belarusian, ukrainian, serbian, croatian, romanian, polish, slovak, hungarian
More articles from other manuals on VAZ cars:
➠ Transmission: Rear axle VAZ-21051 (1979-2010)
➠ Transmission: Rear axle VAZ-21061 (1976-2006)
➠ Transmission: Rear axle VAZ-2107 (1982-2012)
➠ Transmission: Rear axle and shafts VAZ-21213 (1994-2006)
➠ Transmission: Rear axle VAZ-21051 (1979-2010)
➠ Transmission: Rear axle VAZ-21061 (1976-2006)
➠ Transmission: Rear axle VAZ-2107 (1982-2012)
➠ Transmission: Rear axle and shafts VAZ-21213 (1994-2006)
Share with friends:
- General information
- Vehicle description
- Vehicle device
- Vehicle operation
- Maintenance
- Main malfunctions
- Applications
- Power unit
- Engine repair
- Cooling and lubrication system
- Supply system
- Transmission
- Clutch
- Transmission
- Cardan gear
- Rear axle
- Chassis
- Front suspension
- Rear suspension
- Steering
- Brake system
- Body
- Exterior
- Interior
- Electrical equipment
- Engine electrics
- Equipment and devices
- General information
- Specifications
- Operation and maintenance
- Power unit
- Engine repair
- Cooling system
- Lubrication system
- Power and exhaust system
- Ignition system
- Engine electrics
- Transmission
- Clutch
- Car gearbox
- Cardan gear
- Rear axle
- Chassis
- Car suspension
- Steering
- Brake system
- Body
- Exterior
- Interior
- Doors and locks
- Electrical equipment
- Equipment and devices
- Lighting and signaling
VAZbook.ru © 2017 · Mobile version · Contact with administration · Sitemap: EN BG BY UA RS HR RO PL SK HU · Site search · News and articles
VAZ-1111 · VAZ-11113 · VAZ-2101 · VAZ-21011 · VAZ-2104 · VAZ-2105 · VAZ-21051 · VAZ-2106 · VAZ-21061 · VAZ-2107 · VAZ-21099 · VAZ-2109 · VAZ-2108 · VAZ-2110 · VAZ-2112 · VAZ-2114 · VAZ-2115 · VAZ-2121 · VAZ-21213 · VAZ-21214 ·