
English Русский
Български
Беларускі
Український
Српски
Hrvatski
Română
Polski
Slovenský
Magyar
| Articles | Contacts | Sitemap |   
Repair and maintenance Lada Repair and maintenance Mazda Repair and maintenance Mitsubishi Repair and maintenance Toyota Repair and maintenance Land Rover Repair and maintenance Hyundai Repair and maintenance Nissan
VAZbook.ru


Main     1111   2101   2105   2106   2107   2109   2110   2115   2121  
VAZ-2104 (1984-2012) VAZ-2105 (1979-2010) VAZ-21051 (1979-2010)
  • Main
  • «Zhiguli»
  • VAZ-2104
  • Electrical equipment
  • Engine electrics
  • Ignition timing — checking and adjustment

Ignition timing — checking and adjustment (VAZ-2104)

            0

It is recommended to check and adjust the ignition timing using a stroboscope, according to the instructions for its use. For a contact ignition system, the timing can be checked and adjusted using an ohmmeter.

To perform the work you will need a special key by 38 mm to turn the crankshaft and a multimeter.

Sequence of execution


1. Prepare the vehicle for operations (see "Preparing a car for maintenance and repair"). We turn on neutral gear.

2. Disconnect the wire from the negative terminal of the battery (see "Battery - Removal and Installation").

3. Remove the distributor cap (see "Distributor Cap and Rotor - Check and Replace").

4. With a special key by 38 mm turn the crankshaft clockwise (see "Front Crankshaft Oil Seal - Replacement"), until the side contact of the runner comes close (reaches about 30°) to the contact of the distributor cap under number one.

(The original can be seen on the website: VAZbook.ru)

5. Connect one probe of the ohmmeter to the "ground", the other to the distributor contact bolt connected to the coil terminal. The resistance shown by the ohmmeter should be zero.

6. Slowly turn the crankshaft until the mark on pulley A aligns with one of the marks B on the timing cover. If the resistance increases to infinity when the marks on the pulley and cover coincide, the ignition timing is set correctly. If the resistance increases earlier or remains equal to zero, the ignition timing must be adjusted.
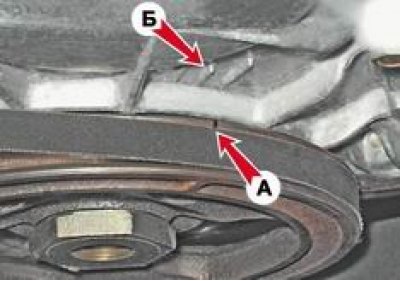
6. Slowly turn the crankshaft until the mark on pulley A aligns with one of the marks B on the…


Note: The long mark corresponds to 0° ignition advance (in this case, the piston of the first cylinder is at the top dead center of the end of the compression stroke), medium - 5°, short - 70°. When using gasoline with an octane rating of 92-95, the ignition advance angle is set to - 5°.


7. For adjustment, loosen the distributor mounting nut to the cylinder block (see below "Ignition distributor - removal and installation").

8. If the resistance tends to infinity, turn the distributor housing clockwise until the resistance is zero.

9. From this position, slowly turn the distributor housing counterclockwise until the resistance begins to increase (breaker contact opening moment). In this case, to select the gap in the roller drive, slightly press the runner counterclockwise.

10. Tighten the distributor mounting nut.

11. Install the distributor cap back into place.

Note You can check and adjust the ignition timing using a test lamp. In this case, work is performed with the ignition on, so you must be careful. When the breaker contacts open, a voltage surge of up to 300 V occurs in the circuit.


Note: The correct setting of the ignition timing can be checked on a warmed-up engine while moving the car. While driving on a flat horizontal section of the road, at a speed of 50 km/h, engage the fourth gear and sharply press the gas pedal. If detonation appears in the engine cylinders for a short time (up to 3 s) (we determine by the ringing sound), then the ignition timing is set correctly. In case of prolonged detonation, we reduce the ignition timing angle by turning the distributor housing clockwise, in the absence of detonation, we increase the angle. This adjustment is usually necessary in case of low quality of fuel in the tank and allows to provide the most favorable conditions for engine operation.


This article is available at russian, bulgarian, belarusian, ukrainian, serbian, croatian, romanian, polish, slovak, hungarian
The text was reviewed by the specialist: Grigory Vologodtsev

Share with friends:

Previous articles
VAZ-2104: Engine electrics
Next articles

Closed state angle of breaker contacts — checking and adjustment
Ignition distributor — lubrication
Distributor Cap and Rotor — Check and Replace
Ignition distributor
Ignition coil — checking, removal and installation
Ignition distributor — removal and installation
Ignition distributor — disassembly

More articles from other manuals on VAZ cars:
➠ Ignition timing — checking and adjustment VAZ-2106 (1976-2006)
➠ Ignition timing — checking and adjustment VAZ-2107 (1982-2012)
➠ Setting the ignition timing VAZ-1111 (1988-1996)
➠ Setting the ignition timing VAZ-2101 (1970-1983)
➠ Setting the ignition timing VAZ-2109 (1984-1997)
Link in different formats to this page


Visitor comments

No comments yet


How much will 47 + 10 ?


VAZ-2104 (1984-2012) 
  • General information
  • Operation and maintenance
  • Power unit
  • Engine repair
  • Fuel system (carburetor)
  • Fuel system (injector)
  • Control system
  • Cooling system
  • Exhaust system
  • Transmission
  • Clutch
  • Car gearbox
  • Cardan gear
  • Rear axle
  • Chassis
  • Front suspension
  • Rear suspension
  • Wheels and tires
  • Steering
  • Brake system
  • Body
  • Exterior
  • Interior
  • Doors and glass
  • Ventilation and heating
  • Electrical equipment
  • Equipment and devices
  • Headlights and lighting
  • Engine electrics
  • Electrical circuits


VAZ-2105 (1979-2010) 
  • General information
  • Vehicle description
  • Vehicle device
  • Vehicle operation
  • Maintenance
  • Power unit
  • Engine repair
  • Cooling and lubrication system
  • Supply system
  • Transmission
  • Clutch
  • Car gearbox
  • Cardan gear
  • Rear axle
  • Chassis
  • Suspension and shock absorbers
  • Steering
  • Brake system
  • Body
  • Body elements
  • Electrical equipment
  • Engine electrics
  • Equipment and devices


VAZ-21051 (1979-2010) 
  • General information
  • Introduction to guide
  • User manual
  • Troubleshooting
  • Power unit
  • Engine repair
  • Engine repair VAZ-2103
  • Cooling system
  • Lubrication system
  • Power and exhaust system
  • Fuel injection
  • Transmission
  • Clutch
  • Car gearbox
  • Cardan gear
  • Rear axle
  • Chassis
  • Suspension and shock absorbers
  • Steering
  • Brake system
  • Body
  • Exterior
  • Interior
  • Doors and windows
  • Electrical equipment
  • Equipment and devices
  • Engine electrics
  • Ignition system
  • Electrical circuits


VAZbook.ru © 2017 · Mobile version · Contact with administration · Sitemap: EN BG BY UA RS HR RO PL SK HU · Site search · News and articles VAZ-1111 · VAZ-11113 · VAZ-2101 · VAZ-21011 · VAZ-2104 · VAZ-2105 · VAZ-21051 · VAZ-2106 · VAZ-21061 · VAZ-2107 · VAZ-21099 · VAZ-2109 · VAZ-2108 · VAZ-2110 · VAZ-2112 · VAZ-2114 · VAZ-2115 · VAZ-2121 · VAZ-21213 · VAZ-21214 ·
The site stores technical data using cookies to improve the service.