
English Русский
Български
Беларускі
Український
Српски
Hrvatski
Română
Polski
Slovenský
Magyar
| Articles | Contacts | Sitemap |   
Repair and maintenance Lada Repair and maintenance Mazda Repair and maintenance Mitsubishi Repair and maintenance Toyota Repair and maintenance Land Rover Repair and maintenance Hyundai Repair and maintenance Nissan
VAZbook.ru


Main     1111   2101   2105   2106   2107   2109   2110   2115   2121  
VAZ-2114 (2004-2013) VAZ-2115 (1997-2012)
  • Main
  • «Samara-2»
  • VAZ-2114
  • Electrical equipment
  • Engine electrics
  • Rectifier block and capacitor — checking and replacement

Rectifier block and capacitor — checking and replacement (VAZ-2114)

            0

Contents: Removal ↓ Examination ↓ Installation ↓

Removal


1. With a spanner by 8 mm unscrew the three bolts connecting the stator winding terminals to the rectifier unit (1) and another bolt securing the rectifier unit (2) (note how the insulating and thrust washers are installed).
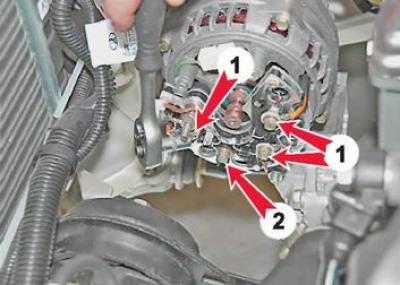
1. With a spanner by 8 mm unscrew the three bolts connecting the stator winding terminals to the…


2. Using a Phillips screwdriver, unscrew the screw securing the capacitor.
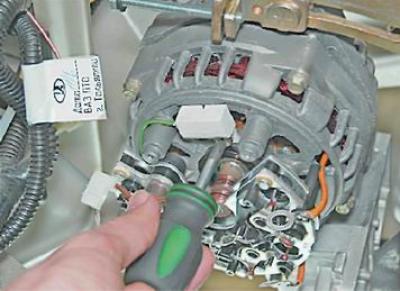
2. Using a Phillips screwdriver, unscrew the screw securing the capacitor.


3. Carefully bend the stator winding terminal wires to the side.
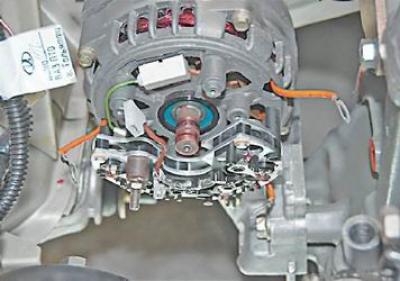
3. Carefully bend the stator winding terminal wires to the side.


4. Remove the rectifier unit together with the capacitor.
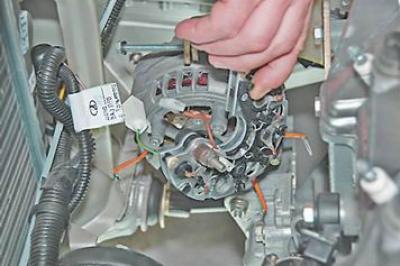


4. Remove the rectifier unit together with the capacitor.


5. With a spanner by 10 mm we unscrew the nut securing the contact bolt.
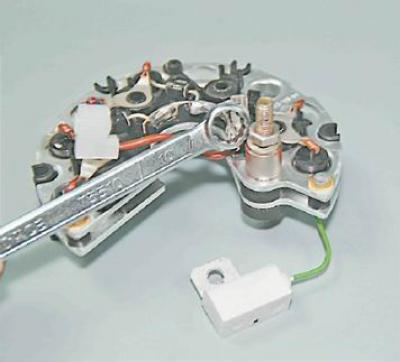
5. With a spanner by 10 mm we unscrew the nut securing the contact bolt.


6. Remove the spring washer, spacer sleeve, insulating washer and capacitor wire tip from the bolt.
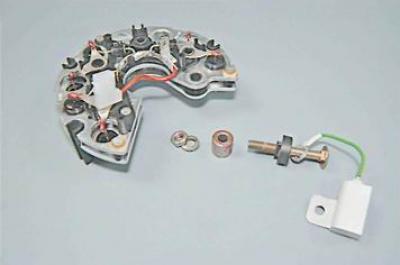
6. Remove the spring washer, spacer sleeve, insulating washer and capacitor wire tip from the bolt.


Examination


Note: A good semiconductor diode conducts current in one direction only. If the diode does not conduct current or conducts current in both directions, it is faulty.


1. To check additional diodes, connect the positive lead of the ohmmeter (in diode test mode) to the common bus of the additional diodes (1), and the probe of the negative terminal to the terminal of the diode being tested (2). A serviceable diode should not pass current (resistance tends to infinity).
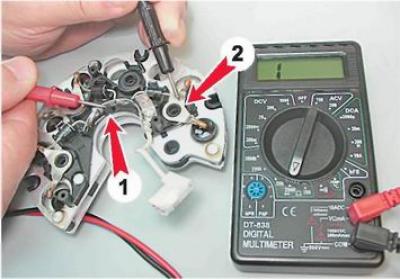
1. To check additional diodes, connect the positive lead of the ohmmeter (in diode test mode) to…


2. Change the tester probes. If the diode is working properly, the ohmmeter should show the presence of resistance (several hundred ohms). We check the other two additional diodes in the same way.
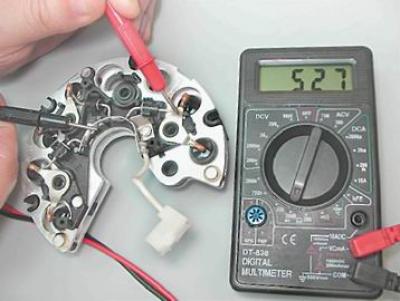
2. Change the tester probes. If the diode is working properly, the ohmmeter should show the…


3. Connect the probe of the negative terminal of the ohmmeter to the plate of the rectifier block, into which the diode being tested is pressed, and the probe of the positive terminal to the diode terminal. A serviceable diode should not pass current (resistance tends to infinity).
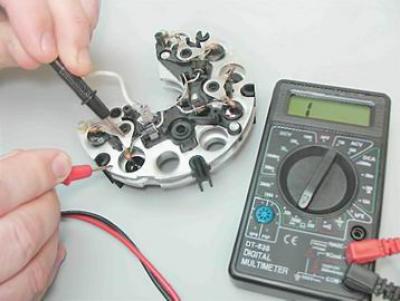
3. Connect the probe of the negative terminal of the ohmmeter to the plate of the rectifier block,…


4. Swap the tester probes. If the diode is OK, the ohmmeter should show a resistance of several hundred ohms.
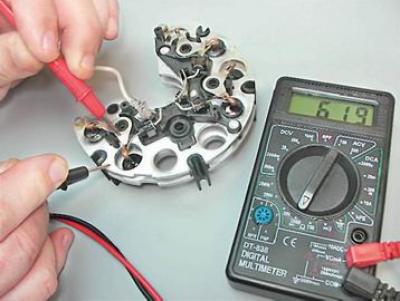
4. Swap the tester probes. If the diode is OK, the ohmmeter should show a resistance of several…


5. We check other diodes of the rectifier block in the same way.

Note: Capacitor capacity can only be measured with a special device. You can verify the capacitor is faulty using an ohmmeter with a measurement limit of at least 1000 kOhm.


6. Connect an ohmmeter to the capacitor terminals and observe its readings. If the capacitor is not "broken", then when connecting the terminals of the device to it, the ohmmeter will initially show a small resistance, then this resistance will quickly increase until it stabilizes. A similar change in the ohmmeter readings should be repeated when changing the polarity of the device.

We replace the faulty rectifier unit and capacitor.

The original source is published on the website VAZbook

Installation


We install the rectifier block and capacitor in the reverse order of removal.


This article is available at russian, bulgarian, belarusian, ukrainian, serbian, croatian, romanian, polish, slovak, hungarian
The text was reviewed by the specialist: Grigory Vologodtsev

Share with friends:

Previous articles
VAZ-2114: Engine electrics
Next articles

Voltage Regulator — Checking and Replacing
Generator Drive Belt — Replacement
Generator Drive Belt — Checking Condition and Adjusting Tension
Generator — check
Description of the generator design
Generator — removal and installation
Generator — repair
Description of the starter design
Starter — removal and installation
Starter — repair

More articles from other manuals on VAZ cars:
➠ Checking the generator rectifier block valves VAZ-21011 (1974-1983)
➠ Checking the diodes of the generator rectifier block VAZ-21051 (1979-2010)
➠ Checking the rectifier block valves VAZ-21213 (1994-2006)
➠ Checking and repairing the cylinder block VAZ-1111 (1988-1996)
➠ Cylinder Block — Checking and Repairing VAZ-2108 (1984-2003)
Link in different formats to this page


Visitor comments

No comments yet


How much will 18 + 23 ?


VAZ-2114 (2004-2013) 
  • General information
  • Operation and maintenance
  • Power unit
  • Engine repair
  • Cooling system
  • Supply system
  • Control system
  • Exhaust system
  • Transmission
  • Clutch
  • Car gearbox
  • Front wheel drives
  • Chassis
  • Wheels and tires
  • Front suspension
  • Rear suspension
  • Steering
  • Brake system
  • Body
  • Exterior
  • Interior
  • Doors and glass
  • Tailgate
  • Ventilation and heating
  • Electrical equipment
  • Equipment and devices
  • Headlights and lighting
  • Engine electrics
  • Electrical circuits


VAZ-2115 (1997-2012) 
  • General information
  • Vehicle device
  • Operation manual
  • Vehicle malfunctions
  • Car care
  • Power unit
  • Engine repair
  • Cooling system
  • Supply system
  • Control system
  • Exhaust system
  • Transmission
  • Clutch
  • Car gearbox
  • Front wheel drives
  • Chassis
  • Front suspension
  • Rear suspension
  • Steering
  • Brake system
  • Body
  • Exterior
  • Interior
  • Doors, covers and windows
  • Electrical equipment
  • Equipment and devices
  • Headlights and lighting
  • Engine electrics
  • Anti-theft system


VAZbook.ru © 2017 · Mobile version · Contact with administration · Sitemap: EN BG BY UA RS HR RO PL SK HU · Site search · News and articles VAZ-1111 · VAZ-11113 · VAZ-2101 · VAZ-21011 · VAZ-2104 · VAZ-2105 · VAZ-21051 · VAZ-2106 · VAZ-21061 · VAZ-2107 · VAZ-21099 · VAZ-2109 · VAZ-2108 · VAZ-2110 · VAZ-2112 · VAZ-2114 · VAZ-2115 · VAZ-2121 · VAZ-21213 · VAZ-21214 ·
The site stores technical data using cookies to improve the service.