
English Русский
Български
Беларускі
Український
Српски
Hrvatski
Română
Polski
Slovenský
Magyar
| Articles | Contacts | Sitemap |   
Repair and maintenance Lada Repair and maintenance Mazda Repair and maintenance Mitsubishi Repair and maintenance Toyota Repair and maintenance Land Rover Repair and maintenance Hyundai Repair and maintenance Nissan
VAZbook.ru


Main     1111   2101   2105   2106   2107   2109   2110   2115   2121  
VAZ-2104 (1984-2012) VAZ-2105 (1979-2010) VAZ-21051 (1979-2010)
  • Main
  • «Zhiguli»
  • VAZ-2105
  • Transmission
  • Rear axle
  • Checking and straightening the rear axle beam

Checking and straightening the rear axle beam (VAZ-2105)

            0

Contents: Examination ↓ Editing ↓

Examination


Be sure to do this if you are repairing a car that has suffered an accident. A deformed beam can cause overloads and noise in the rear axle. Check the beam in both horizontal and vertical planes in the following order.

Attach a square flange A.70172 to each end of the beam. The side of the square is 150 mm and ground. Mount the beam with flanges on identical prisms so that the surface of the housing mating to the beam is in the vertical plane. Check the deformation of the beam by placing a square against the outer (Fig. 129) and side surfaces of flange A.70172.
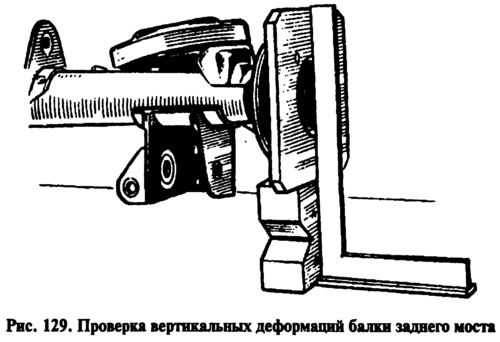
Attach a square flange A.70172 to each end of the beam. The side of the square is 150 mm and…


If the beam is not deformed, the square will fit tightly. Check the deformation with a feeler gauge, if the 0.2 mm feeler gauge passes on any flange, the beam must be straightened.

Check the perpendicularity of the gearbox mounting surface relative to the support surface of the A.70172 flange using a square. A 0.2 mm feeler gauge should not pass. If the deformation exceeds the specified value, the beam must be straightened.

Editing


Attach flanges A.70172 to each end of the beam, used only when straightening the beam. Mount the beam with flanges on the support of the hydraulic press 1 so that the ends of the clamping crossbar 2 (Fig. 130) are in the deformation zone of the beam, which is most often at a distance of 200-300 mm from its flanges. Mount the stand 6 with the indicator so that the indicator leg rests against the upper part of the side surface of the flange, and the indicator pointer is on the division equal to the value of the beam deformation, measured with a feeler gauge before straightening the beam.
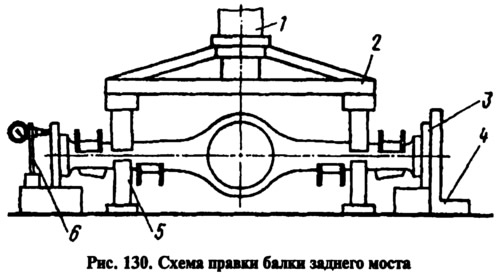


Attach flanges A.70172 to each end of the beam, used only when straightening the beam. Mount the…


Installed under the beam (in the deformation zone) limit stops 5, straighten it with a hydraulic press sequentially in the horizontal and vertical planes, monitoring the results of straightening with a feeler gauge on a square 4 or on an indicator.

(The original source is published on the website: vazbook.ru)

The maximum press force at the point of load application should not exceed 10,000 kgf, so that excessive deformation of the beam casing section does not occur. With the stop height 5 correctly selected experimentally, the beam can be straightened without using a square or indicator, followed by checking for deformation. Remove the beam from the press and check it as indicated above, replacing flanges 3 (A.70172) with test ones.

In the absence of appropriate equipment, as an exception, straightening is allowed sequentially from each side, but with mandatory verification of deformation on both sides.

After all the adjustments have been made, thoroughly wash the beam and check the quality of the seams, the tightness of the beam, and the cleanliness inside the beam (absence of burrs, chips and oil residues) and the cleanliness of the breather. Then paint the beam from the outside to protect it from corrosion.


This article is available at russian, bulgarian, belarusian, ukrainian, serbian, croatian, romanian, polish, slovak, hungarian
The text was reviewed by the specialist: Grigory Vologodtsev

Share with friends:

Previous articles
VAZ-2105: Rear axle
Next articles

Disassembly and assembly of the rear axle
Removal and installation the rear axle
Possible malfunctions of the main transmission
The device of the main transmission, differential and axle shafts
Removal, installation, inspection, disassembly and assembly of axle shafts
Measuring the axial free play of the axle shaft on a vehicle
Determining gearbox faults on a vehicle
Removal and installation the gearbox
Disassembling the gearbox

More articles from other manuals on VAZ cars:
➠ Checking the rear axle beam VAZ-2101 (1970-1983)
➠ Checking the rear axle beam VAZ-21213 (1994-2006)
➠ Rear Axle — Checking Oil Level and Changing Oil VAZ-2106 (1976-2006)
➠ Rear Axle — Checking Oil Level and Changing Oil VAZ-2107 (1982-2012)
➠ Checking the fluid level in the rear door window washer reservoir VAZ-1111 (1988-1996)
Link in different formats to this page


Visitor comments

No comments yet


How much will 43 + 27 ?


VAZ-2104 (1984-2012) 
  • General information
  • Operation and maintenance
  • Power unit
  • Engine repair
  • Fuel system (carburetor)
  • Fuel system (injector)
  • Control system
  • Cooling system
  • Exhaust system
  • Transmission
  • Clutch
  • Car gearbox
  • Cardan gear
  • Rear axle
  • Chassis
  • Front suspension
  • Rear suspension
  • Wheels and tires
  • Steering
  • Brake system
  • Body
  • Exterior
  • Interior
  • Doors and glass
  • Ventilation and heating
  • Electrical equipment
  • Equipment and devices
  • Headlights and lighting
  • Engine electrics
  • Electrical circuits


VAZ-2105 (1979-2010) 
  • General information
  • Vehicle description
  • Vehicle device
  • Vehicle operation
  • Maintenance
  • Power unit
  • Engine repair
  • Cooling and lubrication system
  • Supply system
  • Transmission
  • Clutch
  • Car gearbox
  • Cardan gear
  • Rear axle
  • Chassis
  • Suspension and shock absorbers
  • Steering
  • Brake system
  • Body
  • Body elements
  • Electrical equipment
  • Engine electrics
  • Equipment and devices


VAZ-21051 (1979-2010) 
  • General information
  • Introduction to guide
  • User manual
  • Troubleshooting
  • Power unit
  • Engine repair
  • Engine repair VAZ-2103
  • Cooling system
  • Lubrication system
  • Power and exhaust system
  • Fuel injection
  • Transmission
  • Clutch
  • Car gearbox
  • Cardan gear
  • Rear axle
  • Chassis
  • Suspension and shock absorbers
  • Steering
  • Brake system
  • Body
  • Exterior
  • Interior
  • Doors and windows
  • Electrical equipment
  • Equipment and devices
  • Engine electrics
  • Ignition system
  • Electrical circuits


VAZbook.ru © 2017 · Mobile version · Contact with administration · Sitemap: EN BG BY UA RS HR RO PL SK HU · Site search · News and articles VAZ-1111 · VAZ-11113 · VAZ-2101 · VAZ-21011 · VAZ-2104 · VAZ-2105 · VAZ-21051 · VAZ-2106 · VAZ-21061 · VAZ-2107 · VAZ-21099 · VAZ-2109 · VAZ-2108 · VAZ-2110 · VAZ-2112 · VAZ-2114 · VAZ-2115 · VAZ-2121 · VAZ-21213 · VAZ-21214 ·
The site stores technical data using cookies to improve the service.