




Hidden cavities treated with anti-corrosion compounds
Name of the cavity | Injection points of the composition | Injection direction | Additional instructions |
| Lower front cross member | On top in the engine compartment | Right and left | Open the hood |
| Front side members | On the side of the engine compartment | Forward and backward | Open the hood |
| Upper front cross member | Above | Right and left | Same |
| Headlight housings | In front (from the outside) | Over the entire surface | Remove the headlights |
| Hood pockets | Into the front holes | On the inner surface of the front part | Open the hood |
| Mudguard pillars | On the side of the engine compartment | On the inner surface | Open the hood |
| Front door pillars | From the side of the salon | Down | Remove the upholstery |
| Sidewall and front shield connectors | Hole from the interior | Forward and backward | |
| Internal and external door thresholds | Under the moldings and from the end of the threshold at the rear | Forward and backward | Remove the moldings and caps |
| Cavities under the front wings | The opening of the shield under the wing is used | Over the entire inner surface | Remove the wing shield |
| Front floor loggers | From below the body | Forward and backward | Hang the car |
| Front floor rail reinforcements | Same | Right and left | Same |
| Middle floor crossbar | Same | Right and left | Same |
| Rear floor rails | Same | Forward and backward | Same |
| Jack brackets | Same | On the inner surface | Same |
| Front suspension buffer brackets | Behind the front wheels | On the inner surface | |
| Front suspension cross member | From below the body | Right and left | Hang the car |
| Rear floor cross member | From the passenger compartment under the back seat | Right and left | Remove the rear seat |
| Central pillars | From the salon | Down | Remove the pillar trim |
| Rear door pillars | Behind the pillar | Down | Remove the upholstery |
| Door pockets | The openings under the door trim are used | Along the inner surface of the door bottom | Remove the upholstery |
| Between the rear fenders and the rear wheel arches | The openings in the luggage compartment are used | Over the entire surface | Open the trunk |
| Rear floor side members | In the trunk | Forward and backward | Open the trunk |
| Rear floor crossbar | Same | Right and left | Remove the upholstery |
| Upper rear cross member | Above the rear lights | Right and left | Remove the tail lights |
| Lower rear cross member | In the trunk | Same | Open the trunk |
| Recesses for fuel tank and spare wheel | Same | Across the entire surface of the top tank floor and spare wheel | Remove the fuel tank and spare tire |
Hidden cavities of the body (left view)
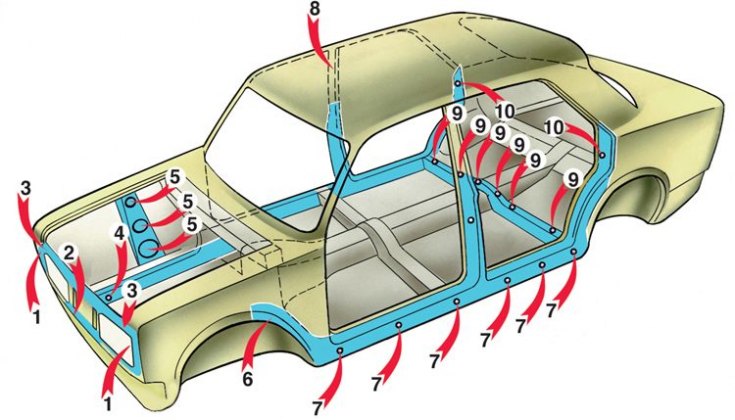
1 – headlight housings; 2 – lower front cross member; 3 – upper front cross member; 4 – front side members; 5 – right mudguard pillar; 6 – cavity under the front left wing; 7 – internal and external door thresholds; 8 – central pillars; 9 – rear floor cross member; 10 – rear pillars
Hidden cavities of the body (right view)
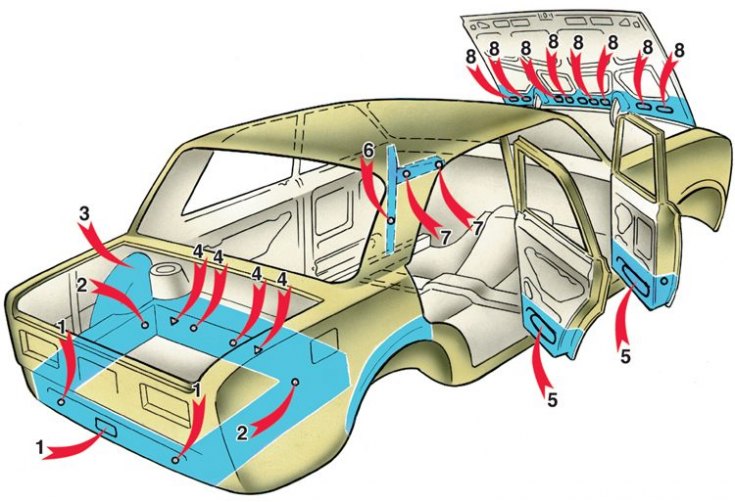
1 – lower rear cross member; 2 – rear floor side members; 3 – cavities between the wings and the rear wheel arches; 4 – rear floor cross member; 5 – door pockets; 6 – front pillars; 7 – connectors of sidewalls and front shield; 8 – hood pockets
Due to the use of complex technological equipment and the need for high-quality work, it is recommended that the treatment of hidden cavities be performed only at vehicle service stations.
1. Place the vehicle on a lift, remove any parts or trim that obstruct access to hidden cavities.
2. Rinse hidden cavities with water at a temperature of 40–50°C through technological and drainage holes (see table Hidden cavities treated with anti-corrosion compounds), the bottom of the body, wheel arches until clean water flows out. In this case, the lowering windows must be closed.
3. Remove any moisture that has entered the interior and trunk, blow out all hidden cavities and areas where anti-corrosion compounds have been applied with compressed air.
4. Drive the car into the anti-corrosion chamber and place it on a lift. Spray the anti-corrosion compound into the areas shown in Fig. Hidden cavities of the body (left view) and Fig. Hidden cavities of the body (right view).
5. Lower the car from the lift, clean the front surfaces of the body from dirt with a rag soaked in white spirit.