
Hidden body cavities (bottom view)
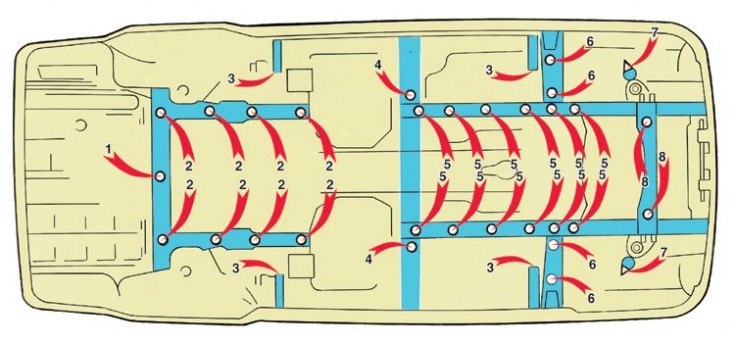
1 - rear floor cross member; 2 - rear spars; 3 - jack brackets; 4 - the middle cross member of the floor; 5 – front spars of the floor; 6 – spars amplifiers; 7 – front suspension buffer brackets; 8 - front suspension cross member
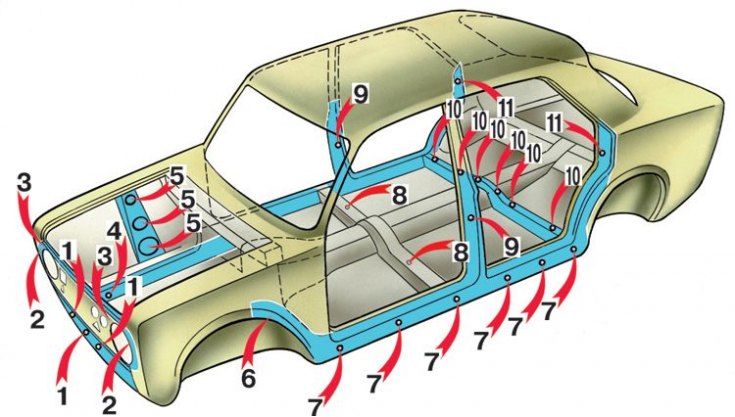
Hidden body cavities (right side view)
1 - the lower cross member of the back; 2 - side members of the trunk floor; 3 - between the wings and rear wheel arches; 4 - cross member of the trunk floor; 5 - front struts; 6 - connectors of the sidewalls and the front panel; 7 - door pockets; 8 - hood pockets
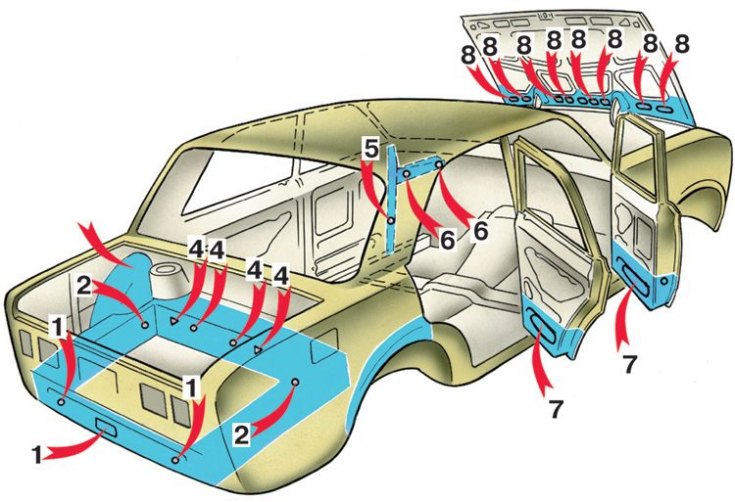
Hidden body cavities (left view)
1 - the lower cross member of the front end; 2 – casings of headlights; 3 - the upper cross member of the front end; 4 – front spars; 5 – rack mudguard; 6 - cavity under the front left wing; 7 - internal and external thresholds of doors; 8 - middle cross-sections of the floor; 9 - central racks; 10 - rear cross member of the floor; 11 - rear racks
Due to the use of sophisticated technological equipment and the need for high-quality work, it is recommended to treat open cavities only at car service stations.
Hidden cavities treated with anti-corrosion compounds
№№ | Cavity name | Through which openings | Composition injection direction | Additional instructions |
1 | Upper cross bar | Through two holes in the front bottom | To the side of the cross member | Remove radiator cover |
2 | Lower cross bar | Through the crank hole | Right and left | – |
3 | headlight housings | front | Over the entire surface | Remove headlights |
4 | Front spars | Through holes in the engine bay | Forward and backward | Open the hood |
5 | Mudguard racks | Through holes in the engine bay | Up and down | Open the hood |
6 | Bracket for front suspension buffers | In the hole in the bracket | To the inner surface | Raise the car |
7 | Front suspension crossbar | through the holes below | Right and left | Raise the car |
8 | Under the front fenders | Through a hole closed with a plug | In all directions | Remove rubber plugs |
9 | Hood pockets | Through the front openings of the inner hood panel | In all directions | Open the hood |
10 | Internal and external door sills | Through the oval openings of the thresholds at the A-pillars and through the openings from the ends of the thresholds under the arches of the rear wheels | In all directions | Remove the sill trims at the front doors and the plugs under the arches |
11 | A-pillars | Through openings from the cabin | Down | Remove upholstery |
Cavity Corrosion Protection
1. Install the car on a lift, remove parts and upholstery that prevent access to hidden cavities.
2. Rinse with water at 40–50°C through the technological and drainage holes hidden cavities indicated in the table, the bottom of the body, wheel arches until clean water flows out. At the same time, the pivot windows must be closed, the lower ones must be raised.
3. Remove moisture that has entered the passenger compartment and trunk, blow out all hidden cavities and other places where anti-corrosion compounds are applied with compressed air.
4. Drive the car into the anti-corrosion spray booth and place it on a lift. Spray anti-corrosion compound in the places indicated in the figures (see fig. Hidden body cavities (bottom view), Hollow body (right side view) and fig. Hidden body cavities (left view)).
5. Lower the car from the lift, clean the front surfaces of the body from contamination with a rag soaked in white spirit.