




Windscreen Frame Panel Replacement
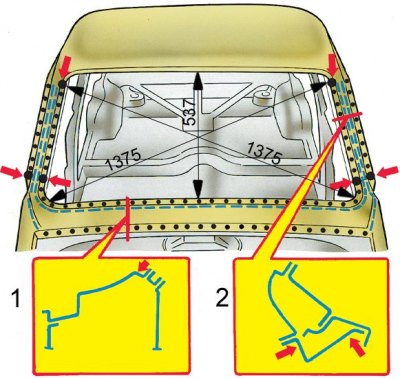
The dashed lines indicate the cutting lines, the dots indicate the contact welding seams. In the main view, the arrows indicate the gas welding locations, and the arrows on the fragments indicate the cutting locations.
1. Drill the spot weld spots at the frame and air intake box joints using a 6mm drill.
2. If replacing both the window frame panel and the roof panel at the same time, mark the gutters on both sides of the roof joints with the windshield frame panel.
3. Chisel off the frame panel (cutting lines are shown as dotted lines) from the posts, gutters and reinforcements. Use nippers to remove any remaining strips of metal and smooth out the edges.
(The original is available on the website: VAZBOOK)
4. Use a torch to burn off and sand away the paint on the parts along the windshield frame and on both sides of the frame panel edge.
5. Install the new frame panel and secure with clamps. When installing the panel, align the marks on the gutters with the roof joints. Gas weld the frame panel in the places shown in the picture.
6. Install the hood and check the fit of the panel. Check the dimensions of the windshield opening and weld the panel with gas welding using brass wire L-62, L-68 by melting the edges 10 mm long every 50 mm. Clean the joints on the frame panel with a grinder.
7. Partial replacement of the windshield frame panel is permitted with the roof panel installed.