
English Русский
Български
Беларускі
Український
Српски
Hrvatski
Română
Polski
Slovenský
Magyar
| Articles | Contacts | Sitemap |   
Repair and maintenance Lada Repair and maintenance Mazda Repair and maintenance Mitsubishi Repair and maintenance Toyota Repair and maintenance Land Rover Repair and maintenance Hyundai Repair and maintenance Nissan
VAZbook.ru


Main     1111   2101   2105   2106   2107   2109   2110   2115   2121  
VAZ-2104 (1984-2012) VAZ-2105 (1979-2010) VAZ-21051 (1979-2010)
  • Main
  • «Zhiguli»
  • VAZ-21051
  • Power unit
  • Engine repair
  • Checking the piston pin press fit

Checking the piston pin press fit (VAZ-21051)

            0

Assembled piston-pin-connecting rod kit mounted on fixture A.95615 for pin pressing-out test
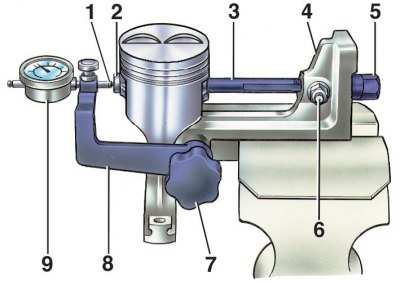


1 – indicator pin in contact with the end of the rod; 2 – the head of the rod in contact with the…

1 – indicator pin in contact with the end of the rod; 2 – the head of the rod in contact with the finger; 3 – threaded rod with groove; 4 – base; 5 – rod nut; 6 – thrust pin of the rod; 7 – bracket clamp handle; 8 – indicator bracket; 9 – indicator


After assembling the connecting rod-pin-piston group, check the strength of the pin pressing using a torque wrench and device A.95615.

1. Clamp the base of the 4th fixture in a vice and install the connecting rod and piston group on it.

2. Lower the indicator bracket 8, insert the threaded rod 3 into the hole in the pin and push it into the hole in the boss until the head 2 of the rod rests against the end of the pin.

3. Screw nut 5 onto the end of the rod and tighten it so that it, in contact with the support, eliminates any possible gaps.

4. Raise bracket 8 to a horizontal position, secure it with handle 7 and install pin 1 of indicator 9 on head 2 of rod inserted into finger.

5. Set the indicator to zero and insert stop 6 into the groove of the threaded rod so that the rod does not turn.


6. Using torque wrench 2, tighten the rod nut, applying a torque of 12.7 N·m (1.3 kgf·m), which corresponds to an axial load of 3.92 kN (400 kgf).

The pin is seated correctly in the connecting rod if, after the torque wrench is released and the nut is returned to its original position, the indicator arrow returns to zero.

If the pin slips in the upper head of the connecting rod, replace the connecting rod with a new one.

(The original can be seen on the website VAZBOOK.ru)


This article is available at russian, bulgarian, belarusian, ukrainian, serbian, croatian, romanian, polish, slovak, hungarian
The text was reviewed by the specialist: Grigory Vologodtsev

Share with friends:

Previous articles
VAZ-21051: Engine repair
Next articles

Assembly of the connecting rod and piston group
Piston mass control
Checking the clearance between the bearings and the crankshaft
Checking the clearances between piston grooves and rings
Checking the clearance between the piston and the pin
Parallelism of the axes of the lower head of the connecting rod and the piston pin
Crankshaft and flywheel — design description
Cleaning the crankshaft lubrication system channels
Main and connecting rod journals
Main bearing shells

More articles from other manuals on VAZ cars:
➠ Checking and repairing the connecting rod and piston group VAZ-1111 (1988-1996)
➠ Checking the clearance between the piston and the pin VAZ-21011 (1974-1983)
➠ Checking the technical condition of the connecting rod and… VAZ-21213 (1994-2006)
➠ Engine Oil — Checking Level and Replacing VAZ-2106 (1976-2006)
➠ Checking and adjusting the front wheel alignment angles VAZ-2107 (1982-2012)
Link in different formats to this page


Visitor comments

No comments yet


How much will 16 + 17 ?


VAZ-2104 (1984-2012) 
  • General information
  • Operation and maintenance
  • Power unit
  • Engine repair
  • Fuel system (carburetor)
  • Fuel system (injector)
  • Control system
  • Cooling system
  • Exhaust system
  • Transmission
  • Clutch
  • Car gearbox
  • Cardan gear
  • Rear axle
  • Chassis
  • Front suspension
  • Rear suspension
  • Wheels and tires
  • Steering
  • Brake system
  • Body
  • Exterior
  • Interior
  • Doors and glass
  • Ventilation and heating
  • Electrical equipment
  • Equipment and devices
  • Headlights and lighting
  • Engine electrics
  • Electrical circuits


VAZ-2105 (1979-2010) 
  • General information
  • Vehicle description
  • Vehicle device
  • Vehicle operation
  • Maintenance
  • Power unit
  • Engine repair
  • Cooling and lubrication system
  • Supply system
  • Transmission
  • Clutch
  • Car gearbox
  • Cardan gear
  • Rear axle
  • Chassis
  • Suspension and shock absorbers
  • Steering
  • Brake system
  • Body
  • Body elements
  • Electrical equipment
  • Engine electrics
  • Equipment and devices


VAZ-21051 (1979-2010) 
  • General information
  • Introduction to guide
  • User manual
  • Troubleshooting
  • Power unit
  • Engine repair
  • Engine repair VAZ-2103
  • Cooling system
  • Lubrication system
  • Power and exhaust system
  • Fuel injection
  • Transmission
  • Clutch
  • Car gearbox
  • Cardan gear
  • Rear axle
  • Chassis
  • Suspension and shock absorbers
  • Steering
  • Brake system
  • Body
  • Exterior
  • Interior
  • Doors and windows
  • Electrical equipment
  • Equipment and devices
  • Engine electrics
  • Ignition system
  • Electrical circuits


VAZbook.ru © 2017 · Mobile version · Contact with administration · Sitemap: EN BG BY UA RS HR RO PL SK HU · Site search · News and articles VAZ-1111 · VAZ-11113 · VAZ-2101 · VAZ-21011 · VAZ-2104 · VAZ-2105 · VAZ-21051 · VAZ-2106 · VAZ-21061 · VAZ-2107 · VAZ-21099 · VAZ-2109 · VAZ-2108 · VAZ-2110 · VAZ-2112 · VAZ-2114 · VAZ-2115 · VAZ-2121 · VAZ-21213 · VAZ-21214 ·
The site stores technical data using cookies to improve the service.