




Contents: Windshield and headlight washers ↓ Windshield and headlight wipers ↓ Fastening of units and assemblies to…↓
To maintain the attractive appearance of the car, constant preventive maintenance of the body coating is required.
To avoid scratches, do not remove dust and dirt with a dry wiping material. Wash the car before the dirt dries, using a low-pressure stream of water and a soft sponge. Wash the car outdoors in the shade in the summer. If this is not possible, immediately wipe the washed surfaces dry, since after water droplets dry in the sun, stains form on the painted surface. In winter, after washing the car in a warm room, wipe the body dry before driving out, since frozen drops can cause cracks in the paintwork.
It is not recommended to use soda and alkaline solutions, as well as waste water, to wash the car, so that the coating does not fade.
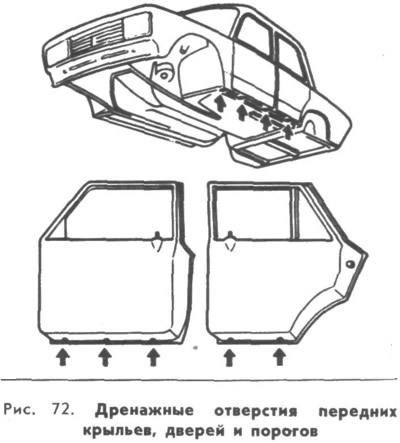
Before washing your car, clean the drainage holes in the front fenders, doors and sills (Fig. 72).
When washing your car, make sure that water does not come into contact with electrical components in the engine compartment.
If signs of corrosion of body parts are detected (corrosion deposits, local paint blisters, small chips, etc.) clean the damaged area with fine sandpaper, treat with "Omega-1" auto rust cleaner, cover with GF-020 primer and paint over with enamel from the can supplied with the car.
To maintain the shine of painted surfaces of the car (especially for vehicles stored outdoors) polish them regularly using polishing pastes or wax compounds. These pastes and compounds close microcracks and pores that appear in the paint coating during operation, which prevents corrosion from occurring under the paint layer.
To ensure that the car body surface retains its shine for a long time, do not leave the car in the sun for a long time, and do not allow acids, soda solutions, brake fluid and gasoline to come into contact with the car body surface.
To prevent stains on the paintwork under the fuel filler flap from gasoline, wipe the surface with a clean cloth before and after refueling.
To increase the corrosion resistance of the body, a special anti-corrosion compound is applied to the closed box-shaped cavities of the thresholds, side members, cross members and other elements of the body base. When operating a car, it is necessary to restore the protective coating of the hidden cavities of the body at service stations during the first year of operation and periodically once every 1.5-2 years. You can also protect the hidden cavities of the body yourself in a garage, using the "Movil" auto preservative for thresholds according to the instructions attached to the auto preparation. Diagrams of places especially susceptible to corrosion are shown in Fig. 73, 74, 75.
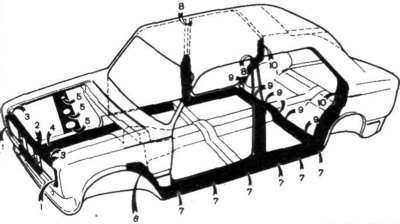
Fig. 73. Hidden cavities of the body (left view):
1 - headlight casings: 2 - lower cross member of the front end; 3 - upper front cross member; 4 - front side members; 5 - mudguard posts; 6 - front wings; 7 - internal and external door thresholds; 8 - central pillars; 9 - rear floor crossbars; 10 - rear pillars.
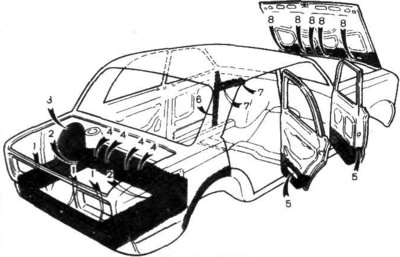
Fig. 74. Hidden cavities of the body (right view):
1 - lower rear cross member; 2 - rear floor side members; 3 - hind wings; 4 - rear floor crossbar; 5 - door pockets; 6 - front pillars; 7 - side and front panel connectors; 8 - hood pockets.
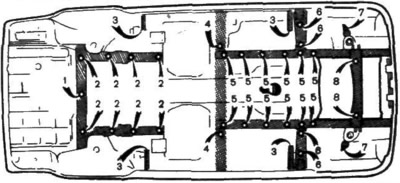
Fig. 75. Hidden cavities of the body (bottom view):
1 - rear floor crossbar; 2 - rear side members; 3 - jack brackets; 4 - middle floor crossbar; 5 - front floor rails; 6 - front side member reinforcements; 7 - Front suspension buffer brackets; 8 - front suspension cross member.
When operating a vehicle in conditions where corrosion is particularly active (road salt, damp climate, proximity to the sea, sources of industrial emissions into the atmosphere, etc.) it is advisable to install additional protective covers, available on the market, under the front fenders to separate the wheel from the rest of the space under the fender.
During the operation of the car, the coating on the bottom of the body is exposed to gravel, sand, salt. As a result of this exposure, the mastic and primer are erased, and the exposed metal rusts.
Therefore, regularly monitor the condition of the underbody coating and promptly restore damaged areas.
Removable shields are installed for inspection, cleaning from possible dirt ingress and restoration of the protective coating of the closed cavities of the front fenders.
Wipe chrome parts with a soft cloth and petroleum jelly.
In case of persistent salt deposits that cannot be removed with Vaseline, it is recommended to use "Auto Cleaner for Chrome Parts". To protect the inner surfaces of chrome bumpers and decorative wheel caps from corrosion, it is recommended to treat them with "Movil" auto sill preservative.
Avoid getting fuel on the bumpers, and do not use fuel to clean or wash them.
Wipe plastic parts with a damp cloth. It is not recommended to use gasoline or solvents, otherwise the plastic parts will lose their shine.
Clean the glass with a soft linen cloth or chamois. Wash very dirty glass first with water with the addition of NIISS-4 liquid (30 cm per 1 liter of water) or other auto preparations of the same purpose. To remove ice from glass, defrost door locks and trunk lid, it is recommended to use "Autodefroster-1" in an aerosol package.
At least once a month, remove dust from fabric upholstery. Wet greasy stains with gasoline, sprinkle with talc, and then remove the talc with a brush. Do not use gasoline or solvents to clean artificial leather upholstery. Use "Autocleaner-1 Upholstery", aqueous solutions of car shampoos, or neutral soap with water for these purposes, then wipe the upholstery dry with a soft cloth or chamois. At the same time, thoroughly wipe the rubber seals and the surfaces of the doors and trunk lid that come into contact with them with a damp cloth.
Every 10,000 km, check and lubricate the following components if necessary:
- door and trunk lid keyholes: a) in warm seasons - with graphite powder; b) in cold weather, especially after washing - with VTV-1 autolubricant in an aerosol can, after drying the wells with compressed air;
- door hinges, hood lock drive cable - engine oil;
- friction surfaces of the trunk lid torsion bar, door opening limiter, as well as the hinge and spring of the fuel tank lid - with VTV-1 auto lubricant in an aerosol package;
- seat movement slides - with consistent grease FIOL-1;
- axis 4 (Fig. 76), spring 5 and the points of contact between cracker 2 and body 1 of the door lock retainer - with FIOL-1 consistent grease, after having disassembled the retainer and washed the parts with gasoline.
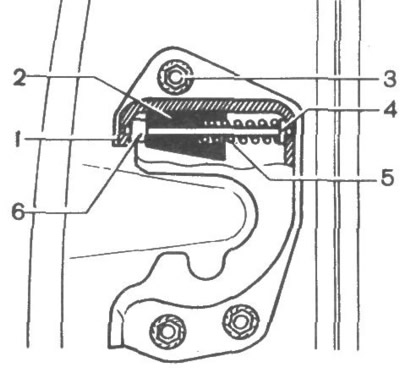
Fig. 76. Door lock retainer:
1 - retainer body; 2 - cracker; 3 - bolt; 4 - axis; 5 - spring; 6 - bushing.
The doors of the body should open and close easily. If the door closes tightly or not tightly, adjust the position of the lock retainer. Before adjusting, outline the retainer body on the body pillar with a pencil. If the door closes tightly, loosen bolts 3, move the retainer outward and tighten the bolts. If the door does not close tightly, move the retainer inward. If the door moves down when closing, lift the retainer and, conversely, lower it if the door rises.
When dismantling the door lock for any reason, wash it from old grease and lubricate it with fresh FIOL-1 consistent grease. It is not recommended to use other lubricants, since the lock may not work at low temperatures.
Windshield and headlight washers
Periodically flush the windshield and headlight washer reservoir, clean the intake filter of the washer system, clean the windshield and headlight washer nozzles, and check the direction of the fluid stream onto the windshield. The fluid stream should be directed onto the glass in the upper zone of the sector described by the windshield wiper. Change the direction of the stream by turning the nozzle with the fastening screw loosened. After adjustment, tighten the screw.
In the summer, you can fill the washer reservoir with clean water, and in the cold season, fill it with a mixture of "Avtoochistitel-2 glass cleaner" or NIISS-4 (25-33%) with water.
Windshield and headlight wipers
In cold weather, before turning on the windshield wipers, make sure that the brushes are not frozen to the glass. Failure to follow this recommendation may lead not only to the breakage of the brushes, but also to the failure of their electric drives.
(The information can be read on the website: VazBook.ru)
Fastening of units and assemblies to the body
Every 20,000 km, check and, if necessary, tighten the fastening parts of various units and assemblies to the body, including the fastening of the hood, trunk lid, and seat runners.