
English Русский
Български
Беларускі
Український
Српски
Hrvatski
Română
Polski
Slovenský
Magyar
| Articles | Contacts | Sitemap |   
Repair and maintenance Lada Repair and maintenance Mazda Repair and maintenance Mitsubishi Repair and maintenance Toyota Repair and maintenance Land Rover Repair and maintenance Hyundai Repair and maintenance Nissan
VAZbook.ru


Main     1111   2101   2105   2106   2107   2109   2110   2115   2121  
VAZ-2110 (1995-2007) VAZ-2112 (1999-2007)
  • Main
  • «Lada»
  • VAZ-2112
  • Body
  • Doors and glass
  • Front door lock — removal, installation and adjustment

Front door lock — removal, installation and adjustment (VAZ-2112)

            0

Contents: Removal ↓ Installation ↓ Adjustment ↓
Note: The door lock consists of an inner and outer part. If the outer part is faulty, it can be replaced without removing the door trim (see "Front Door Lock Outer Part - Replacement"). When replacing or repairing the interior of the lock, the door trim must be removed.


Removal


1. Remove the door trim (see "Front door trim - removal and installation").

2. Remove the plastic film from the door.

3. Using a Phillips screwdriver, unscrew the three screws securing the inner door opening handle.
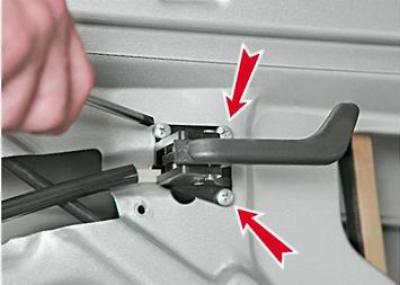
3. Using a Phillips screwdriver, unscrew the three screws securing the inner door opening handle.


4. Disconnect the inner handle rod from the lock:

a) Using an awl, remove the retainer from the lock lever pin (see pos. 4, photo p. 6).

b) Remove the washer and the rear end of the inner handle rod from the pin.

5. Remove the inner handle assembly with the rod.

6. Using a slotted screwdriver, disconnect the plastic tips of the outer handle of the lock (3) and the pull of the switch (larva) of the lock (2) from the lock levers. You do not need to detach the pull tip of the lock release button (1).
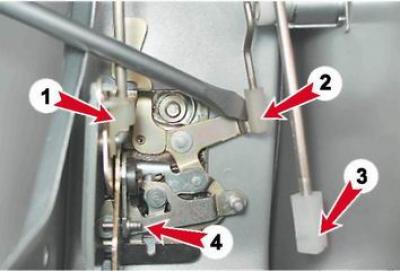
6. Using a slotted screwdriver, disconnect the plastic tips of the outer handle of the lock (3) and…


7. Disconnect the wiring blocks of the central lock switch.
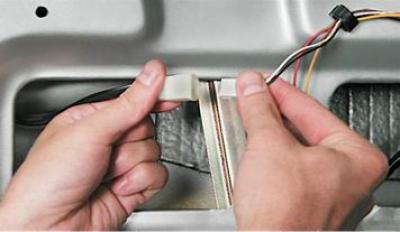


7. Disconnect the wiring blocks of the central lock switch.


8. Unscrew the two lock screws (see "Front Door Lock Outer Part - Replacement") and remove the outer part of the lock.
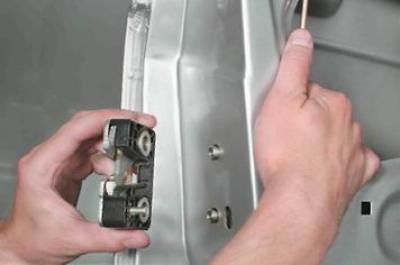
8. Unscrew the two lock screws (see «Front Door Lock Outer Part - Replacement») and remove the…


9. Remove the inner part of the lock together with the locking button rod and the central lock switch from the door.
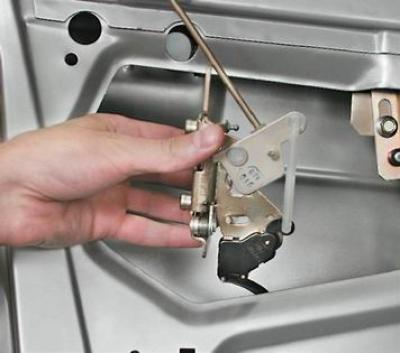
9. Remove the inner part of the lock together with the locking button rod and the central lock…


Note. The front right door has a locking motor-reducer. Remove it in the same way as the rear door motor-reducer (see "Rear door lock - removal, installation and adjustment").


The text is on the website: VazBook.ru

10. Before removing the lock retainer, mark its position on the middle pillar of the body (with a marker or felt-tip pen).

11. Remove the lock retainer (see "Front door lock - removal, installation and adjustment").

Note: There may be adjusting shims installed under the retainer. They should be installed in place during assembly.


Installation


We install the door lock in the reverse order.

Advice: It is convenient to put plastic tips on the ball joints of the lock levers using sliding pliers.


We install the lock retainer according to the marks applied to the body pillar. If the door does not close well (for example, with a metallic knock or having to slam the door hard to close it), adjust the lock (see below).

Adjustment


Note. The door lock is adjusted by changing the position of the latch on the rack. When closing the door, the protruding part of the latch body should not touch the door and the elements of the outer part of the lock.


The pin of the lock must enter the slot of the outer part of the lock without touching the edges of the slot.
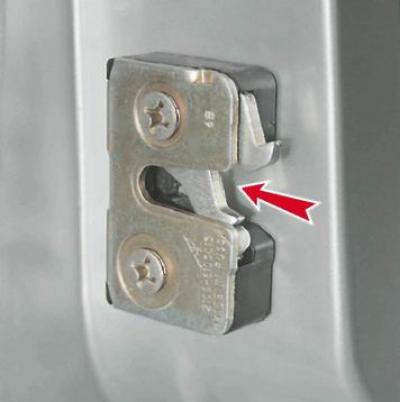
The pin of the lock must enter the slot of the outer part of the lock without touching the edges of…


1. Loosen the clamp pin and two clamp mounting screws (see above p. 9). By changing the position of the lock in the vertical plane, we achieve the optimal position of the lock pin in the slot of the lock.

2. We adjust the door closing density by moving the lock in the horizontal plane.

3. If the retainer touches the lock or the door, then we accordingly increase or decrease the number of adjusting shims installed under the retainer.

Tip: You can make additional adjustment shims yourself by cutting them out of sheet metal (for example, from aluminum).


4. After completing the adjustment, tighten the mounting screws and the lock retainer pin.


This article is available at russian, bulgarian, belarusian, ukrainian, serbian, croatian, romanian, polish, slovak, hungarian
The text was reviewed by the specialist: Grigory Vologodtsev

Share with friends:

Previous articles
VAZ-2112: Doors and glass
Next articles

Front Door Outside Handle — Removal and Installation
Front door lock switch (cylinder) — removal and installation
Front door trim — removal and installation
Front Door Lock Outer Part — Replacement
Front door window lifter — removal and installation
Front door glass — removal and installation
Front door opening limiter — removal and installation
Front door — removal and installation
Rear Door Trim — Removal and Installation

More articles from other manuals on VAZ cars:
➠ Front door lock — removal, installation and adjustment VAZ-2114 (2004-2013)
➠ Lock, cylinder and outer handle of the front door — removal and… VAZ-2104 (1984-2012)
➠ Front Door Lock and Outside Handle — Removal and Installation VAZ-2106 (1976-2006)
➠ Lock, cylinder and outer handle of the front door — removal and… VAZ-2107 (1982-2012)
➠ Adjusting the front door lock VAZ-2108 (1984-2003)
Link in different formats to this page


Visitor comments

No comments yet


How much will 26 + 15 ?


VAZ-2110 (1995-2007) 
  • General information
  • Vehicle description
  • Specifications
  • User manual
  • Maintenance
  • Operation and maintenance
  • Tips for car owner
  • Power unit
  • Engine repair
  • Supply system
  • Control system
  • Cooling system
  • Exhaust system
  • Transmission
  • Clutch
  • Car gearbox
  • Front wheel drives
  • Chassis
  • Suspension and wheels
  • Steering
  • Brake system
  • Body
  • Exterior
  • Interior
  • Doors and glass
  • Tailgate
  • Ventilation and heating
  • Electrical equipment
  • Equipment and devices
  • Headlights and lighting
  • Engine electrics
  • Electrical circuits


VAZ-2112 (1999-2007) 
  • General information
  • Operation and maintenance
  • Power unit
  • Engine repair
  • Supply system
  • Control system
  • Cooling system
  • Exhaust system
  • Transmission
  • Clutch
  • Car gearbox
  • Front wheel drives
  • Chassis
  • Wheels and tires
  • Car suspension
  • Steering
  • Brake system
  • Body
  • Exterior
  • Interior
  • Doors and glass
  • Tailgate
  • Ventilation and heating
  • Electrical equipment
  • Equipment and devices
  • Headlights and lighting
  • Engine electrics
  • Electrical circuits


VAZbook.ru © 2017 · Mobile version · Contact with administration · Sitemap: EN BG BY UA RS HR RO PL SK HU · Site search · News and articles VAZ-1111 · VAZ-11113 · VAZ-2101 · VAZ-21011 · VAZ-2104 · VAZ-2105 · VAZ-21051 · VAZ-2106 · VAZ-21061 · VAZ-2107 · VAZ-21099 · VAZ-2109 · VAZ-2108 · VAZ-2110 · VAZ-2112 · VAZ-2114 · VAZ-2115 · VAZ-2121 · VAZ-21213 · VAZ-21214 ·
The site stores technical data using cookies to improve the service.