




Fuel tank and fuel lines
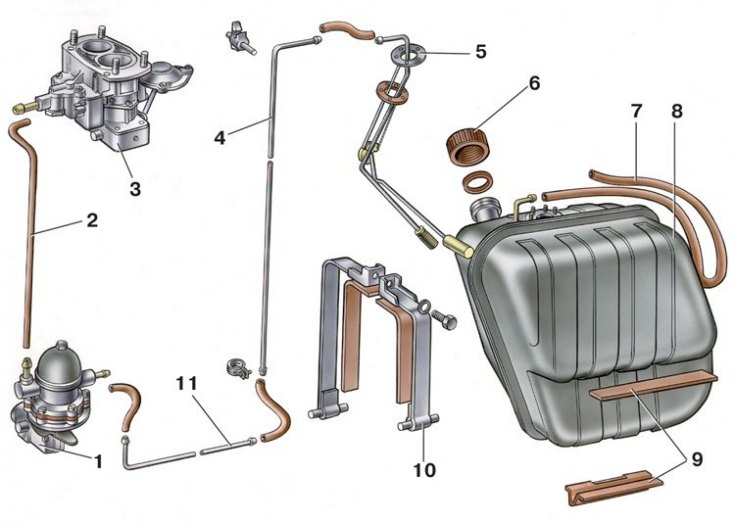
1 – fuel pump; 2 – hose from the fuel pump to the carburetor; 3 – carburetor; 4 – rear tube; 5 – fuel level and reserve indicator sensor; 6 – fuel tank cap; 7 – fuel tank ventilation pipe; 8 – fuel tank; 9 – gaskets; 10 – fuel tank mounting clamp; 11 – front tube
Removal and installation
1. Remove the battery ground wire.
2. Unscrew plug 6 of the filler pipe, drain plug and drain the gasoline (on cars produced since 1985, there is no drain plug).
3. Remove the fuel tank shield.
4. Disconnect the ground, fuel gauge and fuel reserve wires.
5. Disconnect the fuel supply and fuel tank vent hoses.
6. Unscrew clamp bolt 10 and remove the fuel tank.
7. Install the fuel tank in reverse order.
(The original source is located on the website: vazbook.ru)
Cleaning and control
1. Remove the fuel level sensor from the tank. To remove dirt and deposits, flush the tank with gasoline. Then flush the tank with a stream of hot water and steam it to remove gasoline residue.
2. Carefully inspect the tank along the joint line and make sure there are no leaks. Solder any leaks along the joint with soft solder.
Warning! You can only solder a well-washed and steamed tank that does not contain gasoline vapors, so that there is no ignition or explosion during soldering.