




Repair of rear axle and gearbox VAZ-21213

Rear axle device
The rear axle structure is shown in Fig. 3-54. Fig. 3-54. Rear axle: 1 - decorative cap; 2 - brake drum and wheel mounting bolt; 3 - axle shaft bearing oil deflector; 4 - brake...
The rear axle structure is shown in Fig. 3-54. Fig. 3-54. Rear axle: 1 - decorative cap; 2 - brake drum and wheel mounting bolt; 3 - axle shaft bearing oil deflector; 4 - brake...

Possible malfunctions of the rear axle, their causes and methods of elimination
Increased noise from the rear wheels Cause of malfunction Method of elimination 1. The wheel mount has become loose. 1. Tighten the wheel nuts. 2. Wear or destruction of the axle...
Increased noise from the rear wheels Cause of malfunction Method of elimination 1. The wheel mount has become loose. 1. Tighten the wheel nuts. 2. Wear or destruction of the axle...
Removal and installation the rear axle
Removal and installation of the rear axle beam are described in subsection. " Rear suspension ". To remove the rear axle, it is sufficient to disconnect the suspension rods and...
Removal and installation of the rear axle beam are described in subsection. " Rear suspension ". To remove the rear axle, it is sufficient to disconnect the suspension rods and...

Disassembly and assembly of the rear axle
Disassembly Remove the brake system pipe with tee from the bridge, disconnecting the ends of the pipes from the brake wheel cylinders. Place the bridge on a repair stand and drain...
Disassembly Remove the brake system pipe with tee from the bridge, disconnecting the ends of the pipes from the brake wheel cylinders. Place the bridge on a repair stand and drain...

Checking the rear axle beam
Carefully check the technical condition of the beam, especially when repairing a car that has suffered an accident. A deformed beam can cause rear axle noise and accelerated tire...
Carefully check the technical condition of the beam, especially when repairing a car that has suffered an accident. A deformed beam can cause rear axle noise and accelerated tire...

Rear axle beam straightening
Attach flanges A.70172 to each end of the beam (used for straightening, not for checking beams) and install it on the supports of the hydraulic press so that the ends of the...
Attach flanges A.70172 to each end of the beam (used for straightening, not for checking beams) and install it on the supports of the hydraulic press so that the ends of the...
Removal and installation axle shafts
Remove the wheel and brake drum. After unscrewing the nuts securing the brake shield to the axle beam, use the ejector 67.7823.9516, holding the brake shield, to remove the axle...
Remove the wheel and brake drum. After unscrewing the nuts securing the brake shield to the axle beam, use the ejector 67.7823.9516, holding the brake shield, to remove the axle...
Checking the technical condition of the axle shafts
Check the technical condition of the parts included in the kit and make sure that: the ball bearing is not worn or damaged; if the axial clearance exceeds 0.7 mm, replace the...
Check the technical condition of the parts included in the kit and make sure that: the ball bearing is not worn or damaged; if the axial clearance exceeds 0.7 mm, replace the...

Removal the axle shaft locking ring
The axle bearing retaining ring must be removed and installed using a hydraulic press only. Pre-bend the holders 39 outwards ( fig. 3-54 ) bolts securing plate 38 with oil...
The axle bearing retaining ring must be removed and installed using a hydraulic press only. Pre-bend the holders 39 outwards ( fig. 3-54 ) bolts securing plate 38 with oil...

Assembly of the axle shaft
Place the axle shaft vertically, resting its flange on ring 7 (Fig. 3-62) of tool 67.7823.9530. Install the axle shaft bearing oil deflector and bearing mounting plate with...
Place the axle shaft vertically, resting its flange on ring 7 (Fig. 3-62) of tool 67.7823.9530. Install the axle shaft bearing oil deflector and bearing mounting plate with...

Measuring the axial free play of the axle shaft on a vehicle
Loosen the rear wheel nuts. Place chocks under the front wheels and lift the rear axle off the ground. Release the parking brake and set the gearshift lever to neutral. Remove the...
Loosen the rear wheel nuts. Place chocks under the front wheels and lift the rear axle off the ground. Release the parking brake and set the gearshift lever to neutral. Remove the...

Rear axle gearbox
The rear axle gearbox assembly is shown in Fig. 3-65. It is unified with the VAZ-2106 gearbox and has a mark on the housing in the form of the number 6. Fig. 3-65. Rear axle...
The rear axle gearbox assembly is shown in Fig. 3-65. It is unified with the VAZ-2106 gearbox and has a mark on the housing in the form of the number 6. Fig. 3-65. Rear axle...
Determining gearbox faults by noise
Troubleshoot in the following order. Test 1 To clearly identify the nature of the noise, drive the car on the highway at approximately 20 km/h. Then gradually increase the speed...
Troubleshoot in the following order. Test 1 To clearly identify the nature of the noise, drive the car on the highway at approximately 20 km/h. Then gradually increase the speed...
Removal and installation the rear axle gearbox
Removal If it is necessary to remove only one gearbox: drain the oil from the rear axle beam; raise the rear of the car, place it on stands and remove the wheels and brake drums;...
Removal If it is necessary to remove only one gearbox: drain the oil from the rear axle beam; raise the rear of the car, place it on stands and remove the wheels and brake drums;...

Disassembling the rear axle gearbox
Secure the gearbox to the stand. Remove the locking plates 9 ( fig. 3-65 ), unscrew bolts 7 and remove covers 8 of the differential box bearings, adjusting nuts 10 and outer rings...
Secure the gearbox to the stand. Remove the locking plates 9 ( fig. 3-65 ), unscrew bolts 7 and remove covers 8 of the differential box bearings, adjusting nuts 10 and outer rings...
Checking the technical condition of gearbox parts
Before inspecting the gearbox parts, rinse them thoroughly. This will make it easier to detect wear and damage to the parts. Check if there is any damage to the main gear teeth...
Before inspecting the gearbox parts, rinse them thoroughly. This will make it easier to detect wear and damage to the parts. Check if there is any damage to the main gear teeth...

Rear axle gearbox assembly
Reliable operation of the gearbox is ensured by strict adherence to the following assembly and adjustment techniques. The gearbox parts are shown in Fig. 3-69. Fig. 3-69. Rear...
Reliable operation of the gearbox is ensured by strict adherence to the following assembly and adjustment techniques. The gearbox parts are shown in Fig. 3-69. Fig. 3-69. Rear...

Installing and adjusting the drive gear
The correct position of the drive gear relative to the driven gear is ensured by selecting the thickness of the adjusting ring installed between the end of the drive gear and the...
The correct position of the drive gear relative to the driven gear is ensured by selecting the thickness of the adjusting ring installed between the end of the drive gear and the...

Adjusting the pinion bearings
To limit axial displacements of the drive gear under operating loads, it is very important to create a preload in its bearings within specified limits. The preload is controlled...
To limit axial displacements of the drive gear under operating loads, it is very important to create a preload in its bearings within specified limits. The preload is controlled...

Installing the differential box
Install the pre-assembled differential box into the crankcase together with the outer bearing rings. Install two adjusting nuts 4 (Fig. 3-77) so that they contact the bearing...
Install the pre-assembled differential box into the crankcase together with the outer bearing rings. Install two adjusting nuts 4 (Fig. 3-77) so that they contact the bearing...

Preload of differential box bearings and adjustment of lateral clearance in the engagement of final drive gears
These operations are performed simultaneously using the A.95688/R tool and the A.55085 key. Attach the device to the gearbox housing. ( fig. 3-77 ) screws 1 and 6, screwing them...
These operations are performed simultaneously using the A.95688/R tool and the A.55085 key. Attach the device to the gearbox housing. ( fig. 3-77 ) screws 1 and 6, screwing them...
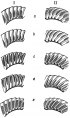
Checking the contact of the working surface of the main gear teeth
For the final test of the quality of the main gear engagement on the stand: install the adjusted gearbox on the stand and lubricate the working surfaces of the driven gear teeth...
For the final test of the quality of the main gear engagement on the stand: install the adjusted gearbox on the stand and lubricate the working surfaces of the driven gear teeth...
Replacing the pinion seal
The need to replace the seal is determined by the decrease in the oil level in the rear axle housing (due to oil leakage through the seal) to a level that disrupts the normal...
The need to replace the seal is determined by the decrease in the oil level in the rear axle housing (due to oil leakage through the seal) to a level that disrupts the normal...
This section is available on russian, bulgarian, belarusian, ukrainian, serbian, croatian, romanian, polish, slovak, hungarian
More articles from other manuals on VAZ cars:
➠ Transmission: Rear axle VAZ-21051 (1979-2010)
➠ Transmission: Rear axle VAZ-2107 (1982-2012)
➠ Transmission: Rear axle VAZ-21011 (1974-1983)
➠ Transmission: Rear axle VAZ-2106 (1976-2006)
➠ Transmission: Rear axle VAZ-21051 (1979-2010)
➠ Transmission: Rear axle VAZ-2107 (1982-2012)
➠ Transmission: Rear axle VAZ-21011 (1974-1983)
➠ Transmission: Rear axle VAZ-2106 (1976-2006)
Share with friends:
- General information
- Vehicle device
- Car VAZ-21219
- Power unit
- Engine repair
- Cooling system
- Lubrication system
- Supply system
- Transmission
- Clutch
- Car gearbox
- Transfer case
- Cardan gear
- Rear axle and gearbox
- Front axle
- Chassis
- Front suspension
- Rear suspension
- Steering
- Brake system
- Body
- Exterior
- Interior
- Doors and windows
- Electrical equipment
- Equipment and devices
- Headlights and lighting
- Engine electrics
- General information
- Vehicle device
- User manual
- Power unit
- Engine repair
- Cooling and lubrication system
- Supply system
- Transmission
- Clutch
- Car gearbox
- Transfer case
- Cardan gear
- Rear axle and shafts
- Front axle and wheel drive
- Chassis
- Wheel suspension
- Steering
- Brake system
- Body
- Exterior
- Interior
- Electrical equipment
- Engine electrics
- Equipment and devices
- General information
- Vehicle information
- Troubleshooting
- Power unit
- Engine repair
- Cooling system
- Fuel system (carburetor)
- Fuel system (injector)
- Ignition system
- Control system
- Exhaust system
- Transmission
- Clutch
- Car gearbox
- Transfer case
- Cardan gear
- Front axle
- Rear axle
- Chassis
- Front suspension
- Rear suspension
- Steering
- Brake system
- Body
- Exterior
- Interior
- Doors, covers and windows
- Ventilation and heating
- Electrical equipment
- Equipment and devices
- Headlights and lighting
- Engine electrics
- Electrical circuits