
English Русский
Български
Беларускі
Український
Српски
Hrvatski
Română
Polski
Slovenský
Magyar
| Articles | Contacts | Sitemap |   
Repair and maintenance Lada Repair and maintenance Mazda Repair and maintenance Mitsubishi Repair and maintenance Toyota Repair and maintenance Land Rover Repair and maintenance Hyundai Repair and maintenance Nissan
VAZbook.ru


Main     1111   2101   2105   2106   2107   2109   2110   2115   2121  
VAZ-2106 (1976-2006) VAZ-21061 (1976-2006)
  • Main
  • «Zhiguli»
  • VAZ-2106
  • Electrical equipment
  • Engine electrics
  • Voltage Regulator — Checking and Replacing

Voltage Regulator — Checking and Replacing (VAZ-2106)

            0

Contents: Examination ↓ Removal ↓ Installation ↓
The voltage regulator is located in the engine compartment on the top of the left mudguard. If the battery in the car is constantly overcharged (the electrolyte boils away and you constantly have to add distilled water), the regulator may be faulty.

Examination


To complete the work you will need a multimeter.

1. Prepare the car for work (see "Preparing a car for maintenance and repair").

2. Check the electrolyte level and the state of charge of the battery, add distilled water if necessary and charge the battery (see "Battery pack - Maintenance").

[The article is taken from an online resource: vazbook.ru]

3. Check the tension of the generator drive belt and adjust it if necessary (see "Generator Drive Belt - Adjustment and Replacement").

4. Start the engine, use the carburetor air damper control handle to set the crankshaft speed to 2500-3000 rpm and turn off all consumers except the ignition system.

5. Measure the voltage at the battery terminals. If the voltage does not exceed 14.5 V, the regulator is working properly. If the voltage is less than 13.9 V, you need to check the contacts in the electrical circuit connections or the regulator is faulty.

Removal


1. Disconnect the wire from the negative terminal of the battery (see "Battery - Removal and Installation").

2. With a socket wrench by 8 mm we unscrew the two nuts securing the regulator.
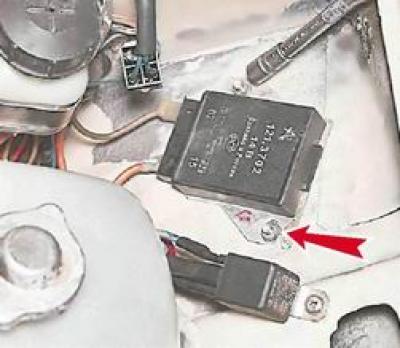
2. With a socket wrench by 8 mm we unscrew the two nuts securing the regulator.


3. Having marked or remembered the location of the wires, we disconnect them from the terminals of the regulator.
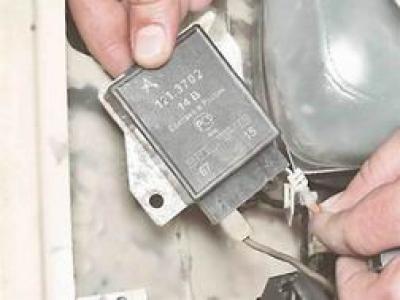


3. Having marked or remembered the location of the wires, we disconnect them from the terminals of…


Installation


The regulator is installed in the reverse order.

Attention! When connecting the wires to the controller, do not mix them up. If connected incorrectly, the voltage in the power grid will increase significantly, which will damage the power consumers. The orange wire is connected to terminal "15", and the gray wire is connected to terminal "67" (see "Electrical diagrams").


This article is available at russian, bulgarian, belarusian, ukrainian, serbian, croatian, romanian, polish, slovak, hungarian
The text was reviewed by the specialist: Grigory Vologodtsev

Share with friends:

Previous articles
VAZ-2106: Engine electrics
Next articles

Generator Drive Belt — Tension Adjustment and Replacement
Description of the generator design
Battery — Removal and Installation
Battery pack — Maintenance
Rechargeable battery
Generator — removal and installation
Generator — Checking and Repairing
Description of the starter design
Starter — removal and installation
Starter — check and repair

More articles from other manuals on VAZ cars:
➠ Voltage Regulator and Capacitor — Checking and Replacing VAZ-2112 (1999-2007)
➠ Voltage Regulator — Checking and Replacing VAZ-2114 (2004-2013)
➠ Replacing the brush holder with voltage regulator VAZ-11113 (1996-2003)
➠ Checking and adjusting the voltage regulator VAZ-2101 (1970-1983)
➠ Brake Pressure Regulator — Checking and Replacing VAZ-2104 (1984-2012)
Link in different formats to this page


Visitor comments

No comments yet


How much will 48 + 43 ?


VAZ-2106 (1976-2006) 
  • General information
  • Vehicle device
  • Operation and maintenance
  • Power unit
  • Engine repair
  • Supply system
  • Cooling system
  • Exhaust system
  • Transmission
  • Clutch
  • Car gearbox
  • Cardan gear
  • Rear axle
  • Chassis
  • Front suspension
  • Rear suspension
  • Wheels and tires
  • Steering
  • Brake system
  • Body
  • Exterior
  • Interior
  • Doors and glass
  • Electrical equipment
  • Equipment and devices
  • Headlights and lighting
  • Engine electrics
  • Electrical circuits


VAZ-21061 (1976-2006) 
  • General information
  • Specifications
  • Troubleshooting
  • Power unit
  • Engine repair
  • Cooling and lubrication system
  • Power and exhaust system
  • Transmission
  • Clutch
  • Car gearbox
  • Cardan gear
  • Rear axle
  • Chassis
  • Front suspension
  • Rear suspension
  • Steering
  • Brake system
  • Body
  • Exterior
  • Interior
  • Doors and windows
  • Heating and ventilation
  • Electrical equipment
  • Equipment and devices
  • Engine electrics
  • Ignition system
  • Lighting and signaling


VAZbook.ru © 2017 · Mobile version · Contact with administration · Sitemap: EN BG BY UA RS HR RO PL SK HU · Site search · News and articles VAZ-1111 · VAZ-11113 · VAZ-2101 · VAZ-21011 · VAZ-2104 · VAZ-2105 · VAZ-21051 · VAZ-2106 · VAZ-21061 · VAZ-2107 · VAZ-21099 · VAZ-2109 · VAZ-2108 · VAZ-2110 · VAZ-2112 · VAZ-2114 · VAZ-2115 · VAZ-2121 · VAZ-21213 · VAZ-21214 ·
The site stores technical data using cookies to improve the service.