
English Русский
Български
Беларускі
Український
Српски
Hrvatski
Română
Polski
Slovenský
Magyar
| Articles | Contacts | Sitemap |   
Repair and maintenance Lada Repair and maintenance Mazda Repair and maintenance Mitsubishi Repair and maintenance Toyota Repair and maintenance Land Rover Repair and maintenance Hyundai Repair and maintenance Nissan
VAZbook.ru


Main     1111   2101   2105   2106   2107   2109   2110   2115   2121  
VAZ-2114 (2004-2013) VAZ-2115 (1997-2012)
  • Main
  • «Samara-2»
  • VAZ-2114
  • Electrical equipment
  • Equipment and devices
  • Coolant Temperature Gauge Sensor — Checking and Replacing

Coolant Temperature Gauge Sensor — Checking and Replacing (VAZ-2114)

            0

Contents: Removal ↓ Examination ↓ Installation ↓
To complete the work you will need:
  • multimeter in ohmmeter mode with a measurement range from 0.1 to 10 kOhm;
  • thermometer with a range of at least 100°C;
  • a small heat-resistant container with a capacity of about 0.5 l.

Tip: The thermometer can be replaced with a digital multimeter with a temperature measurement mode.


Removal


1. Drain the coolant (see "Coolant - replacement").

2. For ease of work, remove the air filter (see "Air filter - removal and installation").

3. Remove the protective cover from the sensor and disconnect the wire tip from the sensor output.
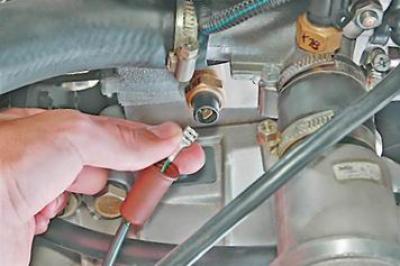
3. Remove the protective cover from the sensor and disconnect the wire tip from the sensor output.


4. Key by 21 mm we unscrew the sensor from the cylinder head.
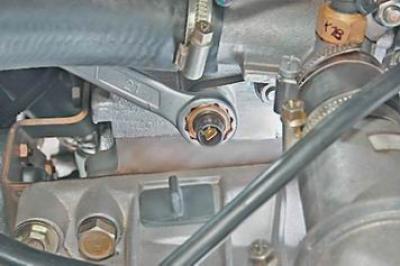
4. Key by 21 mm we unscrew the sensor from the cylinder head.


Examination


We check the sensor in the same way as the engine management system coolant temperature sensor (see "Coolant Temperature Sensor - Checking and Replacing"). The ohmmeter probes should be connected to the terminal and to the sensor body.


Original source is on the resource VAZbook.ru

The resistance of a good sensor should be close to the data specified in the table:

Coolant temperature,°CCoolant temperature sensor resistance, Ohm
100less than 109
90155-196
70280-390
50585-820
301350-1880

We replace the faulty sensor. The sensor marking is on the hexagonal part of its body.
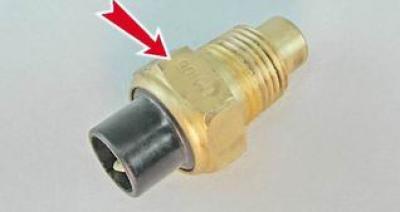
We replace the faulty sensor. The sensor marking is on the hexagonal part of its body.


Installation


We install the sensor in the reverse order of removal.

Fill the engine cooling system with liquid. Start the engine and make sure there are no coolant leaks from under the sensor. If necessary, reinstall the sensor, applying heat-resistant sealant to its threaded part.


This article is available at russian, bulgarian, belarusian, ukrainian, serbian, croatian, romanian, polish, slovak, hungarian
The text was reviewed by the specialist: Grigory Vologodtsev

Share with friends:

Previous articles
VAZ-2114: Equipment and devices
Next articles

On-board control system indicator unit — removal and installation
Instrument cluster — replacing bulbs
Instrument cluster — removal and installation
Control and measuring instruments and sensors
Horn — adjustment and replacement
Oil Pressure Sensor — Replacement
Low Brake Fluid Sensor — Checking and Replacing
Windshield washer reservoir low fluid level sensor — checking and replacing
Low Coolant Level Sensor in Expansion Tank — Checking and Replacing
Low Oil Level Sensor — Checking and Replacing

More articles from other manuals on VAZ cars:
➠ Coolant Temperature Sensor — Checking and Replacing VAZ-2104 (1984-2012)
➠ Replacing the coolant temperature gauge sensor VAZ-21061 (1976-2006)
➠ Coolant Temperature Sensor — Checking and Replacing VAZ-2107 (1982-2012)
➠ Removal and checking the coolant temperature gauge sensor VAZ-2110 (1995-2007)
➠ Coolant Temperature Gauge Sensor VAZ-21011 (1974-1983)
Link in different formats to this page


Visitor comments

No comments yet


How much will 39 + 31 ?


VAZ-2114 (2004-2013) 
  • General information
  • Operation and maintenance
  • Power unit
  • Engine repair
  • Cooling system
  • Supply system
  • Control system
  • Exhaust system
  • Transmission
  • Clutch
  • Car gearbox
  • Front wheel drives
  • Chassis
  • Wheels and tires
  • Front suspension
  • Rear suspension
  • Steering
  • Brake system
  • Body
  • Exterior
  • Interior
  • Doors and glass
  • Tailgate
  • Ventilation and heating
  • Electrical equipment
  • Equipment and devices
  • Headlights and lighting
  • Engine electrics
  • Electrical circuits


VAZ-2115 (1997-2012) 
  • General information
  • Vehicle device
  • Operation manual
  • Vehicle malfunctions
  • Car care
  • Power unit
  • Engine repair
  • Cooling system
  • Supply system
  • Control system
  • Exhaust system
  • Transmission
  • Clutch
  • Car gearbox
  • Front wheel drives
  • Chassis
  • Front suspension
  • Rear suspension
  • Steering
  • Brake system
  • Body
  • Exterior
  • Interior
  • Doors, covers and windows
  • Electrical equipment
  • Equipment and devices
  • Headlights and lighting
  • Engine electrics
  • Anti-theft system


VAZbook.ru © 2017 · Mobile version · Contact with administration · Sitemap: EN BG BY UA RS HR RO PL SK HU · Site search · News and articles VAZ-1111 · VAZ-11113 · VAZ-2101 · VAZ-21011 · VAZ-2104 · VAZ-2105 · VAZ-21051 · VAZ-2106 · VAZ-21061 · VAZ-2107 · VAZ-21099 · VAZ-2109 · VAZ-2108 · VAZ-2110 · VAZ-2112 · VAZ-2114 · VAZ-2115 · VAZ-2121 · VAZ-21213 · VAZ-21214 ·
The site stores technical data using cookies to improve the service.