
English Русский
Български
Беларускі
Український
Српски
Hrvatski
Română
Polski
Slovenský
Magyar
| Articles | Contacts | Sitemap |   
Repair and maintenance Lada Repair and maintenance Mazda Repair and maintenance Mitsubishi Repair and maintenance Toyota Repair and maintenance Land Rover Repair and maintenance Hyundai Repair and maintenance Nissan
VAZbook.ru


Main     1111   2101   2105   2106   2107   2109   2110   2115   2121  
VAZ-2114 (2004-2013) VAZ-2115 (1997-2012)
  • Main
  • «Samara-2»
  • VAZ-2114
  • Electrical equipment
  • Equipment and devices
  • Windshield washer reservoir low fluid level sensor — checking and replacing

Windshield washer reservoir low fluid level sensor — checking and replacing (VAZ-2114)

            0

Contents: Removal ↓ Installation ↓
Note: If there is less than one liter of fluid in the windshield washer reservoir, the corresponding indicator lamp in the on-board control system indicator unit should light when the ignition is on. Otherwise, the indicator light unit is faulty (see "On-board control system indicator unit - removal and installation") or, a sensor for insufficient fluid level in the washer reservoir, or their circuit is faulty. The terminals in the sensor wiring harness block may have oxidized.


To complete the work you will need a multimeter (in voltmeter and ohmmeter mode).

Removal


1. Prepare the car for work (see "Preparing the car for maintenance and repair").

2. Disconnect the wiring harness connector from the sensor.
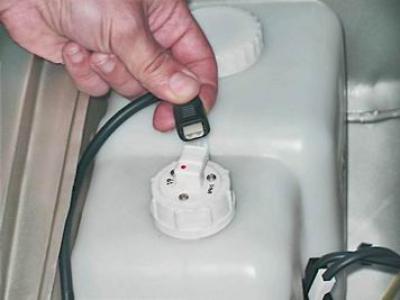
2. Disconnect the wiring harness connector from the sensor.


3. Using a piece of wire or a metal paper clip, short-circuit the terminals of the junction block. If the low fluid level indicator lamp in the windshield washer reservoir lights up, the sensor is faulty. If the lamp does not light, measure the voltage at the terminals of the junction block with a voltmeter when the ignition is on. The voltage should be about 12 V. If voltage does not reach the block, there may be poor contact or a broken wire in the sensor circuit, or the indicator unit is faulty.


4. Unscrew the sensor cover. Remove the sensor by removing the sensor float from the tank.
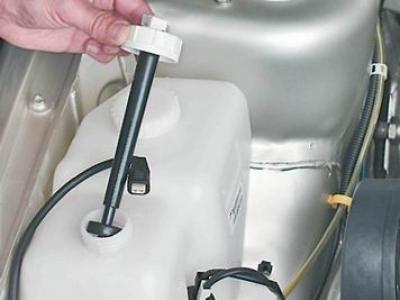
4. Unscrew the sensor cover. Remove the sensor by removing the sensor float from the tank.


5. Connect the multimeter (in ohmmeter mode) to the sensor terminals.

6. By moving the float from one extreme position to another, we check the readings of the device. The electrical resistance of a working sensor in the upper position of the float should be infinitely large, and in the others - close to zero.

Recommendation: Oxidized terminals in the socket should be cleaned with an awl or a thin file. Damaged sections of wires should be restored. The faulty sensor and indicator unit are replaced (see "On-board control system indicator unit - removal and installation").


Installation


We install the new sensor in the reverse order.


This article is available at russian, bulgarian, belarusian, ukrainian, serbian, croatian, romanian, polish, slovak, hungarian
The text was reviewed by the specialist: Grigory Vologodtsev

Share with friends:

Previous articles
VAZ-2114: Equipment and devices
Next articles

Low Brake Fluid Sensor — Checking and Replacing
Oil Pressure Sensor — Replacement
Coolant Temperature Gauge Sensor — Checking and Replacing
On-board control system indicator unit — removal and installation
Instrument cluster — replacing bulbs
Low Coolant Level Sensor in Expansion Tank — Checking and Replacing
Low Oil Level Sensor — Checking and Replacing
Ambient Air Temperature Sensor — Replacement
Windscreen wipers and washers
Windscreen wiper — removal and installation

More articles from other manuals on VAZ cars:
➠ Checking the fluid level in the windshield washer reservoir VAZ-1111 (1988-1996)
➠ Windshield Washer Reservoir — Refilling Fluid Level VAZ-2104 (1984-2012)
➠ Windshield Washer Reservoir — Refilling Fluid Level VAZ-2107 (1982-2012)
➠ Checking the level and adding fluid to the washer reservoir VAZ-21099 (1990-2004)
➠ Checking and replacing the brake fluid level sensor VAZ-2110 (1995-2007)
Link in different formats to this page


Visitor comments

No comments yet


How much will 42 + 43 ?


VAZ-2114 (2004-2013) 
  • General information
  • Operation and maintenance
  • Power unit
  • Engine repair
  • Cooling system
  • Supply system
  • Control system
  • Exhaust system
  • Transmission
  • Clutch
  • Car gearbox
  • Front wheel drives
  • Chassis
  • Wheels and tires
  • Front suspension
  • Rear suspension
  • Steering
  • Brake system
  • Body
  • Exterior
  • Interior
  • Doors and glass
  • Tailgate
  • Ventilation and heating
  • Electrical equipment
  • Equipment and devices
  • Headlights and lighting
  • Engine electrics
  • Electrical circuits


VAZ-2115 (1997-2012) 
  • General information
  • Vehicle device
  • Operation manual
  • Vehicle malfunctions
  • Car care
  • Power unit
  • Engine repair
  • Cooling system
  • Supply system
  • Control system
  • Exhaust system
  • Transmission
  • Clutch
  • Car gearbox
  • Front wheel drives
  • Chassis
  • Front suspension
  • Rear suspension
  • Steering
  • Brake system
  • Body
  • Exterior
  • Interior
  • Doors, covers and windows
  • Electrical equipment
  • Equipment and devices
  • Headlights and lighting
  • Engine electrics
  • Anti-theft system


VAZbook.ru © 2017 · Mobile version · Contact with administration · Sitemap: EN BG BY UA RS HR RO PL SK HU · Site search · News and articles VAZ-1111 · VAZ-11113 · VAZ-2101 · VAZ-21011 · VAZ-2104 · VAZ-2105 · VAZ-21051 · VAZ-2106 · VAZ-21061 · VAZ-2107 · VAZ-21099 · VAZ-2109 · VAZ-2108 · VAZ-2110 · VAZ-2112 · VAZ-2114 · VAZ-2115 · VAZ-2121 · VAZ-21213 · VAZ-21214 ·
The site stores technical data using cookies to improve the service.