
English Русский
Български
Беларускі
Український
Српски
Hrvatski
Română
Polski
Slovenský
Magyar
| Articles | Contacts | Sitemap |   
Repair and maintenance Lada Repair and maintenance Mazda Repair and maintenance Mitsubishi Repair and maintenance Toyota Repair and maintenance Land Rover Repair and maintenance Hyundai Repair and maintenance Nissan
VAZbook.ru


Main     1111   2101   2105   2106   2107   2109   2110   2115   2121  
VAZ-2114 (2004-2013) VAZ-2115 (1997-2012)
  • Main
  • «Samara-2»
  • VAZ-2114
  • Power unit
  • Control system
  • Spark plugs — checking and replacing

Spark plugs — checking and replacing (VAZ-2114)

            0

Recommendation: Spark plugs should be replaced every 30,000 km, or when they fail, if the engine starts to idle unstably.


To perform the work you will need a special socket wrench for spark plugs by 21 mm.

Sequence of execution


1. Remove the high-voltage wire from the spark plug of the first cylinder (see above, "High voltage wires - checking and replacement").

2. Wipe with a rag and blow compressed air from a tire pump at the spark plug installation site (to prevent sand from getting into the cylinder after removing the spark plug).

3. With a spark plug socket wrench by 21 mm we turn away the candle.
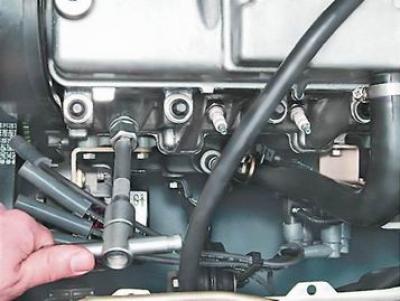
3. With a spark plug socket wrench by 21 mm we turn away the candle.


Note: The condition of the spark plug can be used to assess the technical condition of the engine and its systems. In a serviceable engine, the spark plug insulator should have a gray or brownish coating. Red or orange coating is caused by operating the car on gasoline with a high additive content. Black oily coating can be caused by oil penetrating the combustion chamber. A spark plug with a heat rating lower than recommended may cause electrode burnout. Similar damage to the spark plug may be caused by a malfunction of the cooling system or ignition system. Large deposits on the spark plug may be caused by poor-quality gasoline or oil.


4. Before installing the spark plug, use a set of round feeler gauges to check the gap between its electrodes. The gap should be 1.0-1.1 mm.
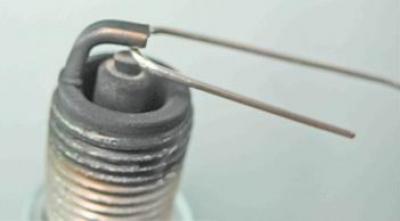
4. Before installing the spark plug, use a set of round feeler gauges to check the gap between its…


Note: When checking the gap with flat feeler gauges, the measurement results will be incorrect.


5. Adjust the gap by bending the side electrode.

Warning! To avoid damaging the threads in the cylinder head, first tighten the spark plug by hand and then tighten it by inserting the handle into the wrench extension. The spark plug tightening torque is 30-40 Nm.


6. Screw the spark plug into the cylinder head and put the high-voltage wire tip on it.

7. Replace the spark plugs of the remaining cylinders in the same way.


This article is available at russian, bulgarian, belarusian, ukrainian, serbian, croatian, romanian, polish, slovak, hungarian
The text was reviewed by the specialist: Grigory Vologodtsev

Share with friends:

Previous articles
VAZ-2114: Control system
Next articles

High Voltage Wires — Checking and Replacing
Engine Management System Relays and Fuses
Engine Management System — Technical Condition Check
Description of the design of the engine control system
Technical characteristics of the engine management system
Ignition Coil (Module) — Checking and Replacing
Injectors — checking and replacement
Idle speed control valve — checking and replacing
Evaporative Canister Purge Valve — Checking and Replacing
Crankshaft Position Sensor — Checking and Replacing

More articles from other manuals on VAZ cars:
➠ Checking and replacing spark plugs VAZ-1111 (1988-1996)
➠ Checking and replacing spark plugs VAZ-21099 (1990-2004)
➠ Spark plugs — checking VAZ-21011 (1974-1983)
➠ Spark plugs — checking condition and replacement VAZ-2104 (1984-2012)
➠ Spark plugs — checking condition and replacement VAZ-2106 (1976-2006)
Link in different formats to this page


Visitor comments

No comments yet


How much will 14 + 11 ?


VAZ-2114 (2004-2013) 
  • General information
  • Operation and maintenance
  • Power unit
  • Engine repair
  • Cooling system
  • Supply system
  • Control system
  • Exhaust system
  • Transmission
  • Clutch
  • Car gearbox
  • Front wheel drives
  • Chassis
  • Wheels and tires
  • Front suspension
  • Rear suspension
  • Steering
  • Brake system
  • Body
  • Exterior
  • Interior
  • Doors and glass
  • Tailgate
  • Ventilation and heating
  • Electrical equipment
  • Equipment and devices
  • Headlights and lighting
  • Engine electrics
  • Electrical circuits


VAZ-2115 (1997-2012) 
  • General information
  • Vehicle device
  • Operation manual
  • Vehicle malfunctions
  • Car care
  • Power unit
  • Engine repair
  • Cooling system
  • Supply system
  • Control system
  • Exhaust system
  • Transmission
  • Clutch
  • Car gearbox
  • Front wheel drives
  • Chassis
  • Front suspension
  • Rear suspension
  • Steering
  • Brake system
  • Body
  • Exterior
  • Interior
  • Doors, covers and windows
  • Electrical equipment
  • Equipment and devices
  • Headlights and lighting
  • Engine electrics
  • Anti-theft system


VAZbook.ru © 2017 · Mobile version · Contact with administration · Sitemap: EN BG BY UA RS HR RO PL SK HU · Site search · News and articles VAZ-1111 · VAZ-11113 · VAZ-2101 · VAZ-21011 · VAZ-2104 · VAZ-2105 · VAZ-21051 · VAZ-2106 · VAZ-21061 · VAZ-2107 · VAZ-21099 · VAZ-2109 · VAZ-2108 · VAZ-2110 · VAZ-2112 · VAZ-2114 · VAZ-2115 · VAZ-2121 · VAZ-21213 · VAZ-21214 ·
The site stores technical data using cookies to improve the service.