




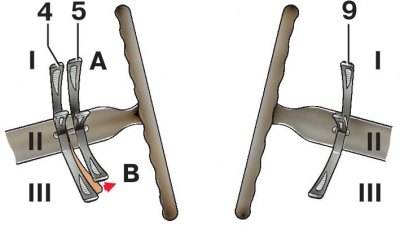
Steering column switches
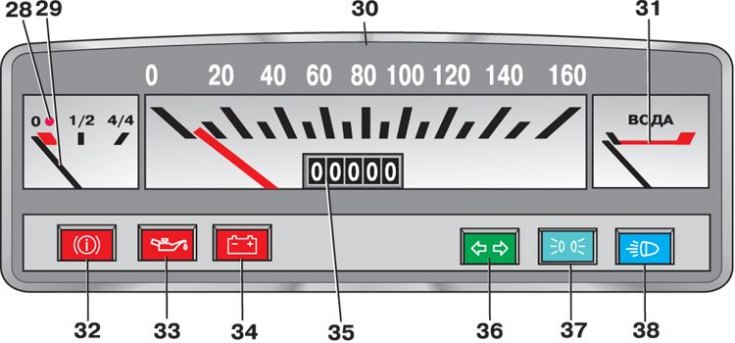
Instrument cluster
Governing bodies
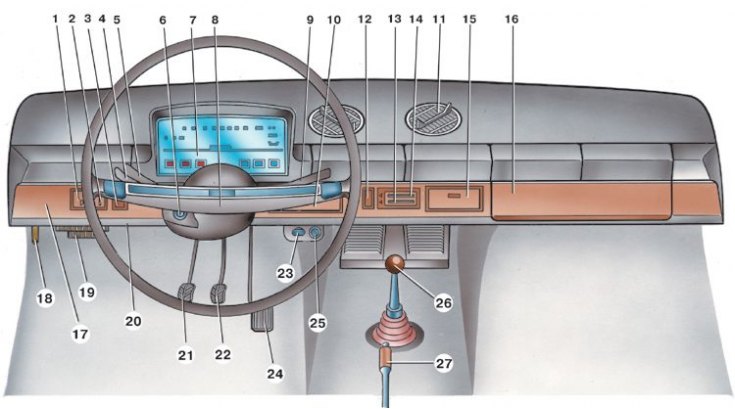
- 1 – External lighting switch. Pressing the lower arm of the button turns on the side lights and the license plate light if the key in the ignition switch is in position 1 or 3. External lighting is turned off by pressing the upper arm of the button.
- 2 – Instrument cluster lighting switch. The instrument cluster lighting is switched on by pressing the lower arm of the key when the outside lighting is on.
- 3 – reserve.
- 4 – headlight switch lever (see fig. Steering column switches). When the external lighting is turned on, if the lever is in the position:
- I – headlights off;
- II – low beam headlights are on;
- III – high beam headlights are on. High beam headlights can be turned on by moving the lever towards you along the steering column.
- 5 – direction indicator switch lever. When the lever is moved to the position (see Fig. Steering column switches) A turns on the right turn signal, in position B – the left turn signal. When the car goes straight after the turn, the lever automatically returns to its original position. This operation can also be performed manually.
- 6 – ignition switch.
- 7 – instrument cluster.
- 8 – sound signal switch.
- 9 – Windscreen wiper and washer switch lever. It is energized if the key in the ignition switch is in position 1 or 3. In position I (see Fig. Steering column switches) everything is off, in position II – the windshield wiper works intermittently, and in position III – continuously. When you press the lever towards you, regardless of its position, the windshield washer turns on.
- On the VAZ-2101 car, the windshield wipers are turned on by a switch installed on the left side of the instrument panel, and they are washed by pressing the washer pump pedal, located under the hood lock drive handle.
- 10 – decorative cover of the radio socket.
- 11 – Rotating deflectors. They are used to direct the air flow to the windshield or into the car body.
- 12 – Three-position switch for the heater electric fan. It is energized if the key in the ignition switch is set to position 1 or 3. When the upper arm of the key is pressed, the low speed of the electric fan is turned on, and when the lower arm is pressed, the high speed is turned on. In the middle position, the electric fan is turned off.
- 13 – heater valve control lever. By moving the lever, the supply of coolant from the engine to the heater radiator is regulated.
- 14 – air intake hatch control lever. By moving the lever, the supply of outside air through the heater radiator is regulated.
- 15 – Ashtray. To use the ashtray, pull the tab towards you. To clean it, press the cigarette extinguisher plate and remove it from the slot.
- 16 – Glove box. To access the glove box, fold the cover upwards. If the key in the ignition switch is in position 1 or 3, the inside of the box is illuminated by a lamp.
- 17 – instrument panel.
- 18 – hood lock drive handle.
- 19 – fuse box.
- 20 – socket for connecting a portable lamp.
- 21 – clutch pedal.
- 22 – brake pedal.
- 23 – carburetor air damper control handle. When the handle is pulled out, the air damper is closed; when it is depressed, it is open.
- 24 – accelerator pedal.
- 25 – cigarette lighter. To use, press the button on the socket, which remains in the recessed position. After about 15 seconds, the socket automatically returns to its original position, ready for use. When the outside lighting is turned on, a special lamp illuminates the cigarette lighter socket.
- 26 – gear shift lever.
- 27 – Parking brake lever. By moving the lever up, the rear wheel brake shoes are activated and, when the ignition is on, the parking brake indicator lamp lights up in the instrument cluster. To return the lever to its original position, press the button at the end of the handle. When moving the lever down, the indicator lamp goes out. If necessary, the parking brake can be used while driving to slow down, or used simultaneously with the service brakes.
- 28 – fuel reserve indicator lamp (see Fig. Instrument cluster). Lights up orange if there is less than 4–6.5 liters of gasoline left in the fuel tank.
- 29 – fuel level indicator.
- 30 – speedometer. Red marks on the scale near the numbers 40, 60 and 100 indicate the vehicle speeds that are not recommended to be exceeded when driving in first, second and third gears, respectively.
- 31 – engine cooling system fluid temperature indicator. When the pointer moves into the red zone of the scale, it indicates engine overheating. In this case, check the alternator drive belt tension and thermostat operation.
- 32 – Parking brake on/off indicator and low brake fluid level indicator. If the ignition is on, the indicator lights up with a red flashing light when the parking brake lever is raised. A constant light indicates that the brake fluid level in the reservoir has dropped below the permissible limit due to fluid consumption or system damage.
- 33 – Oil pressure control lamp in the engine lubrication system. Lights up red when the ignition is turned on and when the engine is running if the pressure in the lubrication system is insufficient.
- 34 – Battery charge indicator lamp. Lights up red when the ignition is turned on and goes out immediately after the engine starts. If the lamp lights up when the engine is running, this indicates a weak tension of the alternator drive belt or a malfunction of the alternator itself.
- 35 – trip meter.
- 36 – indicator lamp for turning on the direction indicators. Lights up with a green flashing light when the right or left turn signal is turned on.
- 37 – Parking light indicator lamp. Lights up green when the outside lighting is turned on.
- 38 – High beam indicator lamp. Lights up blue when the high beam headlights are on.
The original source is published on the website [www.VAZbook.ru]