English Русский
Български
Беларускі
Український
Српски
Hrvatski
Română
Polski
Slovenský
Magyar
| Articles | Contacts | Sitemap |   
Repair and maintenance Lada Repair and maintenance Mazda Repair and maintenance Mitsubishi Repair and maintenance Toyota Repair and maintenance Land Rover Repair and maintenance Hyundai Repair and maintenance Nissan
VAZbook.ru


Main     1111   2101   2105   2106   2107   2109   2110   2115   2121  
VAZ-2101 (1970-1983) VAZ-21011 (1974-1983)
  • Main
  • «Zhiguli»
  • VAZ-21011
  • Transmission
  • Clutch
  • Checking the clutch master cylinder on the stand

Checking the clutch master cylinder on the stand (VAZ-21011)

            0

Contents: Checking the tightness of the rear…↓ Checking the tightness of the front…↓

Checking the tightness of the rear sealing ring


Scheme for checking the condition of the rear sealing ring for leaks
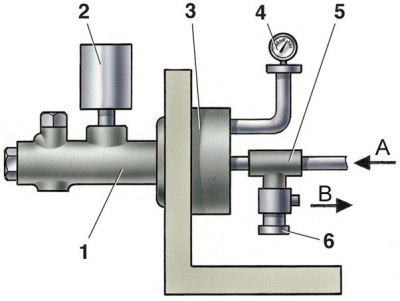


1 – master cylinder; 2 – vessel; 3 – adapter with seal; 4 – pressure gauge; 5 – tee; 6 – adjusting…

1 – master cylinder; 2 – vessel; 3 – adapter with seal; 4 – pressure gauge; 5 – tee; 6 – adjusting screw; A – air from the compressor; B – air release


1. Mount the master cylinder on the stand, ensuring a good seal between the cylinder flange and the mating surface of the stand. Attach vessel 2 with hydraulic fluid to the cylinder. Open the compressed air valve with adjusting screw 6 unscrewed, then slowly close the adjusting screw until air comes out of vessel 2.

2. Check the air pressure using a pressure gauge; it should be within 0.05–0.08 MPa (0.5–0.8 kgf/cm²). If the pressure is lower, replace the rear sealing ring.

Checking the tightness of the front sealing ring


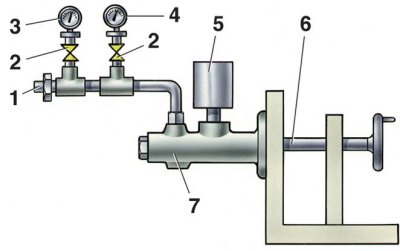
Scheme of checking the condition of the front sealing ring for tightness


1 – bleed screw; 2 – tap; 3 – pressure gauge with a division value of 0.2 MPa (2 kgf/cm²); 4 –…

1 – bleed screw; 2 – tap; 3 – pressure gauge with a division value of 0.2 MPa (2 kgf/cm²); 4 – pressure gauge with a division value of 0.005 MPa (0.05 kgf/cm²); 5 – vessel; 6 – pusher; 7 – master cylinder


1. Install the master cylinder on the stand and connect it to a vessel filled with hydraulic fluid and to pressure gauges.

2. Close the pressure gauge valve 3 and, by moving the master cylinder pusher, ensure a stable pressure of 0.2 MPa (2 kgf/cm²).

3. With the plunger secured and no fluid leaking, the pressure should remain constant for 2 minutes.

4. Close the pressure gauge tap 4 and open the pressure gauge tap 3. By moving the pusher, set a stable pressure of 10 MPa on the pressure gauge (100 kgf/cm²).

5. With the pushrod secured and no fluid leaking, the specified pressure should remain constant for at least 2 minutes. Otherwise, replace the front sealing ring.


This article is available at russian, bulgarian, belarusian, ukrainian, serbian, croatian, romanian, polish, slovak, hungarian
The text was reviewed by the specialist: Grigory Vologodtsev

Share with friends:

Previous articles
VAZ-21011: Clutch
Next articles

Disassembly, inspection, repair and assembly of the master and working cylinders
Removal and installation of the working and master cylinders of the clutch drive
Clutch control
Removal and installation the clutch
Bleeding the clutch hydraulic drive
Possible clutch malfunctions, their causes and methods of elimination

More articles from other manuals on VAZ cars:
➠ Checking the clutch master cylinder on the stand VAZ-21051 (1979-2010)
➠ Checking the clutch master cylinder on the stand VAZ-21213 (1994-2006)
➠ Clutch release hydraulic master cylinder — removal and… VAZ-2106 (1976-2006)
➠ Clutch release hydraulic master cylinder — removal and… VAZ-2107 (1982-2012)
➠ Checking the brake fluid level in the master cylinder reservoir VAZ-2110 (1995-2007)
Link in different formats to this page


Visitor comments

No comments yet


How much will 28 + 23 ?


VAZ-2101 (1970-1983) 
  • General information
  • Vehicle description
  • Vehicle device
  • Vehicle operation
  • Maintenance
  • Main malfunctions
  • Applications
  • Power unit
  • Engine repair
  • Cooling and lubrication system
  • Supply system
  • Transmission
  • Clutch
  • Transmission
  • Cardan gear
  • Rear axle
  • Chassis
  • Front suspension
  • Rear suspension
  • Steering
  • Brake system
  • Body
  • Exterior
  • Interior
  • Electrical equipment
  • Engine electrics
  • Equipment and devices


VAZ-21011 (1974-1983) 
  • General information
  • Specifications
  • Operation and maintenance
  • Power unit
  • Engine repair
  • Cooling system
  • Lubrication system
  • Power and exhaust system
  • Ignition system
  • Engine electrics
  • Transmission
  • Clutch
  • Car gearbox
  • Cardan gear
  • Rear axle
  • Chassis
  • Car suspension
  • Steering
  • Brake system
  • Body
  • Exterior
  • Interior
  • Doors and locks
  • Electrical equipment
  • Equipment and devices
  • Lighting and signaling


VAZbook.ru © 2017 · Mobile version · Contact with administration · Sitemap: EN BG BY UA RS HR RO PL SK HU · Site search · News and articles VAZ-1111 · VAZ-11113 · VAZ-2101 · VAZ-21011 · VAZ-2104 · VAZ-2105 · VAZ-21051 · VAZ-2106 · VAZ-21061 · VAZ-2107 · VAZ-21099 · VAZ-2109 · VAZ-2108 · VAZ-2110 · VAZ-2112 · VAZ-2114 · VAZ-2115 · VAZ-2121 · VAZ-21213 · VAZ-21214 ·
The site stores technical data using cookies to improve the service.