
Rear o-ring
Scheme for checking the condition of the rear sealing ring for tightness
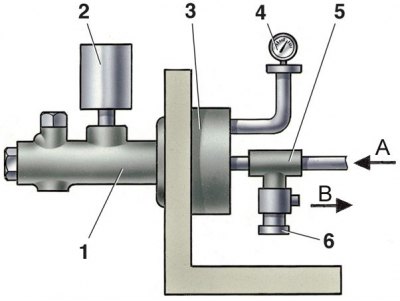
1 – main cylinder; 2 - vessel; 3 - adapter with a seal; 4 - manometer; 5 - tee; 6 - adjusting screw; A - air from the compressor; B - air outlet
Leak test
1. Install the master cylinder on the stand (see fig. Scheme for checking the condition of the rear sealing ring for tightness), while providing a good seal between the cylinder flange and the mating plane of the stand.
2. Attach vessel 2 with hydraulic fluid to the cylinder.
3. Open the compressed air cock with the adjusting screw 6 loosened, then slowly close the adjusting screw until air escapes from the vessel 2.
4. Check the air pressure on the pressure gauge, which should be at least 0.05–0.08 MPa (0.5–0.8 kgf/cm2). If the pressure is less, replace the rear O-ring.
Front o-ring
Scheme for checking the condition of the front sealing ring for leaks
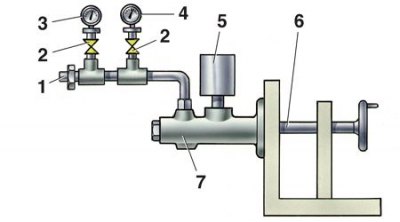
1 - screw for pumping; 2 - crane; 3 - pressure gauge with a division value of 0.2 MPa (2 kgf/cm2); 4 - pressure gauge with a division value of 0.005 MPa (0.05 kgf/cm2); 5 - vessel; 6 - pusher; 7 - main cylinder
Leak test
1. Install the master cylinder on the stand and connect it to a vessel filled with hydraulic fluid and to pressure gauges (see fig. Scheme for checking the condition of the front sealing ring for leaks).
2. Close the valve of the pressure gauge 3 and, by moving the pusher of the main cylinder, ensure a stable pressure of 0.2 MPa (2 kgf cm2).
3. With the pusher fixed and no fluid leakage, the pressure should remain constant for 2 minutes.
4. Close the pressure gauge valve 4 and open the pressure gauge valve 3. By moving the pusher, set a stable pressure of 10 MPa on the pressure gauge (100 kgf/cm2).
5. With the pusher fixed and no fluid leakage, the indicated pressure must remain constant for at least 2 minutes. Otherwise a forward sealing ring replace.