




Contents: Distributor ↓ Spark plugs ↓
To ensure that the ignition system works properly, especially in winter, carefully monitor the cleanliness of the high-voltage wires; to ensure that there is no damage to the rubber protective caps on the wires and no signs of oxidation at the connection points.
Distributor
Every 10,000 km mileage:
1. Check the condition of the working surface of contacts 3 (Fig. 38) of the breaker. In case of a large transfer of metal from one contact to another, clean them with a flat velvet file. Remove the crater completely (deepening) on the breaker lever contact is not recommended. Check and, if necessary, clean the contacts in the distributor cap and on the runner.
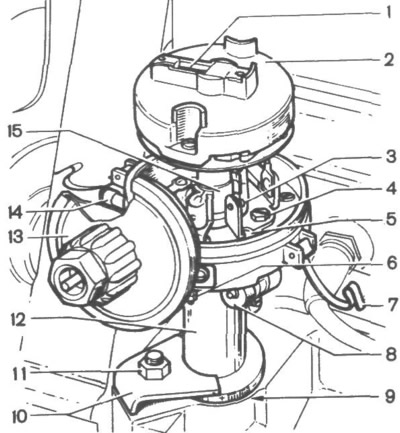
Fig. 38. Ignition distributor:
1 - interference suppression resistor: 2 - runner; 3 - breaker contacts; 4 - screw; 5 - groove; 6 - terminal; 7 - spring latch; 8 - capacitor; 9 - scale; 10 - bracket; 11 - nut; 12 - body; 13 - vacuum corrector; 14 - oiler; 15 - cam.
2. Wipe the breaker contacts, rotor, outer and inner surfaces of the distributor cap with a clean, gasoline-soaked chamois or other lint-free material.
3. Check the gap between the breaker contacts, which should be 0.4±0.05 mm, for which:
- rotating the crankshaft, set cam 15 to a position in which the breaker contacts will be maximally open;
- check the gap with a feeler gauge; if it does not meet the standard, loosen screws 4 and use a screwdriver inserted into a special slot 5 to move the contact post of the breaker to the required distance. After completing the adjustment, tighten screws 4.
4. Check the ignition timing, for which:
- connect a 12-volt test lamp with one end of the wire to terminal 6 and the other end to ground;
- turn on the ignition and slowly turn the crankshaft;
- if the ignition timing is set correctly, the indicator lamp should light when mark 4 (Fig. 39) on the crankshaft pulley is aligned with mark 2 on the timing cover, and the contact of runner 2 (Fig. 38) should be opposite the contact of the first or fourth cylinder on the distributor cover.
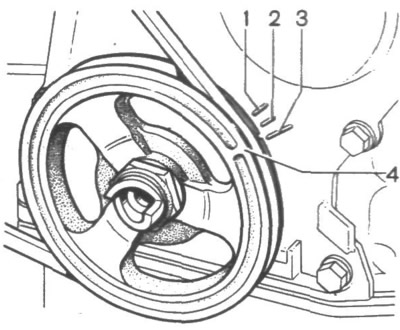
Fig. 39. Marks on the pulley and cover of the timing mechanism drive:
1 - 10°; 2 - 5°; 3 - 0° (TDC); 4 - mark on the pulley.
(The information is posted on the portal: VazBook.ru)
5. If the marks do not align when the indicator lamp lights up, adjust the ignition timing as follows:
- turn the crankshaft to a position in which the runner with its contact will be directed towards the contact of the first or fourth cylinder on the distributor cover, and mark 4 (Fig. 39) coincides with mark 2. In this case, the piston of the first or fourth cylinder will not reach TDC by 5° when measured by the angle of rotation of the crankshaft;
- loosen nut 11 (Fig. 38) of bracket 10 and smoothly turn housing 12 of the ignition distributor clockwise until the breaker contacts close;
- slowly turn the distributor housing counterclockwise until the indicator lamp lights up; while doing this, lightly press the slider counterclockwise to select the gaps;
- stop the distributor housing exactly at the moment the indicator lamp lights up (the breaker contacts are at the beginning of the opening phase);
- holding the distributor housing in this position, tighten nut 11;
- turn off the ignition, place the distributor cap on the housing and secure it with two spring latches 7.
On a new car, check the gap between the breaker contacts and the ignition timing after the first 2000-3000 km.
Every 20,000 km pour 2-3 drops of engine oil into the hole of oiler 14.
Spark plugs
Every 10,000 km mileage:
- clean the spark plugs from carbon deposits with gasoline and a hard brush, -
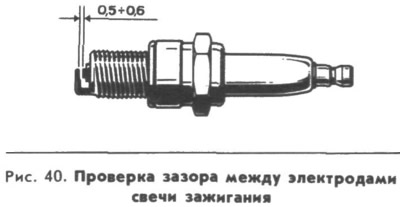
- check the gap between the spark plug electrodes with a round wire feeler gauge. The gap should be within 0.5-0.6 mm (Fig. 40). It can only be adjusted by bending the side electrode.
Every 30,000 km mileage, replace the spark plugs with new ones. For reliable engine starting at low negative temperatures, it is recommended to replace long-lasting spark plugs with new ones, even if they are still quite functional; they can be used during the warm season.