
English Русский
Български
Беларускі
Український
Српски
Hrvatski
Română
Polski
Slovenský
Magyar
| Articles | Contacts | Sitemap |   
Repair and maintenance Lada Repair and maintenance Mazda Repair and maintenance Mitsubishi Repair and maintenance Toyota Repair and maintenance Land Rover Repair and maintenance Hyundai Repair and maintenance Nissan
VAZbook.ru


Main     1111   2101   2105   2106   2107   2109   2110   2115   2121  
VAZ-2110 (1995-2007) VAZ-2112 (1999-2007)
  • Main
  • «Lada»
  • VAZ-2110
  • Transmission
  • Front wheel drives
  • Inner CV joint — disassembly and assembly

Inner CV joint — disassembly and assembly (VAZ-2110)

            0

Contents: Disassembling the CV joint ↓ CV joint assembly ↓
To perform repair work on disassembling the CV joint, you will need a container in which you can place the joint balls in the order in which they are removed (for example, make a gutter from a corner).

Disassembling the CV joint


1. Remove the inner hinge (see points 1-5 "CV joint (front wheel drive inner joint) - removal, replacement of the boot and installation").

2. Having installed soft pads on the jaws of the vice, we fix the hinge in the vice. Using a permanent marker, we apply marks on the end surfaces of the hinge parts, determining their mutual arrangement.

Helpful Hint: If you don't have a permanent marker, you can use a diamond file to make the marks.


Warning: When securing the CV joint (internal hinge) in a vice, be especially careful with the surface that contacts the working edge of the gearbox oil seal. Even small scratches on this surface will damage the oil seal.


3. Using a thin slotted screwdriver, remove the retainer from the hinge housing.
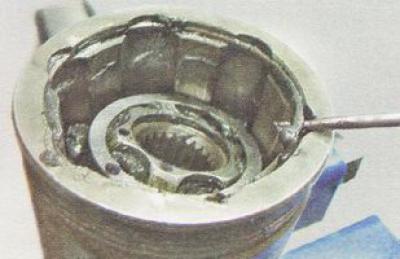
3. Using a thin slotted screwdriver, remove the retainer from the hinge housing.


4. Remove the inner race together with the balls and separator from the joint housing.


Original source is on the resource VAZBOOK.RU
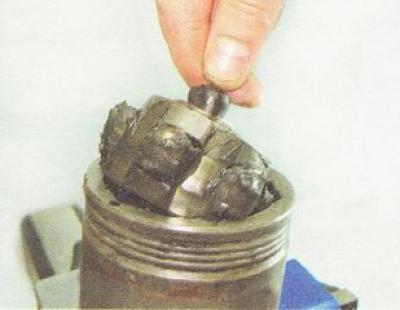
4. Remove the inner race together with the balls and separator from the joint housing.


5. Having placed the separator on a clean surface, slightly shift the inner race downwards and remove the balls from the separator. Place the balls in the prepared groove, starting from the first ball located opposite the mark, and then clockwise. When assembling, each ball must be installed in the place from which it was removed.
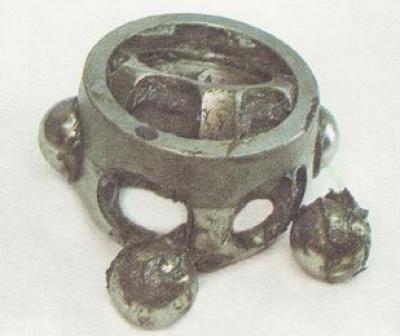
5. Having placed the separator on a clean surface, slightly shift the inner race downwards and…


6. Turn the inner race inside the separator so that its pins are located opposite the separator windows, and remove the race from the separator.
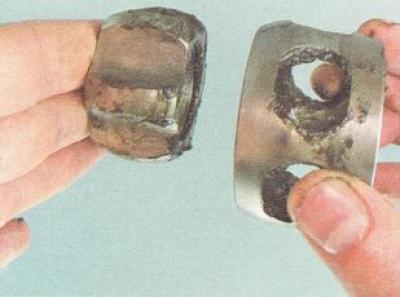
6. Turn the inner race inside the separator so that its pins are located opposite the separator…


7. Thoroughly wash all CV joint parts in kerosene. Check all parts for any damage. If any traces of corrosion or wear are found on any of the parts, replace the CV joint assembly. Using balls from another CV joint is not allowed.


CV joint assembly


1. Align the marks on the inner race and the separator. Insert the balls into the separator, each in the place from which it was removed during disassembly
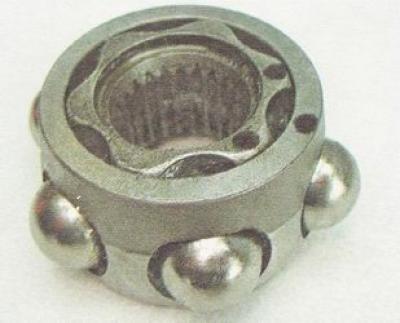
1. Align the marks on the inner race and the separator. Insert the balls into the separator, each…


2. Place a third of the CV joint grease into the joint housing (80 cm³ for the entire hinge).

3. Having aligned the marks made during disassembly of the joint on the separator and the joint housing, we insert the separator assembled with the inner race and balls into the outer joint housing (the annular groove on the collar must be on the outside of the hinge).
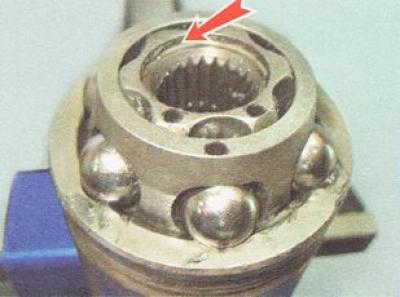
3. Having aligned the marks made during disassembly of the joint on the separator and the joint…


4. Fill the accessible cavities of the separator with CV joint grease and press the separator with the cage into the joint housing. Place the remaining grease into the joint and lubricate the inner surface of the boot with it.

5. Using a slotted screwdriver, insert the retainer into the groove of the hinge housing.
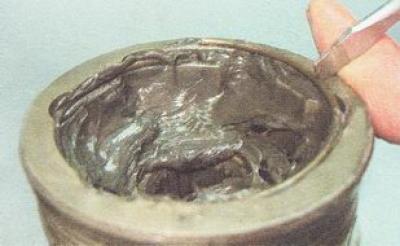
5. Using a slotted screwdriver, insert the retainer into the groove of the hinge housing.


6. Install the hinge on the drive shaft (see "Installation", items 1-5 and 7 "CV joint (front wheel drive inner joint) - removal, replacement of the boot and installation").

7. Install the front wheel drive on the vehicle (see "Installation", p. 1-5 "Drive wheel - removal and installation").


This article is available at russian, bulgarian, belarusian, ukrainian, serbian, croatian, romanian, polish, slovak, hungarian
The text was reviewed by the specialist: Grigory Vologodtsev

Share with friends:

Previous articles
VAZ-2110: Front wheel drives
Next articles

Inner CV joint — removal, replacement of boot and installation
Outer CV joint — disassembly and assembly
Outer CV joint — removal, replacement of boot and installation
Drive wheel — removal and installation
Front wheel drives — design and description

More articles from other manuals on VAZ cars:
➠ Checking the protective boots of the constant velocity joints… VAZ-1111 (1988-1996)
➠ Disassembling the cardan joint VAZ-21061 (1976-2006)
➠ Replacing the ball joint of the suspension arm VAZ-21099 (1990-2004)
➠ Replacing the ball joint VAZ-2115 (1997-2012)
➠ Disassembling the cardan joint VAZ-21214 (1994-2006)
Link in different formats to this page


Visitor comments

No comments yet


How much will 24 + 36 ?


VAZ-2110 (1995-2007) 
  • General information
  • Vehicle description
  • Specifications
  • User manual
  • Maintenance
  • Operation and maintenance
  • Tips for car owner
  • Power unit
  • Engine repair
  • Supply system
  • Control system
  • Cooling system
  • Exhaust system
  • Transmission
  • Clutch
  • Car gearbox
  • Front wheel drives
  • Chassis
  • Suspension and wheels
  • Steering
  • Brake system
  • Body
  • Exterior
  • Interior
  • Doors and glass
  • Tailgate
  • Ventilation and heating
  • Electrical equipment
  • Equipment and devices
  • Headlights and lighting
  • Engine electrics
  • Electrical circuits


VAZ-2112 (1999-2007) 
  • General information
  • Operation and maintenance
  • Power unit
  • Engine repair
  • Supply system
  • Control system
  • Cooling system
  • Exhaust system
  • Transmission
  • Clutch
  • Car gearbox
  • Front wheel drives
  • Chassis
  • Wheels and tires
  • Car suspension
  • Steering
  • Brake system
  • Body
  • Exterior
  • Interior
  • Doors and glass
  • Tailgate
  • Ventilation and heating
  • Electrical equipment
  • Equipment and devices
  • Headlights and lighting
  • Engine electrics
  • Electrical circuits


VAZbook.ru © 2017 · Mobile version · Contact with administration · Sitemap: EN BG BY UA RS HR RO PL SK HU · Site search · News and articles VAZ-1111 · VAZ-11113 · VAZ-2101 · VAZ-21011 · VAZ-2104 · VAZ-2105 · VAZ-21051 · VAZ-2106 · VAZ-21061 · VAZ-2107 · VAZ-21099 · VAZ-2109 · VAZ-2108 · VAZ-2110 · VAZ-2112 · VAZ-2114 · VAZ-2115 · VAZ-2121 · VAZ-21213 · VAZ-21214 ·
The site stores technical data using cookies to improve the service.