




Checking the electrolyte level
The electrolyte level should be between the "MIN" and "MAX" marks on the translucent battery case. During battery operation, the electrolyte level gradually decreases as the water contained in it evaporates. Therefore, its level should be checked every 4 months. It is not allowed to operate the battery with the electrolyte level below the "MIN" mark. To restore the electrolyte level, only distilled water should be added.
If it is definitely established that the cause of the low level is splashing, then it is necessary to add electrolyte of the same density as that remaining in the battery element. If the level is above the norm, then the electrolyte must be collected with a rubber bulb.
Checking the battery level
To determine the degree of discharge when the battery fails, and also every 4 months, measure the density of the electrolyte with an automotive densimeter and compare it with the data in Table 20.
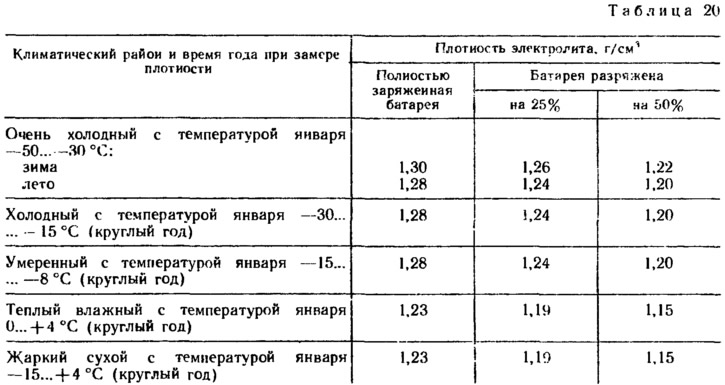
If the battery is discharged more than 25% in winter and 50% in summer, it should be removed from the car and recharged.
When measuring the density, make sure that no electrolyte gets on the surface of the battery, the body or other parts, causing corrosion, current leakage, etc.
The text is copied from the online resource vazbook
The density of the electrolyte depends on the temperature. With a change in the latter by every 15°C, the density changes by approximately 0.01 g/cm³. Therefore, if the electrolyte temperature differs from 25°C, then a temperature correction should be added or subtracted from the densimeter readings:
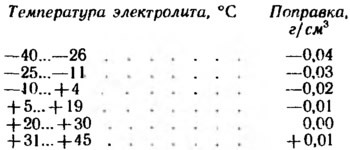
To avoid getting erroneous results, do not measure the density of the electrolyte in the following cases:
- if its level does not correspond to the norm;
- when the electrolyte is too hot or cold. The optimum temperature of the electrolyte when measuring the density is 15-25°C;
- immediately after adding distilled water. You should wait until the electrolyte mixes. If the battery is discharged, this may take several hours;
- after several starts. You should wait until the electrolyte density in the battery cells is uniform;
- with "boiling" electrolyte. You should wait until the bubbles in the electrolyte collected in the densimeter pipette rise to the surface.
If, when measuring the specific gravity of the electrolyte, it is found to be excessively high (1.3 g/cm³ and above), then it is necessary to remove some of the electrolyte from the element, add distilled water instead, wait until the electrolyte mixes, and measure the density again.
Battery charge
The battery removed from the vehicle must be carefully cleaned, especially its upper part, and the electrolyte level must be checked. The battery is charged with a current of 1.8 A with the plugs unscrewed. When charging the battery, it is necessary to periodically check the electrolyte temperature and not allow it to rise above 40°C. If the temperature reaches 40°C, then the charging current must be halved or the charge must be interrupted and the battery must be cooled to 27°C.
Charging stops when abundant gas emission begins in all battery cells, and the voltage and density of the electrolyte remain constant during the last 3 hours of charging.
The density of the electrolyte of a charged battery at 25°C must correspond to the data in Table 20 for each climatic region.
If at the end of the charge the density of the electrolyte (determined taking into account the temperature correction) differs from that specified in Table 20, then it is corrected. If the density is increased, part of the electrolyte is removed and distilled water is added. If the density of the electrolyte is below the norm, then, having removed it from the element, electrolyte of increased density (1.4 g/cm³) is added.
After adjusting the electrolyte density, continue charging the battery for another 30 minutes to mix the electrolyte. Then disconnect the battery and measure its level in all elements after 30 minutes. If the electrolyte level differs from the norm, it is brought to the recommended value, as indicated above.