English Русский
Български
Беларускі
Український
Српски
Hrvatski
Română
Polski
Slovenský
Magyar
| Articles | Contacts | Sitemap |   
Repair and maintenance Lada Repair and maintenance Mazda Repair and maintenance Mitsubishi Repair and maintenance Toyota Repair and maintenance Land Rover Repair and maintenance Hyundai Repair and maintenance Nissan
VAZbook.ru


Main     1111   2101   2105   2106   2107   2109   2110   2115   2121  
VAZ-2110 (1995-2007) VAZ-2112 (1999-2007)
  • Main
  • «Lada»
  • VAZ-2112
  • Body
  • Exterior
  • Hood Lock Drive Rod — Lubrication and Replacement

Hood Lock Drive Rod — Lubrication and Replacement (VAZ-2112)

            0

Contents: Lubrication ↓ Removal ↓ Installation ↓
To replace the rod, you will need an assistant and, in addition, a nylon cord at least 5 m long, a plastic ballpoint pen body and a piece of thin steel wire 10 cm long or a paper clip.

Lubrication


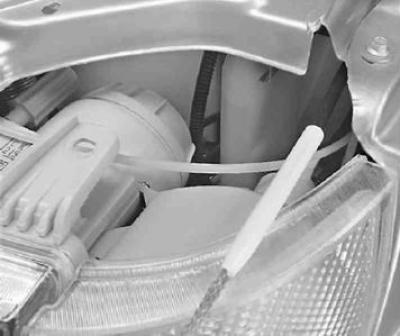
1. Disconnect the bent end of the rod from the hood lock lever (see above, "Hood lock - removal, installation and adjustment").
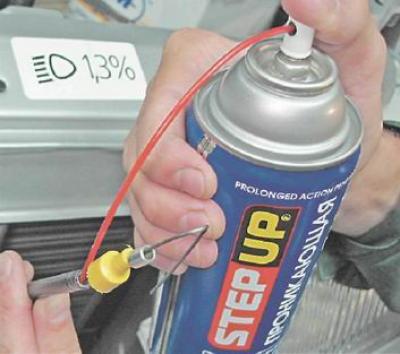
1. Disconnect the bent end of the rod from the hood lock lever (see above, «Hood lock - removal,…


2. Inject penetrating lubricant into the rod casing.

3. Inject penetrating lubricant into the casing from the other end of the rod (see below p. 9).

Removal


Note. To replace the hood lock rod together with the casing, you need to do a labor-intensive job - remove the instrument panel. Here is a method for replacing the hood lock rod with minimal disassembly. If the rod moves easily in the casing, and you have to replace it because it broke, then you can replace only the wire by pushing it into the old casing.


1. With an open-end wrench by 8 mm unscrew the nut of the rod mounting clamp.
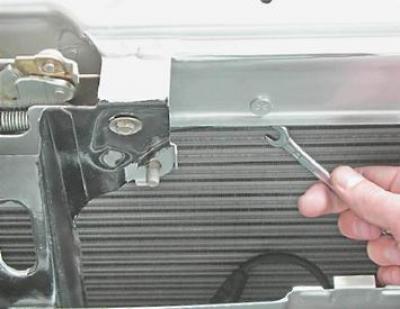
1. With an open-end wrench by 8 mm unscrew the nut of the rod mounting clamp.


Note: The nut is located above the clamp loop, so it is difficult to access (the photo shows a view from below).
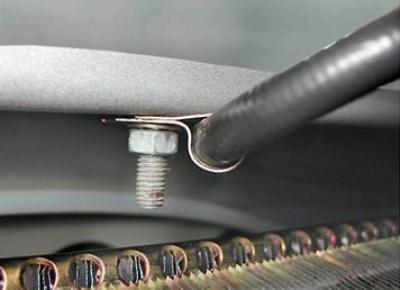


Note: The nut is located above the clamp loop, so it is difficult to access (the photo shows a view…


2. Remove the clamp first from the threaded stud, and then from the rod casing.
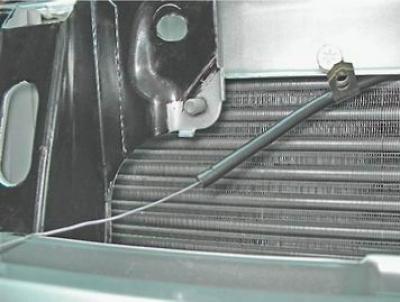
2. Remove the clamp first from the threaded stud, and then from the rod casing.


3. After unscrewing three bolts, remove the left headlight shield.
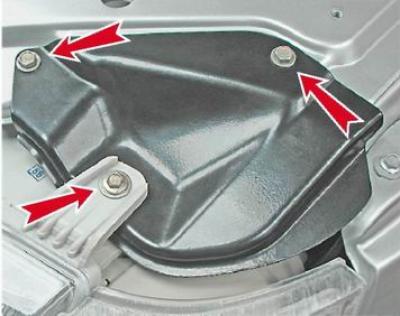
3. After unscrewing three bolts, remove the left headlight shield.


Note: On early model cars the upper front cross member has a different shape and does not have a headlight shield.


4. Pull the traction casing into the resulting opening.
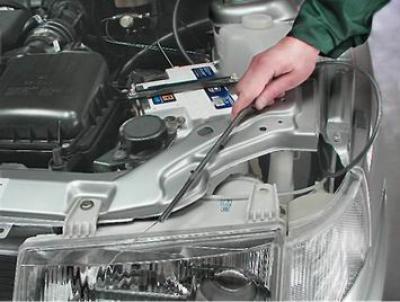

4. Pull the traction casing into the resulting opening.


5. Fold the nylon cord in half and place the resulting cord loop on the bent end of the cable. Tuck the end of the cable into the sheath.
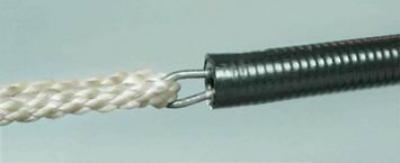
5. Fold the nylon cord in half and place the resulting cord loop on the bent end of the cable. Tuck…


6. With a socket wrench by 13 mm with a ratchet (or with a spanner) through the open cover of the mounting block we unscrew the axis with the hexagonal head of the hood opening handle (for clarity, the photograph shows a view with the instrument panel removed; access to the axle is hindered by wire harnesses).
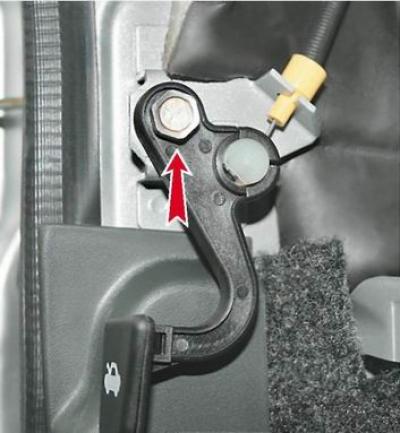
6. With a socket wrench by 13 mm with a ratchet (or with a spanner) through the open cover of the…


7. Remove the handle axle and take the rod casing out of the bracket slot. Lower the handle under the instrument panel and take the plastic rod end out of the handle.
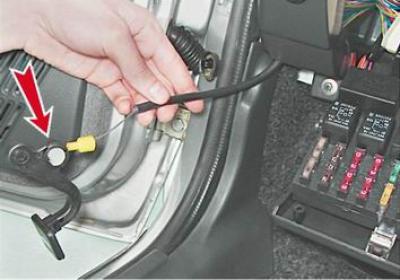
7. Remove the handle axle and take the rod casing out of the bracket slot. Lower the handle under…


8. We pull the rod into the car's interior (before the cord appeared).
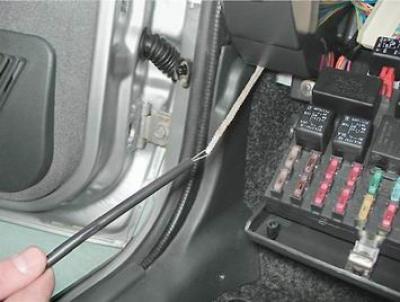
8. We pull the rod into the car's interior (before the cord appeared).


9. Disconnect the cord from the rod and remove the rod assembly with the casing.

Installation


1. Using a steel wire, bend the loop at the end and pull the cord loop through the body of the ballpoint pen (the tapering part of the handle body should be directed in the opposite direction from the cord loop).
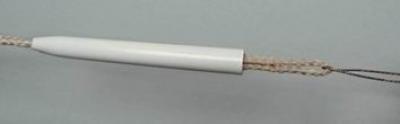
1. Using a steel wire, bend the loop at the end and pull the cord loop through the body of the…


2. Using pliers, bend the end of the new 3-4 cm long rod into a loop. Put the cord loop on the bent end of the rod. To securely fix the cord on the rod, secure the loop with insulating tape.
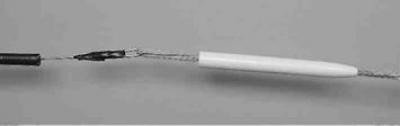
2. Using pliers, bend the end of the new 3-4 cm long rod into a loop. Put the cord loop on the bent…


3. Tightly push the handle body part onto the new rod casing. Apply a little penetrating liquid to the handle body.
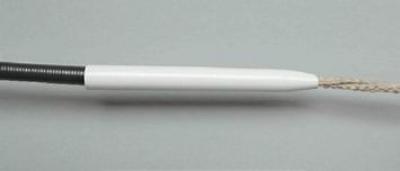
3. Tightly push the handle body part onto the new rod casing. Apply a little penetrating liquid to…


4. Insert the plastic end of the new cable into the hood release handle (see above).

Note: The following action should be performed together with an assistant.


5. From outside the car, smoothly pull the hood lock drive rod using the cord, while simultaneously directing the handle body from the inside of the car into the hole in the rubber seal of the engine compartment partition.
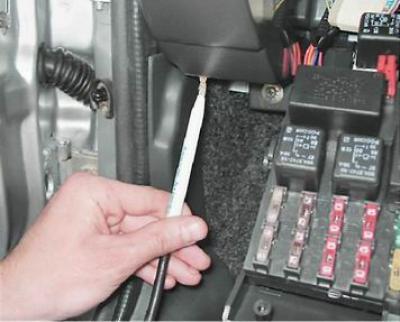
5. From outside the car, smoothly pull the hood lock drive rod using the cord, while simultaneously…


6. Pull the rod outward.

6. Pull the rod outward.


7. Fasten the lock opening handle to the axis (see above).

8. Remove the cord and attach the rod to the hood lock (see "Hood lock - removal, installation and adjustment").

Note: When attaching the drive rod to the hood lock lever, first put the lock in place for fitting. Make sure that the rod is routed correctly, there is no twisting or kinking of the casing. Use pliers to completely pull out the rod and mark the bending point of the rod.


9. Further assembly is carried out in reverse order.


This article is available at russian, bulgarian, belarusian, ukrainian, serbian, croatian, romanian, polish, slovak, hungarian
The text was reviewed by the specialist: Grigory Vologodtsev

Share with friends:

Previous articles
VAZ-2112: Exterior
Next articles

Hood lock — removal, installation and adjustment
Hood — removal, installation and adjustment of position
Hood trim — removal and installation
Gas bonnet struts — replacement
Radiator grille — removal and installation
Air intake grille of the ventilation system — removal and installation
Front fender liner — removal and installation
Front bumper — removal and installation
Threshold trim — removal and installation
Front wing — removal and installation

More articles from other manuals on VAZ cars:
➠ Replacing the hood lock drive rod VAZ-11113 (1996-2003)
➠ Hood lock and lock drive cable — removal and installation VAZ-2104 (1984-2012)
➠ Hood lock and lock drive cable — removal and installation VAZ-2106 (1976-2006)
➠ Hood lock and lock drive cable — removal and installation VAZ-2107 (1982-2012)
➠ Hood Lock Drive Rod — Replacement VAZ-2114 (2004-2013)
Link in different formats to this page


Visitor comments

No comments yet


How much will 22 + 49 ?


VAZ-2110 (1995-2007) 
  • General information
  • Vehicle description
  • Specifications
  • User manual
  • Maintenance
  • Operation and maintenance
  • Tips for car owner
  • Power unit
  • Engine repair
  • Supply system
  • Control system
  • Cooling system
  • Exhaust system
  • Transmission
  • Clutch
  • Car gearbox
  • Front wheel drives
  • Chassis
  • Suspension and wheels
  • Steering
  • Brake system
  • Body
  • Exterior
  • Interior
  • Doors and glass
  • Tailgate
  • Ventilation and heating
  • Electrical equipment
  • Equipment and devices
  • Headlights and lighting
  • Engine electrics
  • Electrical circuits


VAZ-2112 (1999-2007) 
  • General information
  • Operation and maintenance
  • Power unit
  • Engine repair
  • Supply system
  • Control system
  • Cooling system
  • Exhaust system
  • Transmission
  • Clutch
  • Car gearbox
  • Front wheel drives
  • Chassis
  • Wheels and tires
  • Car suspension
  • Steering
  • Brake system
  • Body
  • Exterior
  • Interior
  • Doors and glass
  • Tailgate
  • Ventilation and heating
  • Electrical equipment
  • Equipment and devices
  • Headlights and lighting
  • Engine electrics
  • Electrical circuits


VAZbook.ru © 2017 · Mobile version · Contact with administration · Sitemap: EN BG BY UA RS HR RO PL SK HU · Site search · News and articles VAZ-1111 · VAZ-11113 · VAZ-2101 · VAZ-21011 · VAZ-2104 · VAZ-2105 · VAZ-21051 · VAZ-2106 · VAZ-21061 · VAZ-2107 · VAZ-21099 · VAZ-2109 · VAZ-2108 · VAZ-2110 · VAZ-2112 · VAZ-2114 · VAZ-2115 · VAZ-2121 · VAZ-21213 · VAZ-21214 ·
The site stores technical data using cookies to improve the service.