
English Русский
Български
Беларускі
Український
Српски
Hrvatski
Română
Polski
Slovenský
Magyar
| Articles | Contacts | Sitemap |   
Repair and maintenance Lada Repair and maintenance Mazda Repair and maintenance Mitsubishi Repair and maintenance Toyota Repair and maintenance Land Rover Repair and maintenance Hyundai Repair and maintenance Nissan
VAZbook.ru


Main     1111   2101   2105   2106   2107   2109   2110   2115   2121  
VAZ-2114 (2004-2013) VAZ-2115 (1997-2012)
  • Main
  • «Samara-2»
  • VAZ-2114
  • Power unit
  • Engine repair
  • Timing Belt — Checking Condition and Adjusting Tension

Timing Belt — Checking Condition and Adjusting Tension (VAZ-2114)

            0

The timing belt should be checked during vehicle maintenance - every 15,000 km.

To perform the work you will need a timing belt tensioner key.

Sequence of execution


1. Prepare the car for work (see "Preparing the car for maintenance and repair").

2. Key by 10 mm we unscrew the three bolts securing the front timing belt cover.
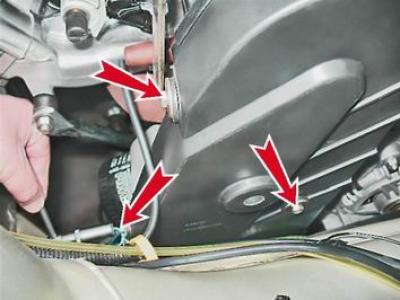
2. Key by 10 mm we unscrew the three bolts securing the front timing belt cover.


3. Lift the cover vertically upwards, then remove it from the engine.
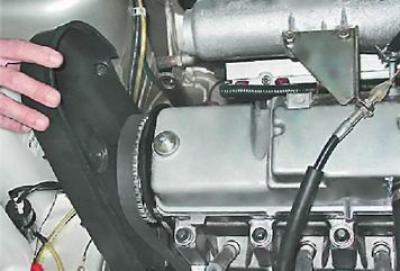
3. Lift the cover vertically upwards, then remove it from the engine.


4. Rotate the crankshaft and visually inspect the condition of the belt.

Note: The crankshaft can be turned with a 17 mm open-end wrench (on some cars by 19 mm) by the bolt that secures its pulley or by the teeth of the flywheel with a large slotted screwdriver. To do this, remove the rubber plug from the hole in the clutch housing (see "Timing Belt - Replacement").


The belt must be clean - no dirt or oil on its surface. A belt with tears, cracks, delamination, cut or worn teeth, abrasions down to the cord must be replaced (see below, "Timing Belt - Replacement").

5. Using two fingers, try to turn the belt 90° in the area between the crankshaft and camshaft pulleys, applying a force of 15-20 N·m (1.5-2.0 kgf·m) to it.

(The article is taken from an online resource: VAZbook.ru)
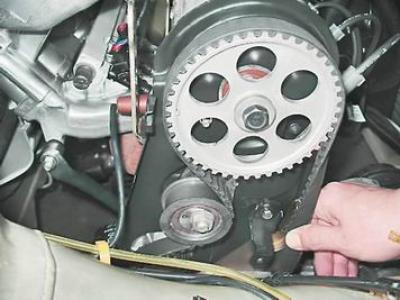
5. Using two fingers, try to turn the belt 90° in the area between the crankshaft and camshaft…


If the force applied is not enough to turn the belt to the required angle, then the belt is overtightened; if the belt can be turned to a greater angle, it is not tensioned enough.

Warning! Adjust the belt tension on a cold engine. Excessive belt tension, oil and dirt on the belt will shorten the service life of the belt, as well as the bearings of the tension roller and the coolant pump. If the belt tension is too low, it may jump over several teeth of the camshaft pulley.


6. To check the relative position of the camshaft and crankshaft, set the piston of the first cylinder to TDC of the compression stroke. To do this:

a. Remove the rubber plug installed in the upper part of the clutch housing.
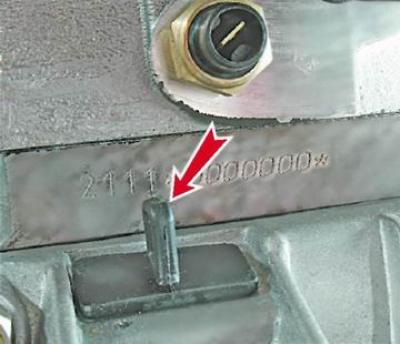

a. Remove the rubber plug installed in the upper part of the clutch housing.


b. Through the resulting window, using a slotted screwdriver with a wide blade, turn the crankshaft by the teeth of the flywheel ring...
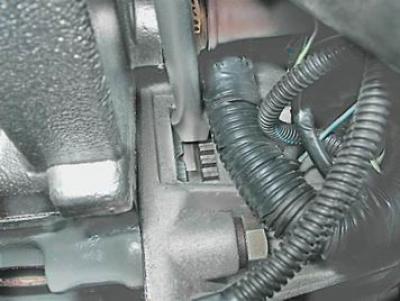
b. Through the resulting window, using a slotted screwdriver with a wide blade, turn the crankshaft…


...until the mark on the camshaft pulley and the protrusion on the rear timing belt cover are aligned.
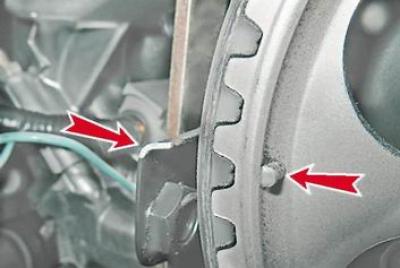
...until the mark on the camshaft pulley and the protrusion on the rear timing belt cover are…


In this case, the mark on the flywheel should be aligned with the center of the scale.
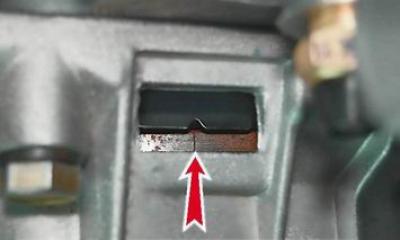
In this case, the mark on the flywheel should be aligned with the center of the scale.


Recommendations: If the relative position of the crankshaft and camshaft is disturbed, turn the crankshaft until the mark aligns with the scale center. Loosen the belt tension and remove it from the camshaft pulley. Turn the camshaft until the mark on its pulley aligns with the protrusion on the rear cover. Without changing the relative position of the shafts, put the belt on the camshaft pulley and adjust the belt tension.


7. Key by 17 mm loosen the tension roller mounting nut.
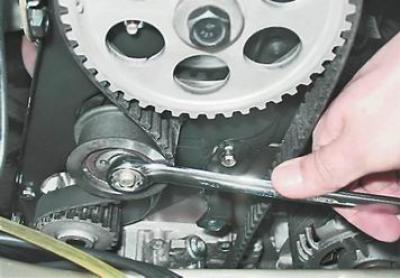
7. Key by 17 mm loosen the tension roller mounting nut.


8. Turning the roller with a special key, we adjust the belt tension and, holding the roller in this position, tighten the nut that secures it.
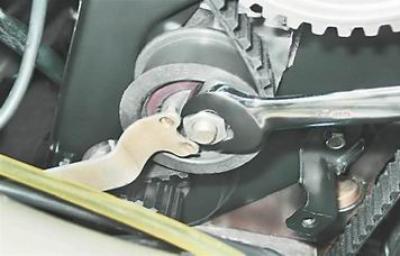
8. Turning the roller with a special key, we adjust the belt tension and, holding the roller in…


9. Check the belt tension (see above) and, if necessary, repeat the adjustment.

10. Finally tighten the roller mounting nut to a torque of 33.2-41.2 N·m (3.4-4.2 kgf·m).

11. Install the front belt cover in place and tighten the bolts that secure it.


This article is available at russian, bulgarian, belarusian, ukrainian, serbian, croatian, romanian, polish, slovak, hungarian
The text was reviewed by the specialist: Grigory Vologodtsev

Share with friends:

Previous articles
VAZ-2114: Engine repair
Next articles

Compression in engine cylinders — check
Lubrication system — checking oil pressure
Decorative engine trim 11183 (1.6i) — removal and installation
Lubrication system — oil and oil filter replacement
Lubrication system — checking the oil level
Timing Belt — Replacement
Timing Belt Tensioner Roller — Replacement
Front Crankshaft Oil Seal — Replacement
Camshaft Seal — Replacement
Intake manifold and exhaust manifold gasket — replacement

More articles from other manuals on VAZ cars:
➠ Timing Belt — Checking the Condition and Adjusting the Timing… VAZ-2110 (1995-2007)
➠ Adjusting the alternator drive belt tension VAZ-1111 (1988-1996)
➠ Adjusting the tension of the pump drive belt VAZ-21011 (1974-1983)
➠ Adjusting the tension of the camshaft drive belt VAZ-21051 (1979-2010)
➠ Steering — checking the technical condition and adjusting the… VAZ-2106 (1976-2006)
Link in different formats to this page


Visitor comments

No comments yet


How much will 28 + 19 ?


VAZ-2114 (2004-2013) 
  • General information
  • Operation and maintenance
  • Power unit
  • Engine repair
  • Cooling system
  • Supply system
  • Control system
  • Exhaust system
  • Transmission
  • Clutch
  • Car gearbox
  • Front wheel drives
  • Chassis
  • Wheels and tires
  • Front suspension
  • Rear suspension
  • Steering
  • Brake system
  • Body
  • Exterior
  • Interior
  • Doors and glass
  • Tailgate
  • Ventilation and heating
  • Electrical equipment
  • Equipment and devices
  • Headlights and lighting
  • Engine electrics
  • Electrical circuits


VAZ-2115 (1997-2012) 
  • General information
  • Vehicle device
  • Operation manual
  • Vehicle malfunctions
  • Car care
  • Power unit
  • Engine repair
  • Cooling system
  • Supply system
  • Control system
  • Exhaust system
  • Transmission
  • Clutch
  • Car gearbox
  • Front wheel drives
  • Chassis
  • Front suspension
  • Rear suspension
  • Steering
  • Brake system
  • Body
  • Exterior
  • Interior
  • Doors, covers and windows
  • Electrical equipment
  • Equipment and devices
  • Headlights and lighting
  • Engine electrics
  • Anti-theft system


VAZbook.ru © 2017 · Mobile version · Contact with administration · Sitemap: EN BG BY UA RS HR RO PL SK HU · Site search · News and articles VAZ-1111 · VAZ-11113 · VAZ-2101 · VAZ-21011 · VAZ-2104 · VAZ-2105 · VAZ-21051 · VAZ-2106 · VAZ-21061 · VAZ-2107 · VAZ-21099 · VAZ-2109 · VAZ-2108 · VAZ-2110 · VAZ-2112 · VAZ-2114 · VAZ-2115 · VAZ-2121 · VAZ-21213 · VAZ-21214 ·
The site stores technical data using cookies to improve the service.