

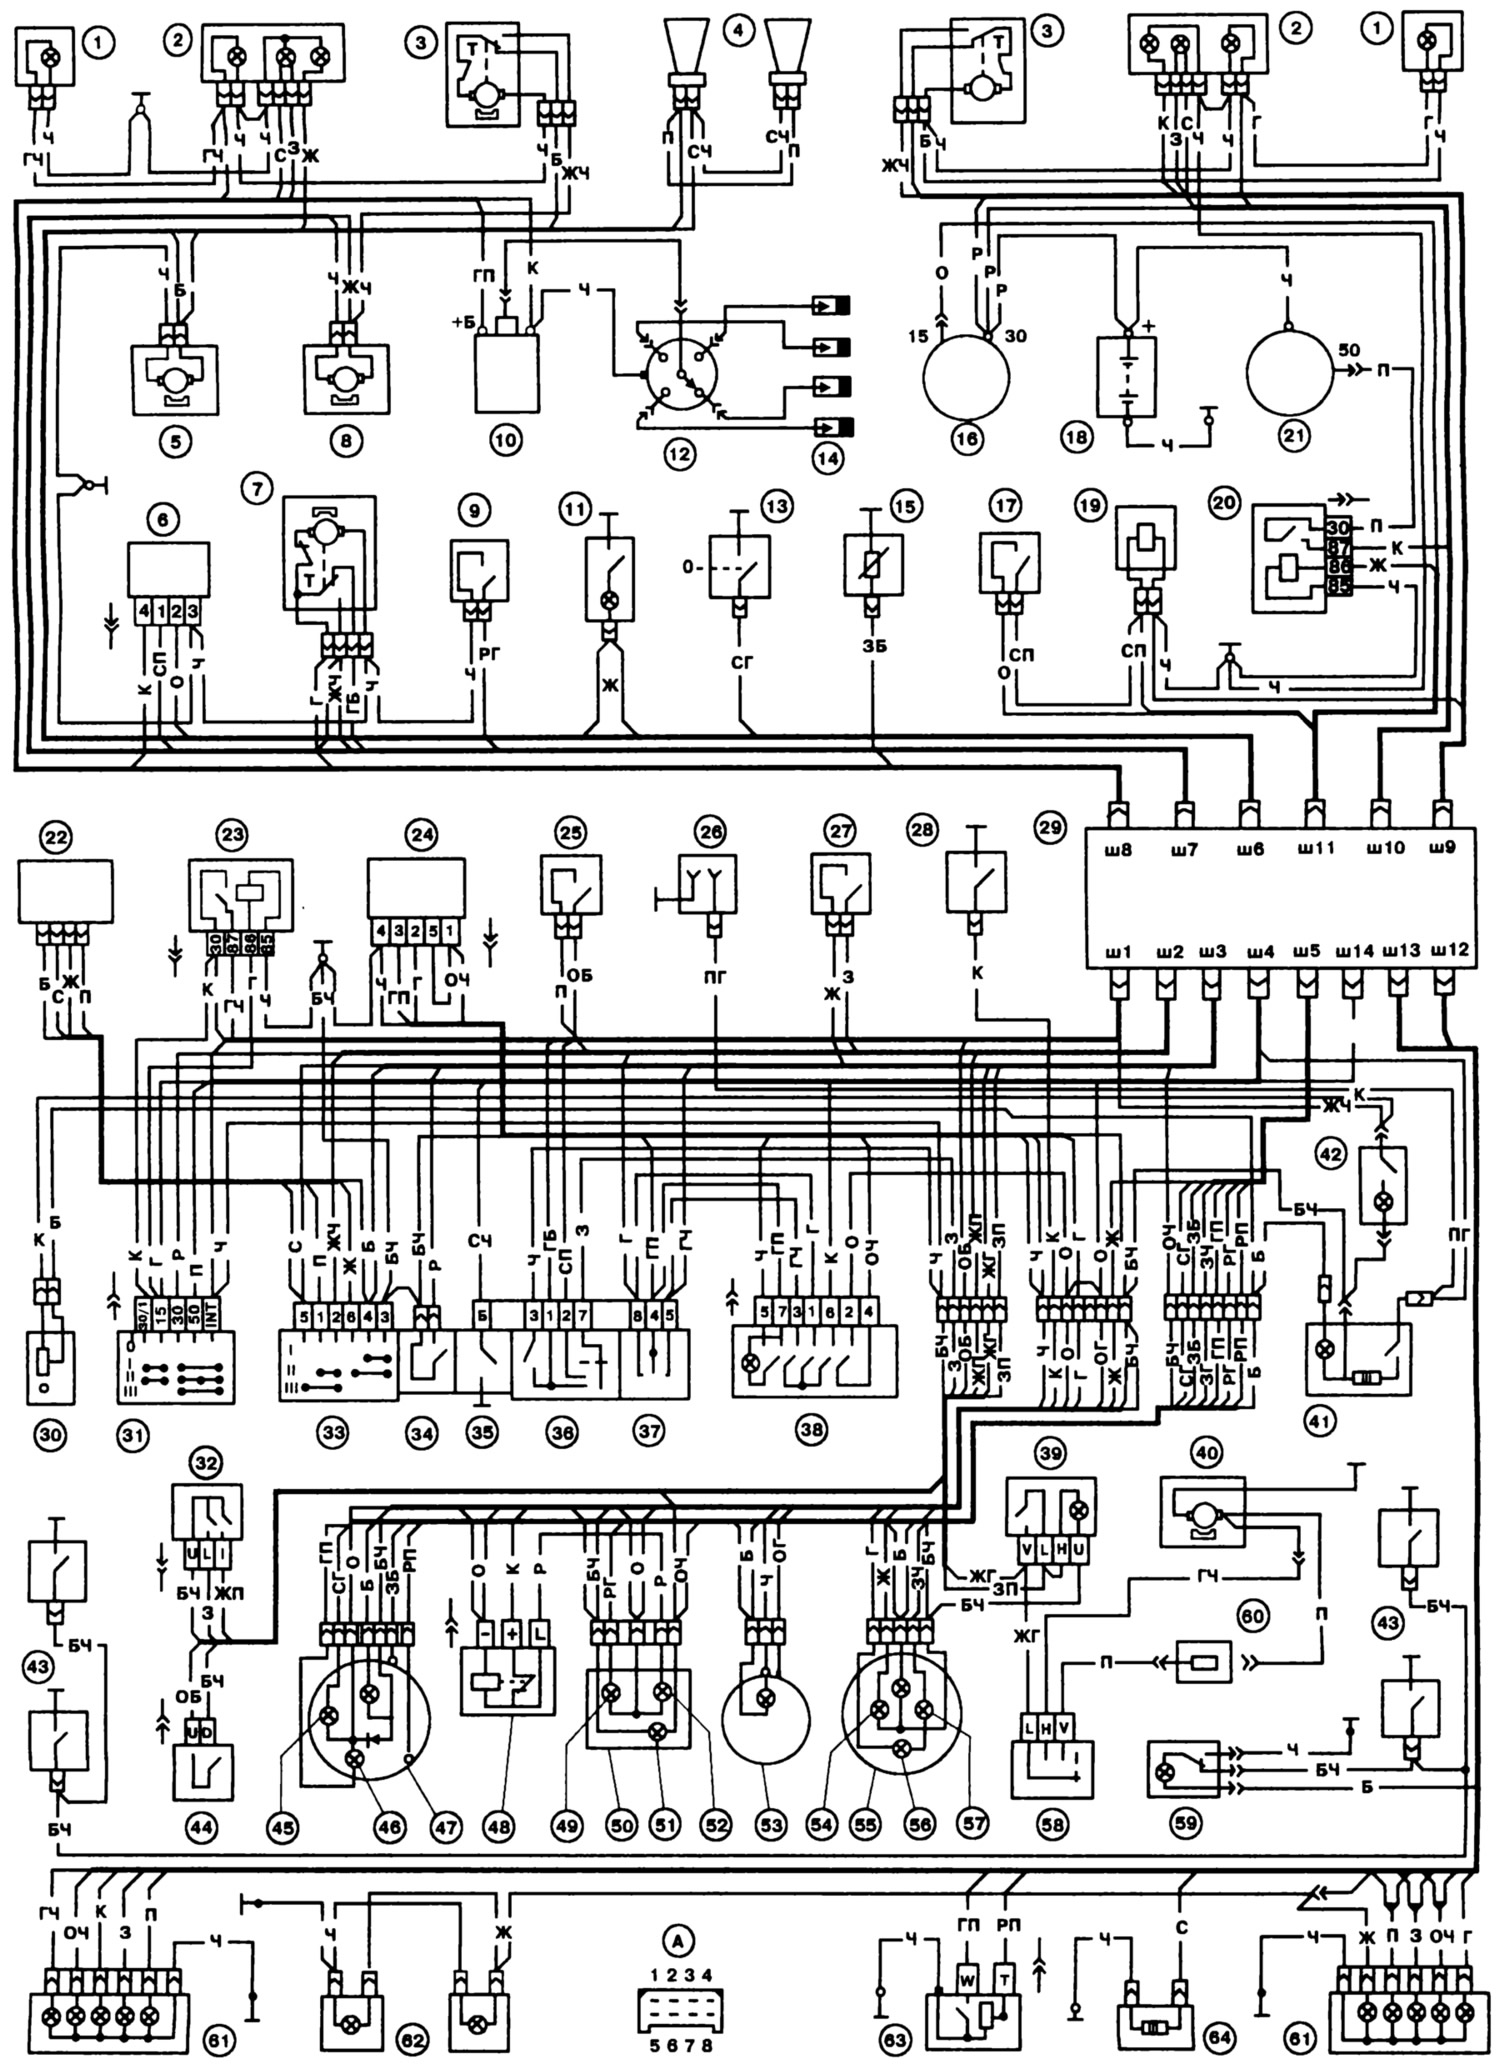
The diagram of the electrical equipment of the VAZ-2105 car is shown in fig. 222, and the features of the VAZ-2104 scheme are given in fig. 223. During the production of automobiles, changes were made to the schemes aimed at improving the reliability of the operation of individual components or related to the simplification of the schemes. Since 1988, a non-contact ignition system and a more powerful generator of type 37.3701 began to be installed on parts of cars. On fig. 222 shows an electrical circuit diagram without a battery charge warning lamp relay, but with additional starter and ignition relays, that is, circuits found on most cars produced.
Open large image in new tab »
Pic. 222. Scheme of the electrical equipment of the car VAZ-2105:
1 - side direction indicators; 2 - block headlights; 3 - headlight cleaner; 4 - sound signals; 5 - the electric motor flew off the headlights; 6 - carburetor pneumatic valve control unit; 7 - windshield wiper motor; 8 - windshield washer motor; 9 - brake fluid level sensor; 10 - ignition coil; 11 - engine compartment lamp; 12 - ignition distributor; 13 - oil pressure warning lamp sensor; 14 - spark plugs; 15 - coolant temperature indicator sensor; 16 - generator; 17 - carburetor microswitch; 18 - battery; 19 - pneumatic valve of the carburetor; 20 - starter enable relay; 21 - starter; 22 - windshield wiper relay; 23 - ignition relay; 24 - relay-breaker for alarm and direction indicators; 25 - stoplight switch; 26 - socket for a portable lamp; 27 - reverse light switch; 28 - switch of the parking brake warning lamp; 29 - mounting block; 30 - instrument lighting switch; 31 - ignition switch; 32 - outdoor lighting switch; 33 - windshield wiper switch; 34 - glass washer switch; 35 - switch of sound signals; 36 - headlight switch; 37 - turn signal switch; 38 - alarm switch; 39 - rear window heating switch; 40 - heater fan motor; 41 - cigarette lighter; 42 - glove box lamp; 43 - ceiling switches located in the door pillars; 44 - rear fog light switch; 45 - oil pressure warning lamp; 46 - fuel reserve control lamp; 47 - instrument cluster; 48 - relay-breaker of the parking brake warning lamp; 49 - brake fluid level control lamp; 50 - block of control lamps; 51 - control lamp of the rear fog light; 52 - parking brake warning lamp; 53 - voltmeter; 54 - control lamp side light; 55 - speedometer; 56 - control lamp of direction indicators; 57 - control lamp high beam headlights; 58 - heater motor switch; 59 - ceiling; 60 - additional heater motor resistor; 61 - rear lights; 62 - lights for lighting the license plate with them; 63 - fuel gauge sensor; 64 - rear window heating element; A - the order of the conditional numbering of the plugs in the blocks of the three-lever switch.
1 - side direction indicators; 2 - block headlights; 3 - headlight cleaner; 4 - sound signals; 5 - the electric motor flew off the headlights; 6 - carburetor pneumatic valve control unit; 7 - windshield wiper motor; 8 - windshield washer motor; 9 - brake fluid level sensor; 10 - ignition coil; 11 - engine compartment lamp; 12 - ignition distributor; 13 - oil pressure warning lamp sensor; 14 - spark plugs; 15 - coolant temperature indicator sensor; 16 - generator; 17 - carburetor microswitch; 18 - battery; 19 - pneumatic valve of the carburetor; 20 - starter enable relay; 21 - starter; 22 - windshield wiper relay; 23 - ignition relay; 24 - relay-breaker for alarm and direction indicators; 25 - stoplight switch; 26 - socket for a portable lamp; 27 - reverse light switch; 28 - switch of the parking brake warning lamp; 29 - mounting block; 30 - instrument lighting switch; 31 - ignition switch; 32 - outdoor lighting switch; 33 - windshield wiper switch; 34 - glass washer switch; 35 - switch of sound signals; 36 - headlight switch; 37 - turn signal switch; 38 - alarm switch; 39 - rear window heating switch; 40 - heater fan motor; 41 - cigarette lighter; 42 - glove box lamp; 43 - ceiling switches located in the door pillars; 44 - rear fog light switch; 45 - oil pressure warning lamp; 46 - fuel reserve control lamp; 47 - instrument cluster; 48 - relay-breaker of the parking brake warning lamp; 49 - brake fluid level control lamp; 50 - block of control lamps; 51 - control lamp of the rear fog light; 52 - parking brake warning lamp; 53 - voltmeter; 54 - control lamp side light; 55 - speedometer; 56 - control lamp of direction indicators; 57 - control lamp high beam headlights; 58 - heater motor switch; 59 - ceiling; 60 - additional heater motor resistor; 61 - rear lights; 62 - lights for lighting the license plate with them; 63 - fuel gauge sensor; 64 - rear window heating element; A - the order of the conditional numbering of the plugs in the blocks of the three-lever switch.
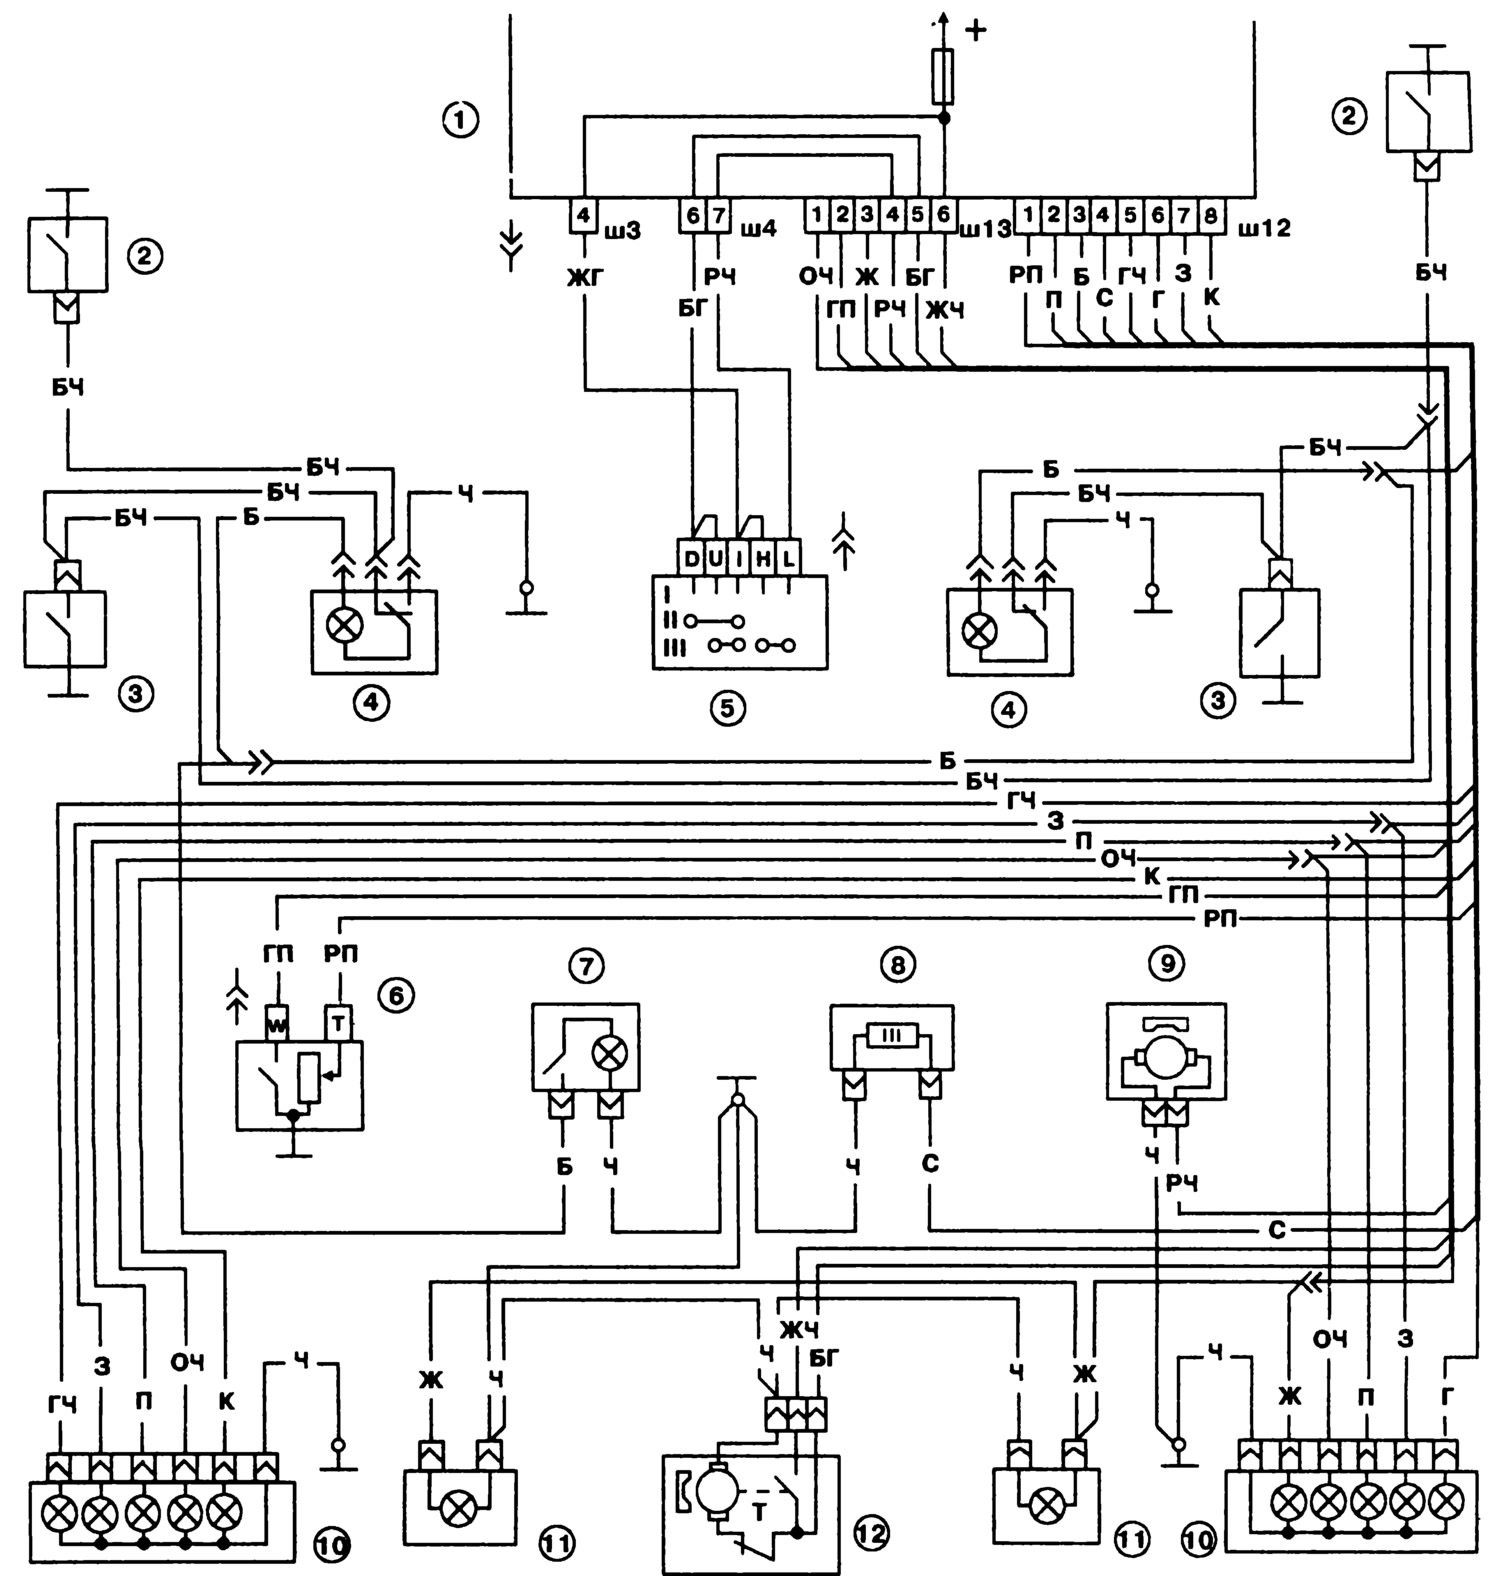
Scheme of the electrical equipment of the car VAZ-2104 (see fig. 223) differs from the VAZ-2105 in the laying of the rear wiring harness and the installation of an additional ceiling lamp to illuminate the luggage area of the body. On some vehicles, a rear window cleaner with a rear window washer pump can be installed. At the same time, a corresponding switch is added to the instrument panel.
Open large image in new tab »
Pic. 223. Scheme of the electrical equipment of the rear of the car VAZ-2104:
1 - mounting block: 2 - switches for ceiling lights located in the racks of the front doors; 3 - switches for ceiling lights located in the pillars of the rear doors; 4 - shades; 5 - switch of the cleaner and washer of the rear window; 6 - sensor for level indicator and fuel reserve; 7 - cover for lighting the rear part of the body; 8 - rear window heating element; 9 - rear window washer motor; 10 - rear lights; 11 - license plate lights; 12 - rear window wiper motor.
1 - mounting block: 2 - switches for ceiling lights located in the racks of the front doors; 3 - switches for ceiling lights located in the pillars of the rear doors; 4 - shades; 5 - switch of the cleaner and washer of the rear window; 6 - sensor for level indicator and fuel reserve; 7 - cover for lighting the rear part of the body; 8 - rear window heating element; 9 - rear window washer motor; 10 - rear lights; 11 - license plate lights; 12 - rear window wiper motor.
All diagrams in the section «electrical equipment», the color of the wires is indicated by letters, with the first letter indicating the color of the wire, and the second (if she is) - the color of the strip on the wire: B - white, G - blue, G - yellow, 3 - green, K - brown, P - red, O - orange, R - pink, C - gray, F - purple.
The voltage in the power circuit of the nodes is supplied mainly by the ignition switch. Always on (regardless of the position of the key in the ignition switch) power supply circuits for sound signals, cigarette lighter, brake light, lampshades, socket for a portable lamp, alarm power supply circuit, clock and front door alarm lights.
Most of the power supply circuits of the vehicle's electrical equipment are protected by fuses installed in the mounting block. The ignition and engine start circuits, the battery charge circuit and the windings of the relay for turning on the dipped and main beam headlights are not protected by fuses.
Before replacing a blown fuse, find out the cause of its blown and eliminate it. It is not allowed to use fuses that are not provided for by the design of the car. When looking for a malfunction, it is recommended to view the ones indicated in Table. 11 circuits that this fuse protects. The fuse number is indicated on the cover of the mounting block.
Table 11
| fuse no | Protected elements (chains) electrical equipment |
| 1 | Rear lights (reversing light). Heater motor. Control lamp and relay (winding) rear window heating. Rear window cleaner and washer (on VAZ-2104) |
| 2 | Windshield wiper and washer motors. Wiper and headlight washer motors. Wiper relay. Relay (contacts) cleaners and headlight washer |
| 3 | Spare |
| 4 | Spare |
| 5 | Rear window defogger and relay (contacts) turning on the heating |
| 6 | Cigarette lighter. Plug socket for portable lamp. |
| 7 | Sound signals |
| 8 | Direction indicators in alarm mode. Switch and relay-interrupter for direction indicators and alarms in alarm mode |
| 9 | Generator excitation winding |
| 10 | Direction indicators in turn signal mode and the corresponding indicator lamp. Control devices. Indicator lamps for fuel reserve, oil pressure, parking brake, brake fluid level. The relay-breaker of a control lamp of a parking brake. Carburetor air valve control system |
| 11 | Rear lights (stop lamps). Plafond (on the VAZ-2104 ceiling lamps) body interior lighting |
| 12 | Right headlight (high beam). Relay winding for headlight cleaners (with high beam on) |
| 13 | Left headlight (high beam). Control lamp of inclusion of a high beam of headlights |
| 14 | Left headlight (side light). Right rear light (side light). License plate lights. Hood lamp. Control lamp of inclusion of dimensional light |
| 15 | Right headlight (side light). Left rear light (side light). Cigarette lighter lamp. Instrument lighting lamps. Glove box lamp |
| 16 | Right headlight (dipped beam). Relay winding for headlight cleaners (with low beam on) |
| 17 | Left headlight (dipped beam). Rear lights (fog light) and a control lamp for turning on the fog light |
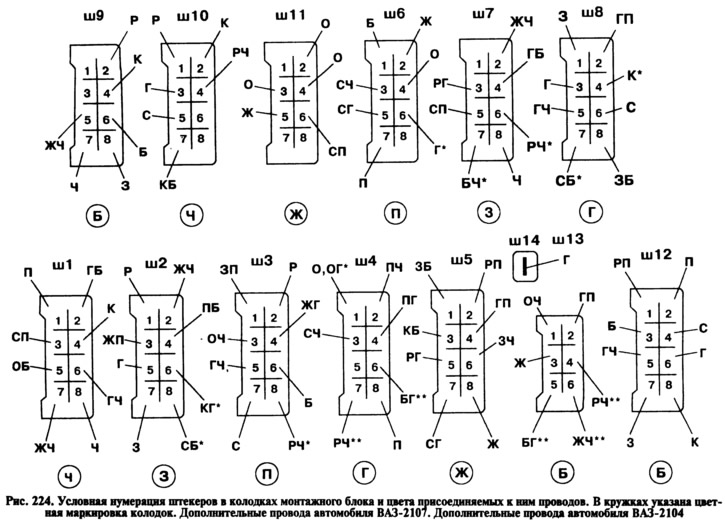
All wires on vehicles are combined in four main wiring harnesses. In the engine compartment are the wiring harnesses for the right and left mudguards, and in the cabin - the wiring harness for the instrument panel and rear. The engine compartment wiring harnesses are connected to the passenger compartment wiring harnesses through a mounting block located at the right rear of the engine compartment. The conditional numbers of the plugs in the connecting blocks of the mounting block and the colors of the wires connected to them are shown in fig. 224. The diagram of the internal connections of the mounting block is shown in fig. 225.
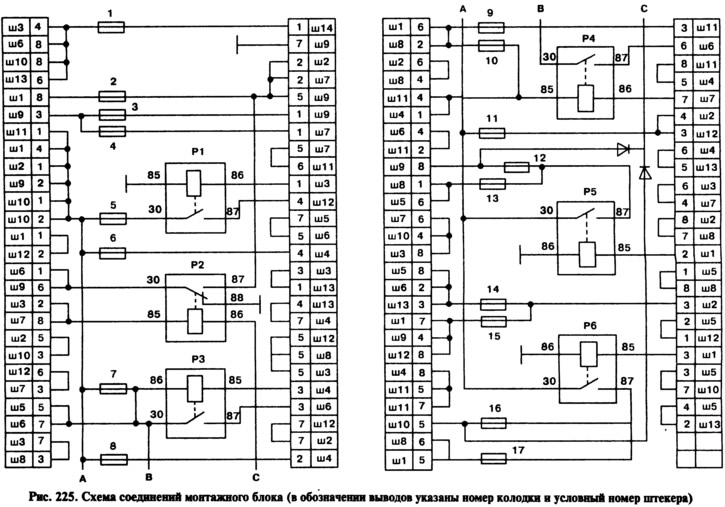
All fuses and auxiliary relays are located in the mounting block. There are 17 fuses in total (15 for a current of 8 A and two for 16 A - 5th and 7th). On the cover of the mounting block, opposite each fuse and relay, there are symbols showing which circuits this fuse protects or turns on one or another relay.
Mounting blocks of domestic production or manufactured in Yugoslavia can be installed on cars (Serbia). Mounting blocks made in Yugoslavia (Serbia), are non-separable and cannot be repaired. If internal connections are broken, replace with new ones. Domestic mounting blocks can be disassembled and the printed circuit board block replaced. It is allowed to solder wires to replace burned out current-carrying tracks on printed circuit boards, but only if this does not require disconnecting the printed circuit boards.
To disassemble the mounting block, remove the cover and remove the relays, jumpers and fuses from the sockets of the mounting block. Then slide the case with printed circuit boards out of the guide slots of the frame of the mounting block. Loosen the screws, remove the bezel and remove the PCB assembly from the housing.
When checking the health of the car's electrical circuit, it is not allowed to short the wires to the body, as this can lead to burnout of the current-carrying tracks of the mounting block.
It is better to check the circuit and electrical equipment components with the help of testers. For example, you can use the combined instrument 43102. This instrument allows you to measure DC voltage in the range 0-2, 0-20 and 0-40 V, AC voltage up to 400 V, DC resistance in the range 0-0.01 and 0- 100 kOhm, crankshaft speed up to 6000 min-1, the angle of the closed state of the breaker contacts is up to 90°.
When repairing a car and an electrical system, it is imperative to disconnect the wire from the terminal «-» battery.