English Русский
Български
Беларускі
Український
Српски
Hrvatski
Română
Polski
Slovenský
Magyar
| Articles | Contacts | Sitemap |   
Repair and maintenance Lada Repair and maintenance Mazda Repair and maintenance Mitsubishi Repair and maintenance Toyota Repair and maintenance Land Rover Repair and maintenance Hyundai Repair and maintenance Nissan
VAZbook.ru


Main     1111   2101   2105   2106   2107   2109   2110   2115   2121  
VAZ-1111 (1988-1996) VAZ-11113 (1996-2003)
  • Main
  • «Oka»
  • VAZ-11113
  • Electrical equipment
  • Equipment and devices
  • Checking and replacing devices

Checking and replacing devices (VAZ-11113)

            0

Contents: Checking the coolant temperature…↓ Checking the sensor and fuel level…↓
You will need:
  • replacement head "for 6"
  • crank
  • screwdriver
  • pliers

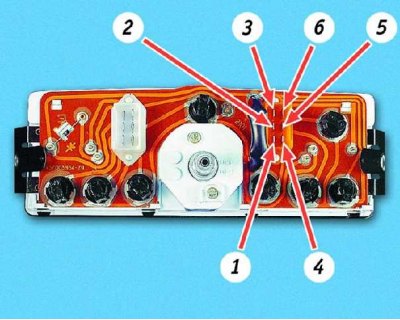
Numbering of contacts on the block (to check the instrument cluster)
Numbering of contacts on the block (to check the instrument cluster)


Numbering of contacts on the block (to check the instrument cluster)


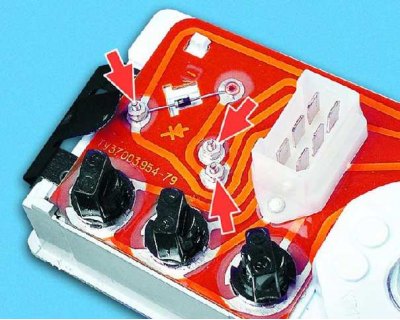
The fuel level and coolant temperature gauges are combined and secured to the mounting plate with three nuts.

Checking the coolant temperature sensor and gauge


The pointer does not deviate from the beginning of the scale regardless of the coolant temperature.

Disconnect the wire from the indicator sensor and connect it to ground. Turn on the ignition:
  • the pointer has deviated - the sensor is faulty (replace);
  • the pointer does not move - continue troubleshooting.

Remove the instrument cluster from the panel and disconnect the red connector block from it. Connect contact 2 of the cluster block to ground with a wire. Turn on the ignition:


  • the pointer has deviated - there is a break in the wire connecting the pointer and the sensor;
  • the pointer arrow has not moved - replace the pointer.

If the new indicator needle does not move, the damage should be looked for in the instrument cluster (in the mounting board or in the places where the socket is soldered to the board). Repair or replace the circuit board or instrument cluster.

The pointer is in the red zone of the scale regardless of the coolant temperature

Disconnect the wire from the indicator sensor. Turn on the ignition:
  • the pointer has moved to the beginning of the scale - the sensor is faulty (replace);
  • the pointer does not move - check if there is a short circuit to ground in the wire connecting the sensor to the pointer. If there is no short circuit, the pointer is faulty (replace).

Checking the sensor and fuel level indicator


The pointer does not deviate from the beginning of the scale regardless of the amount of gasoline in the fuel tank

Fold the rear seat and remove the indicator sensor hatch cover. Disconnect the gray-red wire from the indicator sensor and connect it to the "ground". Turn on the ignition:
  • the pointer has deviated - the sensor is faulty (replace);
  • the pointer does not move - continue troubleshooting.

Remove the instrument cluster from the panel and disconnect the red connector from it. Connect contact 1 of the cluster connector to ground with a wire. Turn on the ignition:
  • the pointer of the indicator has deviated to the end of the scale - there is a break in the wire connecting the sensor to the pointer;
  • the pointer does not move - replace the pointer. If the pointer of the new pointer also does not move from the beginning of the scale, replace the mounting plate or the instrument cluster.

The pointer is at the end of the scale regardless of the amount of gasoline in the fuel tank


Disconnect the gray-red wire from the indicator sensor. Turn on the ignition:
  • the pointer has moved to the beginning of the scale - the sensor is faulty (replace);
  • the pointer does not move – the pointer is faulty (replace).
the pointer does not move – the pointer is faulty (replace).


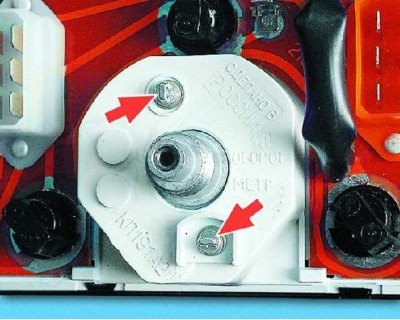
The speedometer is attached to the instrument cluster housing with two screws that have holes in the heads for sealing.
The speedometer is attached to the instrument cluster housing with two screws that have holes in…


1. Remove the instrument cluster from the vehicle (see subsection 8.6.1).
1. Remove the instrument cluster from the vehicle (see subsection 8.6.1).


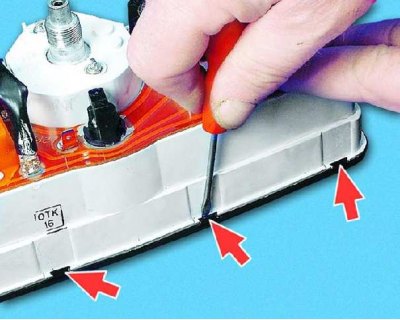
2. Carefully bend back the spring clips of the frame and...
2. Carefully bend back the spring clips of the frame and...


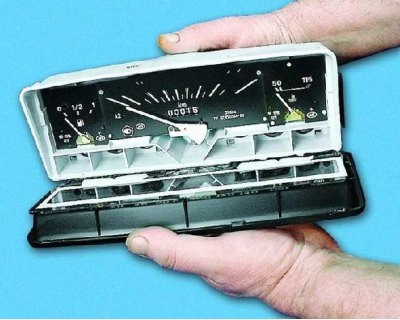
3....remove the frame with the protective glass from the instrument cluster housing.
3....remove the frame with the protective glass from the instrument cluster housing.


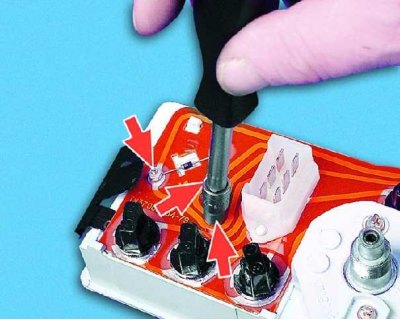
4. Unscrew the three nuts securing the indicator, remove the flat washers and...
4. Unscrew the three nuts securing the indicator, remove the flat washers and...


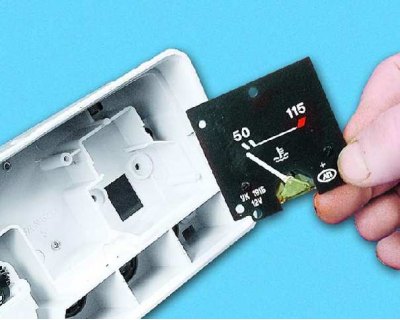
5....remove the pointer assembly with the scale from the instrument cluster housing.
5....remove the pointer assembly with the scale from the instrument cluster housing.


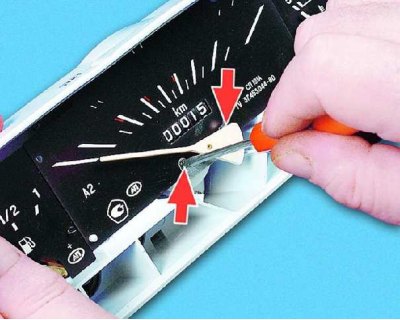
6. To replace the speedometer, unscrew the two screws securing the speedometer scale and...

Information taken from the website (www.VazBook.ru)
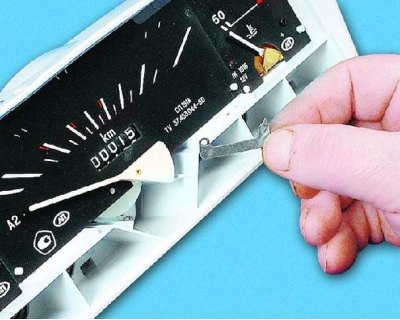
6. To replace the speedometer, unscrew the two screws securing the speedometer scale and...


7....remove the speedometer needle travel limiter plate.
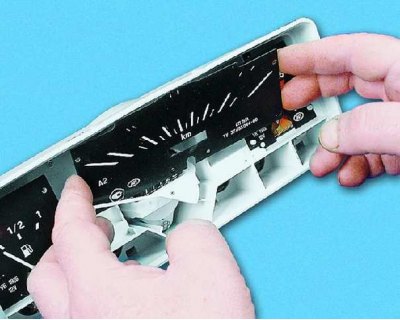
7....remove the speedometer needle travel limiter plate.


8. Remove the speedometer scale.
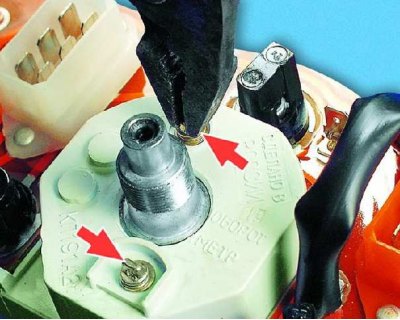
8. Remove the speedometer scale.


9. Unscrew the two screws securing the speedometer and carefully remove it from the combination meter housing. Install the instruments in the reverse order of removal.


This article is available at russian, bulgarian, belarusian, ukrainian, serbian, croatian, romanian, polish, slovak, hungarian
The text was reviewed by the specialist: Grigory Vologodtsev

Share with friends:

Previous articles
VAZ-11113: Equipment and devices
Next articles

Replacement of control lamps and backlight lamps
Removal and installation the instrument cluster
Checking and replacing the relay
Removal and installation the fuse box
Replacing the speedometer drive cable
Replacing the Parking Brake Indicator Lamp Switch
Replacing switches on the instrument panel and their backlight bulbs
Replacing the brake light switch
Replacing the reverse light switch

More articles from other manuals on VAZ cars:
➠ Engine Oil — Checking Level and Replacing VAZ-2104 (1984-2012)
➠ Engine Oil — Checking Level and Replacing VAZ-2106 (1976-2006)
➠ Engine Oil — Checking Level and Replacing VAZ-2107 (1982-2012)
➠ Checking the condition and replacing the front wheel brake pads VAZ-2109 (1984-1997)
➠ Evaporative Canister Purge Valve — Checking and Replacing VAZ-2110 (1995-2007)
Link in different formats to this page


Visitor comments

No comments yet


How much will 33 + 20 ?


VAZ-1111 (1988-1996) 
  • General information
  • Vehicle description
  • Vehicle device
  • Vehicle operation
  • Maintenance
  • Applications
  • Power unit
  • Engine repair
  • Cooling system
  • Lubrication system
  • Supply system
  • Transmission
  • Clutch
  • Transmission
  • Chassis
  • Front suspension and wheels
  • Rear suspension
  • Steering
  • Brake system
  • Body
  • Exterior
  • Interior
  • Electrical equipment
  • Engine electrics
  • Equipment and devices


VAZ-11113 (1996-2003) 
  • General information
  • Introduction to the guide
  • User manual
  • Maintenance
  • Power unit
  • Engine repair
  • Cooling and lubrication system
  • Fuel system
  • Exhaust system
  • Transmission
  • Car gearbox
  • Clutch and drive shafts
  • Chassis
  • Front suspension
  • Rear suspension
  • Steering
  • Brake system
  • Body
  • Exterior
  • Interior
  • Doors and locks
  • Electrical equipment
  • Equipment and devices
  • Lighting and signaling
  • Engine electrics
  • Ignition system


VAZbook.ru © 2017 · Mobile version · Contact with administration · Sitemap: EN BG BY UA RS HR RO PL SK HU · Site search · News and articles VAZ-1111 · VAZ-11113 · VAZ-2101 · VAZ-21011 · VAZ-2104 · VAZ-2105 · VAZ-21051 · VAZ-2106 · VAZ-21061 · VAZ-2107 · VAZ-21099 · VAZ-2109 · VAZ-2108 · VAZ-2110 · VAZ-2112 · VAZ-2114 · VAZ-2115 · VAZ-2121 · VAZ-21213 · VAZ-21214 ·
The site stores technical data using cookies to improve the service.