
Ball joints
First of all, make sure that the protective covers of the hinges are intact. Breaks, cracks, delamination of rubber from metal fittings, traces of lubricant leakage are unacceptable. Then check for wear on the running surfaces of the ball joints by manually turning the ball pin. Free (without resistance) finger movement or sticking is unacceptable. A more accurate check of the condition of the upper ball joint by the value of the radial and axial clearance is carried out on the fixture 02.8701.9502. To do this, install the ball joint 1 (pic. 164, a) into the socket of the fixture and tighten it with a screw. Install indicator 2 in the fixture bracket so that the indicator leg rests against the side surface of the hinge body, and the indicator needle is at zero. Then install the torque wrench 3 in the socket of the fixture and, applying a moment of 20 kgf·m to it in both directions, determine the total radial clearance in the ball joint using indicator 2. If it exceeds 0.7 mm, replace the joint with a new one.
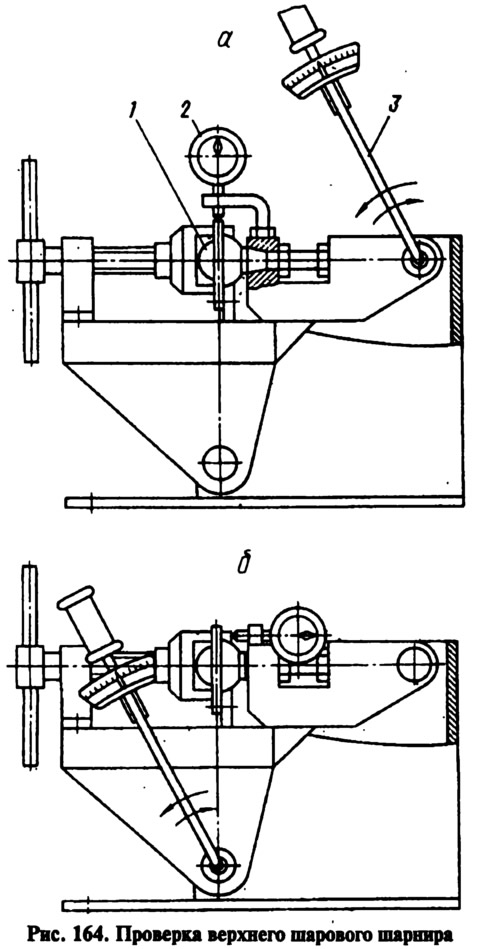
Similarly, check the axial clearance in the ball joint, after changing its fastening in the fixture, as shown in fig. 164b. Axial clearance in the hinge is allowed no more than 0.7 mm.
Suspension springs
Carefully inspect the springs. If cracks or deformation of the coils are found that could cause a malfunction, replace the spring with a new one. After compressing the spring three times until the coils touch, check it for compliance with the following data.
- Free spring length, mm - 360
- Spring length under load 435±15 kgm, mm:
- group A (yellow marking), over - 232
- group B (green marking), no more — 232
- Spring length under load 603 kgf, mm - 182
At the same time, check the condition of the insulating gaskets; if they are damaged, replace them with new ones.
Stabilizer bar
Check if the rod is deformed and if its ends are in the same plane; if the deformation is insignificant, then straighten the rod, if the deformation is significant, replace the rod. Check the safety of the pillows in the mounting brackets to the body and to the lower suspension arms; Replace pads when worn.
Front suspension crossbar
Checking its status is described in the section «Determining the technical condition of the front suspension parts on a car».
The dimensions of the main mating parts are given in table. 9.
