English Русский
Български
Беларускі
Український
Српски
Hrvatski
Română
Polski
Slovenský
Magyar
| Articles | Contacts | Sitemap |   
Repair and maintenance Lada Repair and maintenance Mazda Repair and maintenance Mitsubishi Repair and maintenance Toyota Repair and maintenance Land Rover Repair and maintenance Hyundai Repair and maintenance Nissan
VAZbook.ru


Main     1111   2101   2105   2106   2107   2109   2110   2115   2121  
VAZ-2104 (1984-2012) VAZ-2105 (1979-2010) VAZ-21051 (1979-2010)
  • Main
  • «Zhiguli»
  • VAZ-21051
  • Electrical equipment
  • Ignition system
  • Setting the ignition timing

Setting the ignition timing (VAZ-21051)

            0

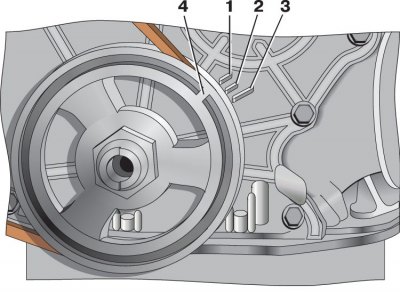
Marks for setting the ignition timing


1 – TDC mark on the crankshaft pulley;

1 – TDC mark on the crankshaft pulley;
2 – 10° ignition advance mark;
3 – 5° ignition advance mark;
4 – 0° ignition advance mark


To check the ignition timing, there are three marks 2, 3 and 4 on the timing mechanism cover and mark 1 on the crankshaft pulley, corresponding to the TDC of the piston in the first and fourth cylinders when aligned with mark 4 on the cover. Initial ignition timing angles for different engines and gasolines used (see subsection 3.7).

1. Connect the "+" clamp of the stroboscope to the "+" terminal of the battery, the ground clamp to the "-" terminal of the battery, and connect the clamp of the stroboscope sensor to the high-voltage wire of the 1st cylinder.

2. Mark mark 1 on the crankshaft pulley with chalk for better visibility. Start the engine and warm it up so that it runs at minimum idle speed.

3. Direct the flashing beam of the strobe light at the pulley and check whether the position of the mark 1 on the pulley corresponds to the ignition timing angle values (see subsection 3.7).

4. To adjust the ignition timing, stop the engine, loosen the distributor mounting nut and turn it to the required angle. To increase the ignition timing angle, turn the distributor housing counterclockwise, and to decrease it, turn it clockwise.


5. Then check the ignition timing again.

6. If you have a diagnostic stand with an oscilloscope, you can also easily check the ignition timing using it, following the instructions for the stand.

7. Install the ignition distributor removed from the engine in place in the following order:
  • remove the distributor cap, check and, if necessary, adjust the gap between the breaker contacts;
  • turn the crankshaft until the compression stroke in the first cylinder begins, and then, continuing to turn the crankshaft, align mark 1 with mark 3;
  • turn the rotor to a position where its outer contact is directed towards the contact of the first cylinder on the distributor cap;
  • holding the distributor shaft from turning, insert it into the socket on the cylinder block so that the centerline passing through the spring clips is approximately parallel to the centerline of the engine;
  • fasten the distributor to the cylinder block, install the cover, connect the wires, check and adjust the ignition timing.


This article is available at russian, bulgarian, belarusian, ukrainian, serbian, croatian, romanian, polish, slovak, hungarian
The text was reviewed by the specialist: Grigory Vologodtsev

Share with friends:

Previous articles
VAZ-21051: Ignition system
Next articles

Ignition system — general information
Gap between contacts of the breaker in the ignition distributor
Ignition distributor — testing on the bench
Switch — testing on the bench
Ignition coil — testing on the bench
Spark plugs — testing on the bench

More articles from other manuals on VAZ cars:
➠ Setting the ignition timing VAZ-1111 (1988-1996)
➠ Setting the ignition timing VAZ-2101 (1970-1983)
➠ Setting the ignition timing VAZ-2109 (1984-1997)
➠ Setting the ignition timing VAZ-21213 (1994-2006)
➠ Ignition timing — checking and adjustment VAZ-2106 (1976-2006)
Link in different formats to this page


Visitor comments

No comments yet


How much will 32 + 32 ?


VAZ-2104 (1984-2012) 
  • General information
  • Operation and maintenance
  • Power unit
  • Engine repair
  • Fuel system (carburetor)
  • Fuel system (injector)
  • Control system
  • Cooling system
  • Exhaust system
  • Transmission
  • Clutch
  • Car gearbox
  • Cardan gear
  • Rear axle
  • Chassis
  • Front suspension
  • Rear suspension
  • Wheels and tires
  • Steering
  • Brake system
  • Body
  • Exterior
  • Interior
  • Doors and glass
  • Ventilation and heating
  • Electrical equipment
  • Equipment and devices
  • Headlights and lighting
  • Engine electrics
  • Electrical circuits


VAZ-2105 (1979-2010) 
  • General information
  • Vehicle description
  • Vehicle device
  • Vehicle operation
  • Maintenance
  • Power unit
  • Engine repair
  • Cooling and lubrication system
  • Supply system
  • Transmission
  • Clutch
  • Car gearbox
  • Cardan gear
  • Rear axle
  • Chassis
  • Suspension and shock absorbers
  • Steering
  • Brake system
  • Body
  • Body elements
  • Electrical equipment
  • Engine electrics
  • Equipment and devices


VAZ-21051 (1979-2010) 
  • General information
  • Introduction to guide
  • User manual
  • Troubleshooting
  • Power unit
  • Engine repair
  • Engine repair VAZ-2103
  • Cooling system
  • Lubrication system
  • Power and exhaust system
  • Fuel injection
  • Transmission
  • Clutch
  • Car gearbox
  • Cardan gear
  • Rear axle
  • Chassis
  • Suspension and shock absorbers
  • Steering
  • Brake system
  • Body
  • Exterior
  • Interior
  • Doors and windows
  • Electrical equipment
  • Equipment and devices
  • Engine electrics
  • Ignition system
  • Electrical circuits


VAZbook.ru © 2017 · Mobile version · Contact with administration · Sitemap: EN BG BY UA RS HR RO PL SK HU · Site search · News and articles VAZ-1111 · VAZ-11113 · VAZ-2101 · VAZ-21011 · VAZ-2104 · VAZ-2105 · VAZ-21051 · VAZ-2106 · VAZ-21061 · VAZ-2107 · VAZ-21099 · VAZ-2109 · VAZ-2108 · VAZ-2110 · VAZ-2112 · VAZ-2114 · VAZ-2115 · VAZ-2121 · VAZ-21213 · VAZ-21214 ·
The site stores technical data using cookies to improve the service.