




The rotor of the generator 94.3701 is driven by a poly-V belt from the engine crankshaft pulley (on some VAZ-2111 engines - from the damper).
Technical characteristics of the generator 94.3701
- Maximum output current at 13 V and 5000 min⁻¹, A…..80
- Adjustable voltage limits, V…..13.2–14.7
- Engine-generator gear ratio…..1:2.4
- Capacitor capacity, μF…..2.2±20%
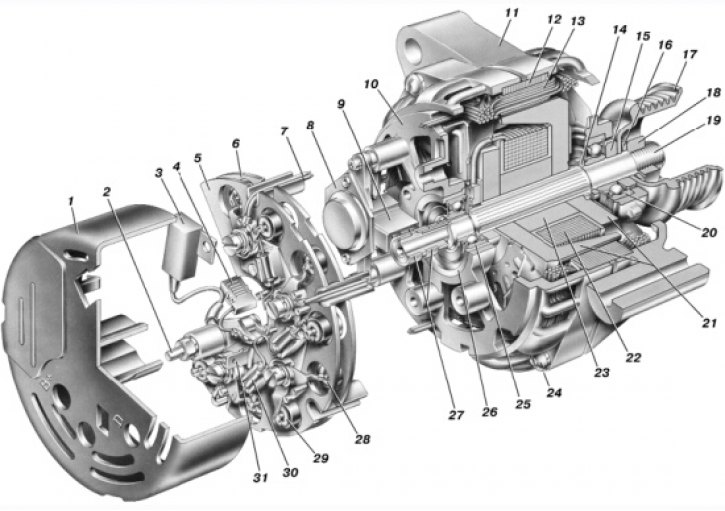
Generator 94.3701: 1 – casing; 2 – output "B+" for connecting consumers; 3 – noise suppression capacitor; 4 – common terminal of additional diodes (connects to the "D+" terminal of the voltage regulator); 5 – holder of positive diodes of the rectifier block; 6 – holder of negative diodes of the rectifier block; 7 – stator winding terminals; 8 – voltage regulator; 9 – brush holder; 10 – back cover; 11 – front cover; 12 – stator; 13 – stator winding; 14 – distance ring; 15 – washer; 16 – cone washer; 17 – pulley; 18 – nut; 19 – rotor shaft; 20 – front rotor shaft bearing; 21 – beak-shaped rotor pole pieces; 22 – rotor winding; 23 – bushing; 24 – tension screw; 25 – rear rotor bearing; 26 – bearing sleeve; 27 – slip rings; 28 – negative diode; 29 – positive diode; 30 – additional diode; 31 – pin "D" (common terminal of additional diodes).
Stator 12 (see fig above) and covers 10 and 11 are tightened with four bolts. Rotor shaft 19 rotates in bearings 20 and 25, which are installed in the covers. The rear bearing of the generator is pressed onto the rotor shaft and pressed by the rear cover 10 through a plastic bushing. Front bearing 20 is rolled into front cover 11 and can only be replaced assembled with it. The inner race of front bearing 20 together with spacer ring 14 and washer is clamped with a nut between the pulley and the rotor shaft. The rear part of the generator is covered with plastic casing 1.
The generator stator is equipped with a three-phase winding 13, made according to the "star" scheme (phase windings have a common point), other terminals of the phase windings are connected to a rectifier bridge consisting of six silicon diodes. The holders contain diodes of only one polarity. Holders 5 and 6 of positive and negative diodes respectively form a rectifier unit, which is fixed on the rear cover 10 of the generator under the plastic casing 1. Three additional diodes 30 are installed on one of the holders, through which voltage is supplied to the excitation winding of the generator after the engine is started.
The excitation winding is located on the generator rotor. The excitation winding terminals are soldered to two copper contact rings 27 mounted on the rotor shaft. Power is supplied to the excitation winding through two contact brushes and contact rings. The contact brushes are located in the brush holder 9, combined in one housing with the voltage regulator 8. The voltage regulator housing is non-separable, and is replaced if it fails.
To protect the on-board network from voltage surges during operation engine management systems and to reduce radio interference between the terminals of the positive and negative diodes, an interference-suppressing capacitor 3 with a capacity of (2.2±0.004) μF is connected, located on the rectifier block.
The connection diagram of the generator system 94.3701 is shown in the figure:
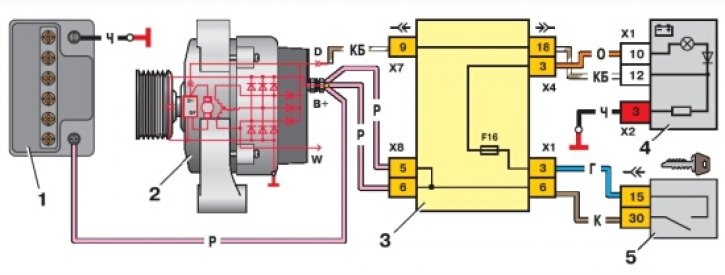
Wiring diagram of generator 94.3701: 1 – battery; 2 – generator; 3 – mounting block; 4 – battery charging indicator lamp located in the instrument cluster; 5 – ignition switch (lock)
The current for generator excitation when the ignition is turned on is supplied to the "D+" terminal of the regulator (the "D" terminal of the generator) through the control lamp 4, located in the instrument cluster. When the ignition is turned on, the lamp should light, and after the engine starts, it should go out if the generator is in good condition. Bright or dim lighting of the lamp indicates malfunctions.
Warnings! The negative terminal of the battery must always be connected to ground and the positive terminal to the B+ terminal of the alternator. Incorrectly reconnecting the battery will immediately cause increased current to flow through the alternator diodes, causing them to be damaged.
Do not operate the generator with the battery disconnected - this may damage the generator voltage regulator and the electronic devices of the vehicle's on-board network.
It is forbidden to check the generator's performance "for a spark" even by briefly connecting the "B+" terminal of the generator to the "ground". A significant current will start to flow through the valves, and they will be damaged. The generator can only be checked using an ammeter and voltmeter.
It is not allowed to check the diodes of the generator rectifier block with a voltage of more than 12 V or with a megohmmeter, since it has too high a voltage for the diodes and they will be broken during the test (a short circuit will occur).
It is prohibited to check the vehicle's electrical wiring with a megohmmeter or a lamp powered by a voltage greater than 12 V. If such a check is necessary, then the wires should first be disconnected from the generator.
The insulation resistance of the stator winding should be checked with increased voltage only on a test bench and necessarily with the phase winding terminals disconnected from the diodes.
When electric welding car body components and parts, you should disconnect the wires from all generator terminals and battery terminals.
Helpful Hints: If the alternator belt breaks on the road and you forgot the spare at home, a 20 mm wide ring cut from an old inner tube can serve as a temporary replacement.
To reduce current consumption when driving a vehicle with a faulty generator, if possible, turn off the radio, secondary lighting, heater fan, heated glass, etc.
[The original is on the portal: VAZbook.ru]