




Wiring diagram for the heater fan motor
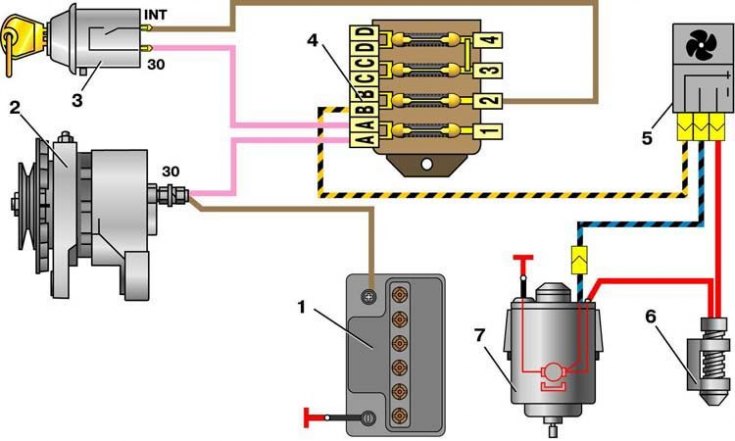
1 – generator; 2 – battery; 3 – ignition switch; 4 – fuse box; 5 – heater switch; 6 – additional resistor; 7 – heater fan electric motor
Heater Electric Motor Parts Heater
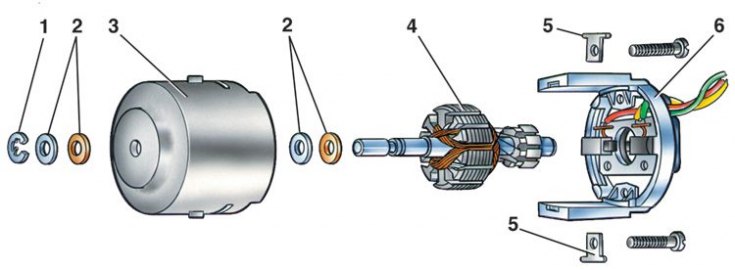
1 – lock washer; 2 – washers; 3 – body; 4 - anchor; 5 – crackers; 6 – lid
The material is posted on the online resource [VazBook]
Data for verification
| Nominal voltage, V | 12 |
| Nominal power, W | 20 |
| Shaft rotation speed when the electric motor is loaded with an impeller at a voltage of 12 V and a temperature of (25±10)°C, min⁻¹ | 3000 ±150 |
| Current consumption at the specified load and rotation speed, no more than, A | 4,5 |
| Low speed of rotation of the anchor shaft with impeller, min⁻¹ | 2200 ±150 |
| Current consumption at anchor rotation frequency of 2200 min⁻¹, no more than, A | 2,7 |
Electric motor ME-255 – direct current with excitation from permanent magnets.
When additional resistor 6 is connected to the electric motor power supply circuit, the armature shaft rotates at a reduced frequency. The resistor is secured with two spring washers in the heater fan casing. The resistor resistance value is 1.5 Ohm at 20°C.
A faulty electric motor is usually recommended to be replaced with a new one. The only possible repair is cleaning the collector.
1. Loosen the screws securing the cover 6 (see fig. Heater Electric Motor Parts) and take it off.
2. Then remove the lock washer 1 from the armature shaft and remove the armature 4 from the housing.
3. Assembly is carried out in reverse order.
4. The technical condition check is similar to that described for the windshield wiper motor (see subsection 11.4.1.2).