
English Русский
Български
Беларускі
Український
Српски
Hrvatski
Română
Polski
Slovenský
Magyar
| Articles | Contacts | Sitemap |   
Repair and maintenance Lada Repair and maintenance Mazda Repair and maintenance Mitsubishi Repair and maintenance Toyota Repair and maintenance Land Rover Repair and maintenance Hyundai Repair and maintenance Nissan
VAZbook.ru


Main     1111   2101   2105   2106   2107   2109   2110   2115   2121  
VAZ-2110 (1995-2007) VAZ-2112 (1999-2007)
  • Main
  • «Lada»
  • VAZ-2110
  • Chassis
  • Brake system
  • Bleeding brakes, replacing brake fluid

Bleeding brakes, replacing brake fluid (VAZ-2110)

            0

Bleeding the brakes is recommended after repairing the brake system that has caused a breach in the tightness of the system and if there is a suspicion of air entering the brake system. The presence of air in the hydraulic drive of the brake system is determined by the "behavior" of the brake pedal - it becomes "soft" (there is no feeling of support at the end of the brake pedal's working stroke) and drops below its normal operating position. In this case, you should first determine and eliminate the cause of air entering the hydraulic drive, and only then begin bleeding it.

To bleed the brakes you will need:
  • assistant;
  • a special key for the brake bleed nipple or an 8 mm open-end wrench;
  • clear vinyl tube of suitable diameter;
  • container for draining brake fluid from the brake system;
  • fresh brake fluid recommended by the manufacturer (see Table 16.4 "Operating fluids").
  • inspection pit or overpass (desirable).

Sequence of execution


1. Prepare the car for work (see points 1, 2b and 4 "Preparing a car for maintenance and repair").

2. Disconnect the wiring harness pad from the connector of the emergency brake fluid level drop sensor and remove the tank cover (see points 1 and 2 "Low Brake Fluid Sensor - Checking and Replacing")

Warning: To prevent air from entering the hydraulic drive of the brake system when bleeding the brakes, make sure that the brake fluid level in the brake reservoir does not fall below the "MIN" mark.


3. Clean the nipple of the rear right wheel brake cylinder and the surface around it from dirt.


4. Remove the protective rubber cap from the brake bleed nipple.

5. Put a special or 8 mm open-end wrench on the brake bleed nipple, and then a transparent vinyl tube (the diameter of the tube should be such that it fits tightly on the brake bleed nipple). We lower the other end of the tube into a transparent container partially filled with brake fluid.
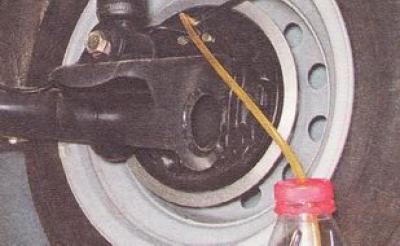
5. Put a special or 8 mm open-end wrench on the brake bleed nipple, and then a transparent vinyl…


6. The assistant presses the brake pedal several times and after the last press holds the brake pedal in the lower position.

7. After loosening the nipple, unscrew it approximately half a turn until liquid begins to come out of the nipple.

8. After the brake fluid stops coming out of the tube, tighten the nipple to bleed the brakes.

9. The assistant presses the brake pedal several times again and holds it in the pressed position.

10. Repeat the steps described in paragraph 7.

11. Bleeding of the brakes should be carried out until the brake fluid with air bubbles stops escaping from the cylinder nipple, after which we finally tighten the nipple to bleed the brakes.

12. Remove the vinyl tube and open-end wrench from the brake bleed nipple and put a protective rubber cap on the nipple.


13. Then we bleed the brake cylinder of the front left wheel.

14. Similarly, we bleed the cylinders of the second circuit: the rear left and front right wheels in the specified order, monitoring the level of brake fluid in the reservoir of the main brake cylinder.
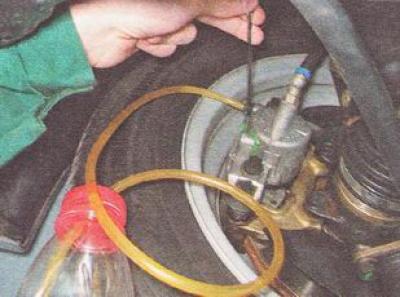
14. Similarly, we bleed the cylinders of the second circuit: the rear left and front right wheels…


15. By pressing the brake pedal, we check the operation of the hydraulic drive and the absence of fluid leakage from the brake bleed nipples.

If the brake pedal is "soft" or it drops below its normal operating position, then we re-check the tightness of the system and repeat bleeding the brakes.

Replacing brake fluid it is carried out in the same way as bleeding the brakes (see above), with some differences.

1. Using a bulb, remove the working brake fluid from the master brake cylinder reservoir.

2. Fill the brake reservoir with new fluid up to the top edge of the reservoir.

3. Bleed the system circuits, starting from the rear wheels of the car in the sequence indicated above.

4. We bleed each wheel brake cylinder until the new one starts to come out (lighter) brake fluid from the brake bleeder nipple.


This article is available at russian, bulgarian, belarusian, ukrainian, serbian, croatian, romanian, polish, slovak, hungarian
The text was reviewed by the specialist: Grigory Vologodtsev

Share with friends:

Previous articles
VAZ-2110: Brake system
Next articles

Checking the brake fluid level in the master cylinder reservoir
Brake system — device and description
Brake pedal free play — checking and adjusting
Front brake mechanism — device and description
Front Brake Pads — Checking Wear
Front brake pads — replacement
Front Brake Hose — Removal, Installation, Replacement

More articles from other manuals on VAZ cars:
➠ Hydraulic brake drive — bleeding and replacing brake fluid VAZ-2104 (1984-2012)
➠ Hydraulic brake drive — bleeding and replacing brake fluid VAZ-2106 (1976-2006)
➠ Hydraulic brake drive — bleeding and replacing brake fluid VAZ-2107 (1982-2012)
➠ Replacing brake fluid VAZ-1111 (1988-1996)
➠ Replacing brake fluid VAZ-2109 (1984-1997)
Link in different formats to this page


Visitor comments

No comments yet


How much will 19 + 27 ?


VAZ-2110 (1995-2007) 
  • General information
  • Vehicle description
  • Specifications
  • User manual
  • Maintenance
  • Operation and maintenance
  • Tips for car owner
  • Power unit
  • Engine repair
  • Supply system
  • Control system
  • Cooling system
  • Exhaust system
  • Transmission
  • Clutch
  • Car gearbox
  • Front wheel drives
  • Chassis
  • Suspension and wheels
  • Steering
  • Brake system
  • Body
  • Exterior
  • Interior
  • Doors and glass
  • Tailgate
  • Ventilation and heating
  • Electrical equipment
  • Equipment and devices
  • Headlights and lighting
  • Engine electrics
  • Electrical circuits


VAZ-2112 (1999-2007) 
  • General information
  • Operation and maintenance
  • Power unit
  • Engine repair
  • Supply system
  • Control system
  • Cooling system
  • Exhaust system
  • Transmission
  • Clutch
  • Car gearbox
  • Front wheel drives
  • Chassis
  • Wheels and tires
  • Car suspension
  • Steering
  • Brake system
  • Body
  • Exterior
  • Interior
  • Doors and glass
  • Tailgate
  • Ventilation and heating
  • Electrical equipment
  • Equipment and devices
  • Headlights and lighting
  • Engine electrics
  • Electrical circuits


VAZbook.ru © 2017 · Mobile version · Contact with administration · Sitemap: EN BG BY UA RS HR RO PL SK HU · Site search · News and articles VAZ-1111 · VAZ-11113 · VAZ-2101 · VAZ-21011 · VAZ-2104 · VAZ-2105 · VAZ-21051 · VAZ-2106 · VAZ-21061 · VAZ-2107 · VAZ-21099 · VAZ-2109 · VAZ-2108 · VAZ-2110 · VAZ-2112 · VAZ-2114 · VAZ-2115 · VAZ-2121 · VAZ-21213 · VAZ-21214 ·
The site stores technical data using cookies to improve the service.