

To replace the wing, remove the bumper, hood, antenna, front door and lighting fixtures. A drill with a diameter of 6-7 mm drills the points of contact welding (pic. 180) gutter with body elements and the gutter is disconnected with a thin flat chisel with a bent end. With a grinder or a thin sharpened chisel, cut the connections along the wing:
- with the front panel from the headlight down, stepping back 2-3 mm from the connection line;
- with the front pillar of the sidewall, stepping back 5 mm from the bending line of the vertical amplifier;
- with the lower part of the sidewall vertically, departing from the edge of the wing 25 mm.
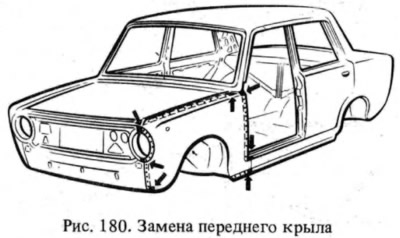
Disconnect the wing, remove the remaining strips of the wing with a chisel. The deformed edges are straightened and the seats of the body and the new wing are cleaned. Dirt and rust are removed from the cavity closed by the wing, and GF-073 zinc-chromate primer is applied. Replace the hood and door. The new wing is adjusted at the landing site, maintaining external clearances (see fig. 178, 179), and fastened with quick-release grips. The wing is welded by gas welding at the ends of the horizontal reinforcement of the groove, at the junction of the wing with the front panel and the lower side plate. For gas welding, a brass rod L62, L68 is used. After checking the external gaps with the door and hood, the wing is welded by contact welding with a pitch of 40-50 mm or by electric welding in a carbon dioxide medium with a semi-automatic wire Sv-08G1S or Sv-08G2S with a diameter of 0.8 mm.