
Most often, the engine stops due to the cessation of the flow of gasoline into the mixing chambers of the carburetor or the failure of the ignition system. In most cases, such causes can be eliminated on the spot without a lot of time, after which you can continue driving. However, this can only be done with a rational sequence of actions in the process of finding a specific malfunction and knowledge of the techniques necessary to carry out health checks of the corresponding devices.
After you have made sure that there is gasoline in the fuel tank, you need to check whether it enters the carburetor mixing chambers. To do this, remove the carburetor air filter cover and, looking into the primary (right in the direction of the car) mixing chamber, open the throttle valves to failure, sharply pressing the end of their drive rod with your hand; at the same time, a stream of gasoline should appear from the atomizer of the accelerator pump, which, with a hot engine, can immediately turn into a clearly visible steam (at night, the mixing chamber should be illuminated with a portable lamp or a flashlight). If a trickle of gasoline appears, it can be assumed that the power system is in order (the same check indicates, in particular, the serviceability of the accelerator pump); in this case, you need to replace the air filter cover and proceed to check the ignition system, which will be discussed below.
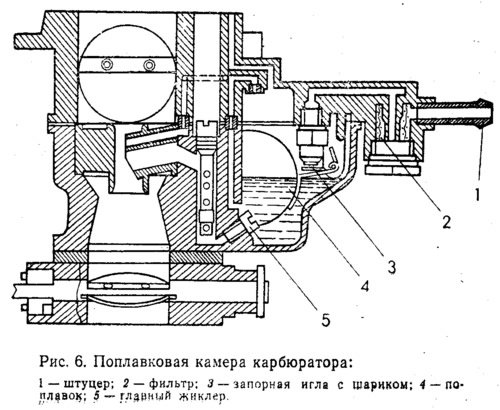
If there is no trickle of gasoline, check if it is getting to the carburetor float chamber. To do this, remove the air filter housing and disconnect the gasoline line from the carburetor; then, after placing the gearshift lever in the neutral position and applying the handbrake, remove the central high voltage wire from the induction coil cover and, pointing forward (along the car) and down the end of the removed fuel line, ask an assistant to turn on the starter for 5-10 seconds. Check if gasoline is coming out of the fuel line in the form of a strong pulsating jet (it is not advisable to use the manual fuel pumping lever instead of the starter, since it may turn out that the gasoline pump supplies gasoline when pumping manually, but does not do this when normally driven from a running engine). If gasoline comes from the fuel pump, it should be assumed that the fuel filter is clogged with dirt (2 in fig. 6) in front of the float chamber, the fuel channel in the needle valve seat is clogged or the main jet is clogged (5 in fig. 6) primary chamber. In this case, you need to remove the carburetor fuel filter, clean it of dirt and blow it out; after that, you need to purge the needle valve with a pump with a conical tip screwed into the end of its hose, directing an air stream into the fitting (1 in fig. 6), on which the fuel line from the fuel pump is put on. Then put on the fuel line, put the central high voltage wire in place, turn on the starter for 5-10 seconds, after which (if the engine has not started during this time) check again to see if there is a stream of gasoline coming out of the sprayer of the accelerator pump. In a positive case, you need to repeat the attempt to start the engine, which is most likely to start working (with the engine still warm, it should be started with the accelerator pedal fully depressed). If a trickle of fuel from the atomizer of the accelerator pump does not appear again, it is necessary to remove the cover of the carburetor float chamber, disassemble and thoroughly blow out the needle valve, and also blow out the jets of the primary and secondary chambers with a pump; after assembling the carburetor, repeat the check for «a trickle of fuel» and, making sure that gasoline enters the primary mixing chamber, start the engine.
Suppose that, as we established at the beginning of the test, gasoline does not flow from the gasoline pump or it flows very weakly. In this case, check the condition of the fuel pump filter and, if necessary, clean the latter. If this does not help, disconnect the fuel line connecting it to the tank from the fuel pump and blow it in the direction of the tank (at «pure» fuel line at the time of pumping with an air pump should be heard «gurgling» in the fuel tank - to hear it better, unscrew the plug from the filler neck). Install the fuel line in place and, after making a few dozen «jocks» using the manual priming lever, make sure that gasoline has begun to flow from the fuel pump. Then, turning on the starter, see if gasoline will continue to flow in the case when the gasoline pump is driven by the engine; in a positive case, the fault can be considered eliminated. If gasoline stopped flowing or did not flow even with manual pumping, it remains to be assumed that the fuel pump is faulty, most likely due to failure of the diaphragms; the latter must be replaced by taking new ones from the portable set of spare parts.
Suppose now that at the very beginning of the test you were convinced that the power system was working. Then proceed to check the ignition system. Remove the central high voltage wire from the distributor cover and, holding it by the rubber tip, bring it to a distance of 5-7 mm to the octane corrector adjusting nut («mass»); then open the window of the left front door, stick your hand in it and, looking at the tip of the removed high voltage wire, turn on the starter for 2-3 seconds (do not forget to put the gearshift lever in neutral and apply the handbrake before doing this). See if a spark with a blue tint jumps between the wire and the adjusting nut. If this is the case, insert the center wire into the distributor cap, remove the high voltage wire from any of the four spark plugs, unscrew this spark plug and put the tip of the removed wire on it (it is even better to use a completely serviceable spare spark plug for testing, without unscrewing the working one). Press the body of the spark plug against the filler cap for filling oil into the engine or against the adjusting nut of the octane corrector and, acting as described above, turn on the starter for 10 seconds; a spark should periodically jump between the electrodes of the candle. If there is no spark, the fault is most likely in the rotor or distributor cap. To check the rotor, remove the distributor cap (along the way, make sure that the sliding graphite contact inserted into it from the inside is present and in good condition, that it is not erased and moves freely in the guide), bring the center high voltage wire to the center contact of the rotor (pic. 4), leaving a gap of 5-7 mm, and turn on the starter; there must be no spark between the wire and the rotor, otherwise the insulation of the rotor is broken and it must be replaced. Be careful when checking the rotor, keeping in mind that after turning on the starter, the rotor will begin to rotate and therefore you should not touch it with your hand.
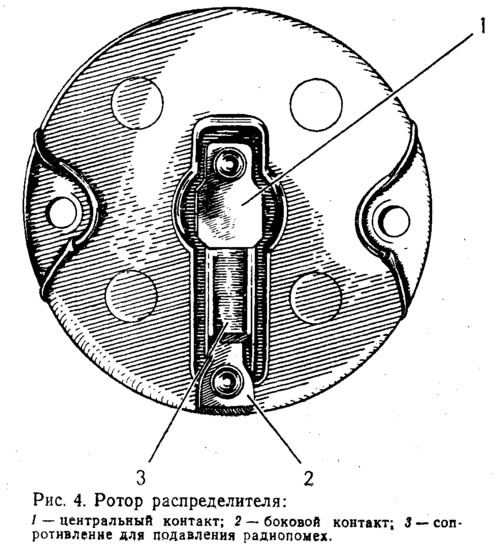
If the spark did not jump, this does not mean that the rotor is working, it is possible that the resistance for suppressing radio interference connecting the central and side contacts of the rotor has failed (see fig. 4). In this case, as a temporary way out, you need to clamp a piece of foil or bare copper wire between the plastic and the brass plates of the central and side contact (it must be borne in mind that this will increase the level of radio interference both in the car itself and in the space surrounding it), then put the distributor cap back in place, insert the center wire and check again for a spark in the candle. If there is no spark again, you should remove and carefully inspect the distributor cover from the outside and inside for the absence of cracks and thread-like traces of soot, the presence of which indicates that the insulation is broken and the cover needs to be replaced. In the absence of a spare cover, the existing one must be thoroughly wiped, the cracks cleaned with a knife and, after replacing the cover, check whether a spark has appeared in the electrodes of the candle; however, this does not always help and at best can be considered as a temporary measure. In addition, with a faulty cover, there may be cases when sparks in the electrodes of the candles will jump, but the engine will not be able to work, since the moments of sparks will not correspond to the required ones. In this position, attempts to start the engine will be accompanied by «sneezing» to the carburetor and «shooting» from the muffler.
Suppose further that at the beginning of the ignition test, a spark between the high voltage center wire and «weight» was absent. Then you should check the low voltage circuit. To do this, insert the starting handle into the crankshaft ratchet, prepare a probe, i.e. a portable lamp, the wires of which have spring clips at the ends (it is desirable to always have such a lamp with you), connect one wire to the low voltage terminal of the distributor (i.e. to the terminal connected by a thin wire to the ignition coil), and the second to «mass» and turn on the ignition. With a slow rotation of the engine crankshaft with a handle and a working system, the probe lamp should light up alternately (when the distributor contacts open) and go out (when they close).
A solid light on the probe lamp means that the contacts are not carrying current; in this case, you need to check their condition and adjust the gap (see section «Engine start»).
If the probe lamp does not light up at all with open contacts, you should check if there is any current in the low voltage circuit. To do this, inspect the wire going from the ignition coil to the distributor, then, if it is in good condition, disconnect it from the low voltage terminal of the distributor, connect it to one probe clip, and connect the second clip to «mass»; When the ignition is turned on, the light should come on. In the positive case, there is current in the circuit and it remains to be assumed that a short circuit has occurred «mass» between the low voltage terminal of the distributor and the moving contact. The closure must be found and eliminated.
Assume that the probe lamp did not light up again during the described test. This indicates, most likely, a low circuit malfunction. voltage between terminal «plus» battery and the input terminal of the ignition coil. As a temporary remedy, directly connect an additional wire to the terminal «plus» battery with terminal «+B» ignition coils and the engine will start, but it will be possible to turn it off only by disconnecting the additional wire. Upon arrival at the parking lot, you must immediately find and eliminate the malfunction in the low voltage circuit.
Suppose that, despite the additional wire, the lamp did not light up again. Then it remains to assume a break in the primary winding of the ignition coil, which in this case must be replaced. Such a malfunction is rare. For replacement, you can use the ignition coil of any domestic car or truck with a voltage of the electrical system of 12 V; such a coil is also suitable for attachment points. It must be borne in mind that the ignition coils of other domestic cars have not two, but three terminals - VK, VK-B and a third terminal without a designation; in this case, connect the terminal without designation to the distributor, connect the second wire to the VK-B terminal, and leave the VK terminal free. In addition, in this case it will not be possible to directly use the standard high voltage wire connecting the ignition coil to the distributor; it will have to be adapted or, even better, replaced with a spare wire that does not have a ferrule at one end.
If at the beginning of the check of the ignition systems it turned out that the spark between the central high voltage wire and the adjusting nut of the octane corrector («weight») weak and does not have a blue tint, but a reddish tint, it should be assumed that the capacitor has failed (happens quite rarely). Any automotive capacitor can be used for replacement.
The procedure for checking the ignition system in the most unfavorable case was described above, when there are no known good contacts, a rotor and a distributor cap, a capacitor and protective caps for high voltage wires; These spare parts are recommended to be carried with you at all times. If they are available, troubleshooting is greatly facilitated, since obviously good parts can be installed in turn instead of parts whose serviceability is in doubt. However, it must be borne in mind that the wrong (with 180°error) installation of the distributor rotor will not only exclude the possibility of starting the engine, but will also lead to a breakdown of the installed rotor; to avoid this, remember (better to draw) the position of the lateral contact of the removed rotor relative to the longitudinal axis of the vehicle.