
Although a number of units and assemblies of the cars in question have an original, fairly advanced and complex design, their maintenance and, in many cases, current repairs after the end of the warranty period (or mileage) can be carried out by the motorist himself, who has some locksmith skills and is equipped with a minimum of additional tools and accessories (see section «Spare parts»).
The following is a series of recommendations for the operation, self-maintenance and repair of cars that are useful for motorists, prompted by practice «Zhiguli».
When disassembling threaded connections in the process of working with a car (except for those subject to high heat, such as spark plug threads) it is useful to lubricate the bolts with grease before assembly (LITOLom-24) in order to facilitate disassembly should it be required again in the future.
Periodically check the tightness of the nuts securing the exhaust pipe of the muffler to the exhaust manifold and the bolts securing the final drive housing to the rear axle beam. A sign of weakening the tightening of the latter is the high-frequency vibration of the car body when driving at a speed of 80 km / h and above, in particular, «petty» rear view mirror shake.
At the end of the break-in of a new car, the carburetor throttle actuator should be adjusted in order to ensure that they are fully opened when the accelerator pedal is pressed all the way down. When checking, one person sitting in the driver's seat presses the pedal to failure (with engine off) and holds it in this position, the second person checks the degree of opening of the throttle valves by pressing on the end of the drive rod of the latter in the direction of further opening. If the throttle valves do not open fully, it is necessary to change the length of the adjustable drive rods; you can also bend up the end of the rod connected to the accelerator pedal.
After the throttle valves have begun to open fully, it is necessary to check and adjust the low idle speed. When starting the engine for this purpose, you must be ready to immediately turn off the ignition if the engine starts «peddling», despite the released pedal; this situation can occur if the length of the adjustable drive rods is set incorrectly.
The adjustment of the throttle valve drive must be periodically checked during operation, especially in the event of a deterioration in the traction and speed qualities of the vehicle.
When adjusting valve clearances, it must be borne in mind that the worst kind of error is to allow complete absence of clearance. In this case, the valves will not close tightly, which will lead to rapid burning of their working chamfers.
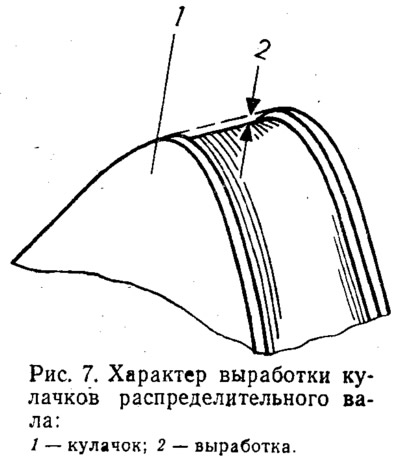
With each adjustment of the gaps in the valves, it is advisable to inspect the condition of the camshaft cams. This can be done by turning each cam in turn so that it takes a horizontal position and its top is directed to the left (along the car). Then it is necessary, highlighting yourself with a portable lamp, without pressing, run the end of the screwdriver across the entire width of the cam and make sure that it is not developed (the absence of protrusions at the ends - fig. 7). If the output has appeared, the camshaft must be replaced, however, if necessary, before the replacement, you can drive a few thousand more kilometers by car, however, with an ever-increasing deterioration in traction and speed qualities. The condition of the camshaft cams must be especially checked in cases where a strong knock in the valves is not eliminated after adjusting the clearances.
At the same time as replacing the camshaft, it is usually necessary to replace the valve levers, the working surfaces of which are damaged. When replacing the camshaft, it is necessary to change the engine oil (with obligatory flushing of the lubrication system of the last) and oil filter, otherwise metal particles remaining in the oil (cam wear products) can quickly damage a new camshaft.
The operating instructions indicate the need to change the coolant after two years of operation of the car or after a run of 60 thousand km. This requirement is due to the fact that the TOSOL A-40 coolant gradually loses its lubricity (lubricating properties), and this worsens the working conditions of the coolant pump seal and can ultimately lead to its failure. For the same reason, unless absolutely necessary, you should not add (the more pour) water or other types of coolant into the cooling system; if this had to be done, you need to switch back to TOSOL A-40 as soon as possible.
Lubrication of the spline connection of the front driveshaft should be done using a grease fitting screwed in place of the screw plug. For this purpose, it is convenient to use a grease fitting to lubricate the ball bearings of the steering pins of the front wheels of cars «Moskvich». After lubrication, the grease fitting must be replaced with a screw plug.
After a significant mileage of the car, the cardan bearings, especially the rear ones, may fail. This malfunction is diagnosed by the appearance of characteristic metallic knocks when starting off, which constantly increase as the mileage increases. To check, disconnect the rear flange of the cardan gear from the flange of the final drive gear and shake the cardan in both planes; its malfunction is determined by an easily perceptible play in the bearings. In this case, the cross assembly with needle bearings must be replaced.
It is convenient to control the thickness of the friction linings of the brake pads of the front wheels by removing the wheel, turning the steering wheel all the way to the left or right and illuminating the ends of the brake pads with a portable lamp.
When changing the brake pads of the front wheels, it is often difficult to press out the fingers. In this case, apply ends or rags moistened with brake fluid to the appropriate places (any), and leave these «compresses» for a few hours, after which the removal of the fingers is greatly facilitated.
After removing the old pads, the new pads, which are naturally thicker, usually do not fit into the caliper. Therefore, before installing them, you need «drown» pistons; it is convenient to do this with the blunt end of the tire mounting spatula. When doing this, be careful not to damage the piston dust caps.
Often, after a significant mileage of the car, it is difficult to remove the brake drums of the rear wheels. In such cases, you need to place stops under the front wheels, jack up the rear wheel, remove it, unscrew the bolts securing the drum to the axle shaft, then turn on the third gear, «disperse» raised brake drum up to a speed of 50-60 km/h (by speedometer) and sharply apply the brake; usually after that the drum is easily removed, otherwise the attempt should be repeated. For safety reasons, no one should stand in the plane of rotation of the drum. Do not allow prolonged (more than 30-40 s) rotation of the drum, as this may damage the differential.
The friction linings of the rear brake pads wear out unevenly; pads usually have more wear «leading» pads facing the front of the vehicle. Therefore, after a run of 60-70 thousand km, it makes sense to change the pads in places in order to extend the life of the kit.
If necessary, disassembly of the steering rods (e.g. to replace a defective hinge cover) unpin the nut, unscrew it to such an extent that it is flush with the pin, and then «tap» hammer the side surface of the conical socket of the lever until the pivot pin itself falls out of the socket. In no case should you hit the nut, or even more so the end of the finger, as this does not give any results and can only lead to damage to the parts.
To increase the service life of the ball joints of the pivot pins of the front wheels, it is useful to add grease to them after the first 4-5 thousand km. To do this, it is necessary to temporarily (or constantly) insert a grease fitting instead of the plug (suitable grease fitting used in cars «Moskvich» models 403, 407 and 408 for water pump lubrication) and introduce grease ShRB-4 into the cavity or, in its absence, LITOL-24. During the lubrication process, you need to monitor the protective cover and, after it swells noticeably, stop further lubrication to avoid tearing it.
Front wheel tire wear is greatly influenced by their mounting angles. Bear in mind that wheel alignment is most important in terms of tire wear, and wheel camber has a relatively small effect on wear.
To check and adjust the convergence at home, you can make a simple measuring ruler, which is a wooden block 1180 mm long with screws with semicircular heads screwed into its ends (when screwing in half the length of the thread, the screws must protrude 20 mm on each side).
An empty car is installed on a viewing hole or overpass; front wheels are placed (approximately) in the direction of linear motion.
The measuring ruler is first set between the front wheels in front of their centers at the maximum height allowed by the engine and front suspension elements; at the same time, the screw heads rest against the inner sidewalls of the tires close to the edges of the disks. Screws are screwed in or unscrewed in such a way that the ruler stands up «by surprise» and there was no transverse clearance between the screw heads and tire sidewalls. The sidewalls of the tires opposite the screw heads are marked with chalk. The ruler is then removed and the vehicle rolled forward about two-thirds of a wheel turn, after which the ruler is positioned behind the centers of the front wheels against the chalk marks again at the highest possible height (if necessary, the position of the marks is corrected by additional slight rolling of the car forward or backward so that the ruler takes the highest possible position). With proper wheel alignment, the transverse clearance should be 0.5-1.5 mm. If this is not the case, the wheel alignment must be adjusted, while acting in accordance with the instructions.
Despite the simplicity of the described measuring ruler and the small measurement errors that occur when using it, experience has shown that the ruler provides the accuracy necessary for practice and allows achieving high tire mileage.
In operation, sometimes there is such a phenomenon - the withdrawal of the car to the left or right. To eliminate this, it is necessary to insert into the appropriate package of shims, which are clamped with bolts for fastening the axle of the lower arm to the front suspension cross member between the axle and the cross member, a half-washer 1-2 mm thick. If the car drives to the left, the half-washer must be inserted into the rear shim pack of the left lower arm, if to the right, into the rear shim pack of the right lower arm. If this is not enough, you can add another half-washer to the right lower arm front shim pack when pulling to the left, and to the left lower arm front shim pack when pulling to the right. It should be borne in mind that the results of the installation of half washers do not affect immediately, but only after a run of 80-100 km. After you are convinced that the slip is eliminated, immediately adjust the toe-in of the front wheels.
If knocks appear in the front suspension, you must first check the condition of the lower bushings of the shock absorbers. To do this, it is enough to disconnect the lower shock absorber mount, pull the latter down and check the tightness of the connection of the lower shock absorber lug with the bracket. If there is play, the rubber bushings must be replaced (possible options for replacing bushings are discussed below in the section «Spare parts»). Before installing new bushings, they should be moistened with brake fluid (any).
Knocking in the front suspension may also be due to increased clearance between the front shock absorber lower mounting spacer and the bolt inserted into it. In this case, the specified connection must be sealed.
When adjusting the front wheel bearings, remember that the main reason for their failure is constriction. Therefore, they should be tightened in such a way that when you press the edge of the brake disc with your finger, a small gap is felt in the bearings.
Inflation pressure should be checked with cold tires.
Studies have shown that, contrary to common practice, it is not necessary to swap all the wheels of a car every 5-10 thousand kilometers. This practice masks suspension defects (especially the front), causing accelerated tire wear, and can lead to premature wear of not just one tire, but of their entire set. In addition, this practice is associated with unnecessary labor and time. Instead, it is necessary to identify and eliminate the causes of wear of a particular tire, after which the most worn tire should be used as a spare.
Unexpected starter failure (when turned on, a weak click is heard, the starter does not scroll the crankshaft) often the result of oxidation of the battery terminals (primarily positive). In this case, you need to clean the terminals as recommended in the section «Engine start».
If the battery charge warning light comes on while the engine is running, the alternator has stopped working, and this is often caused by minor problems that can be corrected immediately.
Check fuse number 10 first (far right) contact with clamps and burnout (you can, for example, try to install fuse number 4 in its place), and then a contact in the plug connectors of the charging indicator lamp relay, which is located under the hood on the right side of the front wheel mudguard.
If this does not help, it is most likely a contamination of the collector rings. However, there is no need to hurry with the removal and disassembly of the generator. Most often, after a short time in the process of movement, the defect disappears by itself and the generator starts to work. By the way, with a non-working generator in a car, you can drive several hundred kilometers along the highway during the day; at night and when using the starter, the distance that can be driven without charging the battery is significantly reduced, but still remains quite large.
Assume that the generator has not started to work. Then it is necessary to wipe the collector rings with a rag soaked in gasoline, turning the engine shaft with the handle. As for the wear of the brushes, their durability usually exceeds 100 thousand km.
Wiping the collector rings, removing and installing brushes can be done without removing the generator from the car, although this is rather inconvenient. To remove the generator, it is necessary to unscrew the bolt of the upper tension bar, move the generator to the engine, remove the belt from the pulley, remove the engine protection panel and the lower mudguard, unscrew the generator bracket nut, remove the bolt and remove the generator from below. In the event that the measures mentioned above did not work, the generator must be sent to a workshop for repair.