
English Русский
Български
Беларускі
Український
Српски
Hrvatski
Română
Polski
Slovenský
Magyar
| Articles | Contacts | Sitemap |   
Repair and maintenance Lada Repair and maintenance Mazda Repair and maintenance Mitsubishi Repair and maintenance Toyota Repair and maintenance Land Rover Repair and maintenance Hyundai Repair and maintenance Nissan
VAZbook.ru


Main     1111   2101   2105   2106   2107   2109   2110   2115   2121  
VAZ-2101 (1970-1983) VAZ-21011 (1974-1983)
  • Main
  • «Zhiguli»
  • VAZ-2101
  • Power unit
  • Cooling and lubrication system
  • Checking parts and repairing the oil pump

Checking parts and repairing the oil pump (VAZ-2101)

            0

All parts must be washed and blown with compressed air. It is necessary to inspect the body and cover, if there are cracks, replace the parts.

Using a set of feeler gauges, check the gaps between the gear teeth, as well as between the outer diameters of the gears and the walls of the pump body, which should be 0.15 mm, respectively (maximum permissible 0.25 mm) and 0.11-0.18 mm (maximum permissible 0.25 mm). If the gaps exceed the maximum values, then the gears are replaced, and if necessary, the pump body.

Using feeler gauge 2, check the gap between the ends of the gears and ruler 1 (Fig. 27), which should be 0.066–0.161 mm (maximum permissible 0.20 mm). If the gap is more than 0.20 mm, replace the gears or the housing, depending on what is worn out.
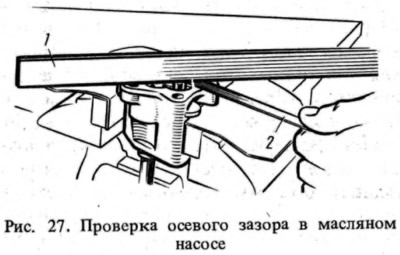
Using feeler gauge 2, check the gap between the ends of the gears and ruler 1 (Fig. 27), which…


Measure the diameters and determine the gap between the axle and the driven gear, which should be 0.017-0.057 mm (maximum permissible 0.10 mm), and also between the pump shaft and the hole in the housing, which should be 0.016-0.055 mm (maximum permissible 0.10 mm). If necessary, replace worn parts.

When repairing the pump, pay attention to the surfaces of the pressure reducing valve and the housing, which should not have any dirt, deposits, nicks, burrs that can lead to jamming of the valve or reduce the oil pressure in the system. Check the elasticity and length of the pressure reducing valve spring and compare with the data given above.


Check the ovality of the roller bushings 10 (see fig. 24) of the oil pump and ignition distributor drives, their pressing into the sockets, and also the coincidence of the hole in the front bushing with the channel in the cylinder block, i.e. whether the bushing has turned. Having measured the diameters of the shaft and bushings, the gaps are determined. If the gaps exceed 0.15 mm (wear limit), and also have damage to the surfaces or weakening of the pressing, the bushings are replaced. To replace the bushings, use the mandrel A.60333/1/2 (Fig. 28). After pressing, the bushings must be finally processed with the step reamer A.90353 to the dimensions specified in Table 2. The reamer processes both bushings at once to maintain their alignment.

The material is posted on the website (VAZbook.ru)
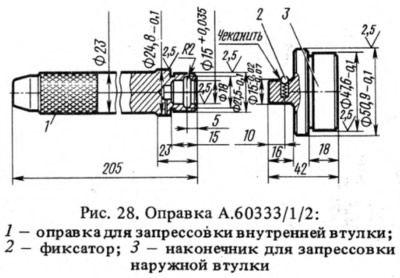
Check the ovality of the roller bushings 10 (see fig. 24) of the oil pump and ignition distributor…


The pressing must not be loosened or the bushing of the oil pump and distributor drive gear must not be out of round. The inner surface must be smooth and free of burrs. Otherwise, the bushing must be replaced with a new one. The A.60326R mandrel (Fig. 29) is used for pressing in and out. After pressing in, the bushing is expanded to a diameter of 16.016–16.037 mm.
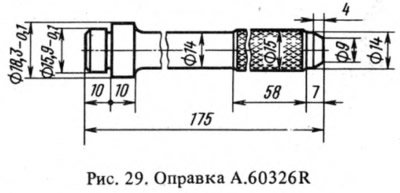
The pressing must not be loosened or the bushing of the oil pump and distributor drive gear must…


This article is available at russian, bulgarian, belarusian, ukrainian, serbian, croatian, romanian, polish, slovak, hungarian
The text was reviewed by the specialist: Grigory Vologodtsev

Share with friends:

Previous articles
VAZ-2101: Cooling and lubrication system
Next articles

Disassembly and assembly of the oil pump
Removal and installation the oil pump on a car
The structure and operation of the lubrication system
Checking the Thermostat
Radiator — removal and inspection

More articles from other manuals on VAZ cars:
➠ Checking and repairing the coolant pump VAZ-1111 (1988-1996)
➠ Checking the technical condition and repairing the oil pump VAZ-2105 (1979-2010)
➠ Disassembling, cleaning and checking fuel pump parts VAZ-21213 (1994-2006)
➠ Generator — Checking and Repairing VAZ-2106 (1976-2006)
➠ Generator — Checking and Repairing VAZ-2107 (1982-2012)
Link in different formats to this page


Visitor comments

No comments yet


How much will 29 + 28 ?


VAZ-2101 (1970-1983) 
  • General information
  • Vehicle description
  • Vehicle device
  • Vehicle operation
  • Maintenance
  • Main malfunctions
  • Applications
  • Power unit
  • Engine repair
  • Cooling and lubrication system
  • Supply system
  • Transmission
  • Clutch
  • Transmission
  • Cardan gear
  • Rear axle
  • Chassis
  • Front suspension
  • Rear suspension
  • Steering
  • Brake system
  • Body
  • Exterior
  • Interior
  • Electrical equipment
  • Engine electrics
  • Equipment and devices


VAZ-21011 (1974-1983) 
  • General information
  • Specifications
  • Operation and maintenance
  • Power unit
  • Engine repair
  • Cooling system
  • Lubrication system
  • Power and exhaust system
  • Ignition system
  • Engine electrics
  • Transmission
  • Clutch
  • Car gearbox
  • Cardan gear
  • Rear axle
  • Chassis
  • Car suspension
  • Steering
  • Brake system
  • Body
  • Exterior
  • Interior
  • Doors and locks
  • Electrical equipment
  • Equipment and devices
  • Lighting and signaling


VAZbook.ru © 2017 · Mobile version · Contact with administration · Sitemap: EN BG BY UA RS HR RO PL SK HU · Site search · News and articles VAZ-1111 · VAZ-11113 · VAZ-2101 · VAZ-21011 · VAZ-2104 · VAZ-2105 · VAZ-21051 · VAZ-2106 · VAZ-21061 · VAZ-2107 · VAZ-21099 · VAZ-2109 · VAZ-2108 · VAZ-2110 · VAZ-2112 · VAZ-2114 · VAZ-2115 · VAZ-2121 · VAZ-21213 · VAZ-21214 ·
The site stores technical data using cookies to improve the service.