




During vehicle operation, it is necessary to check the condition of the anti-corrosion coating and, if necessary, provide additional protection, especially for hidden cavities, by applying special anti-corrosion compounds, and for joints of parts by applying sealing mastics. For the introduction of anti-corrosion compounds into hidden cavities, the manufacturer provides technological holes or openings through which the tips of the guns can be passed. After introducing the compound, close the openings with rubber plugs. Particular attention during vehicle operation should be paid to the integrity of the protective coating on the bottom of the body, which is subject to the most intense external influences, and therefore, corrosion.
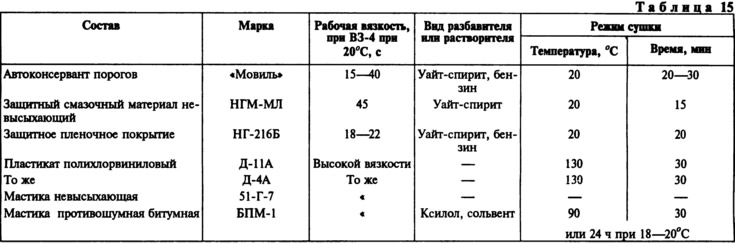
The materials used for anti-corrosion treatment are listed in Table 15:
- protective lubricant NGM-ML is used for processing hidden cavities. This material is used to process hidden cavities of all new cars;
- auto preservative "Movil" is used to treat hidden cavities during operation. It is allowed to apply the auto preservative to surfaces previously covered with oils, as well as to a rusty surface. It is recommended to treat cavities every two years;
- protective film coating NG-216B is used to cover vehicle components and parts under the body during transportation;
- plastisol D-11A is used to protect the underbody from corrosion, abrasive wear and for soundproofing new cars. Coating thickness 1-1.5 mm;
- bPM-1 bitumen anti-noise mastic is used to protect the underbody from corrosion during vehicle operation. The mastic is applied with a thickness of 1-1.5 mm. It reduces noise well, but has insufficient anti-corrosion properties and cannot withstand salt solutions, abrasives and other substances for a long time;
- plastisol D-4A is used for sealing welded seams and joints of parts on the external and internal surfaces of the body;
- non-drying mastic 51-G-7 is used for sealing body joints, corner joints and gaps.
Anti-corrosion compounds are applied evenly and should not contain pores. To apply them into hidden cavities of the body, use the KRU-1 gun with a special elastic tubular plastic extension. The extension is connected to the pneumatic gun with a union nut at one end, and at the other end has a sawing nozzle that creates a spray torch. Due to its elasticity, the extension ensures the penetration of the sawing nozzle into hard-to-reach places of the body.
Apply the anti-corrosion compound to the surfaces using air or airless spraying. Air spraying requires compressed air at a pressure of 3-4 kgf/cm², which is fed into a spray gun with a tank and then into a sawing nozzle. The best coating quality is achieved with airless spraying under a pressure of up to 160 kgf/cm², which allows sawing materials of significant viscosity.
Preparation and anti-corrosion treatment of hidden cavities
Due to the need for complex technological equipment to perform the work and the requirement for high-quality work, it is recommended that the treatment be performed at vehicle service stations.
The order of operations for protection of hidden cavities from corrosion is as follows:
- place the car on a lift, remove parts and upholstery that prevent access to hidden cavities;
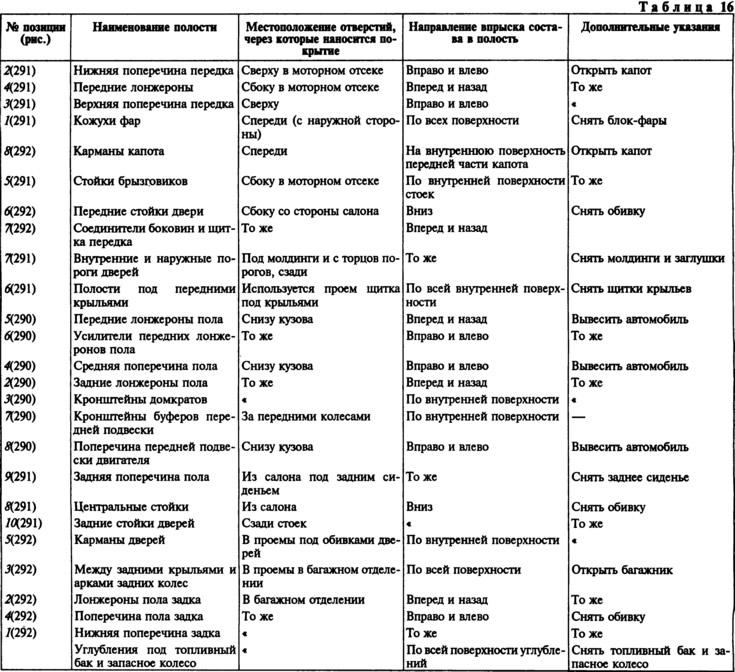
- wash the hidden cavities (Table 16), the bottom of the body and the rear wheel arches with water at a temperature of 40-50°C through the technological and drainage holes. It is necessary to wash the hidden cavities until clean water flows out of the hole. In this case, the door windows must be raised;
- remove any moisture that has entered the interior and trunk, blow out all hidden cavities and areas where anti-corrosion compounds have been applied with compressed air;
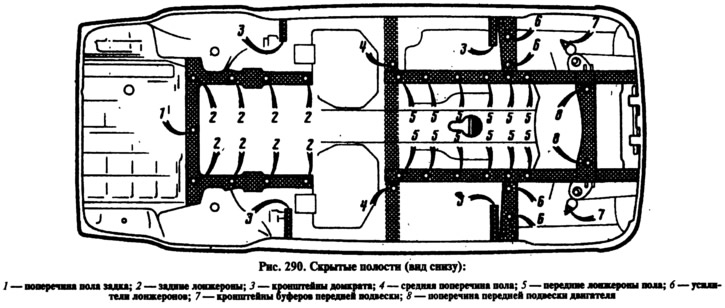
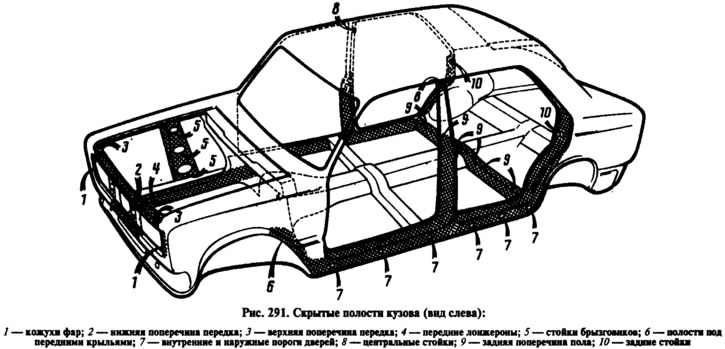
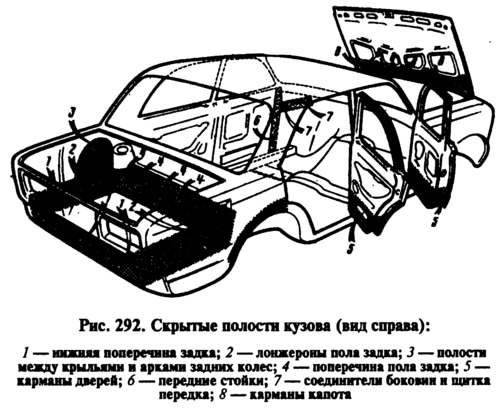
- move the vehicle to the anti-corrosion chamber and place it on a lift. Spray the anti-corrosion compound in the areas shown in Fig. 290-292;
- lower the car from the lift, clean the front surfaces of the body from dirt with a rag soaked in white spirit.
Restoration of anti-corrosion and anti-noise coating of the underbody and wheel arches
During vehicle operation, the coating on the underbody is exposed to gravel, sand, salt, moisture, as a result of which the mastic and primer are damaged and worn away. The exposed metal is subject to corrosion.
At the automobile plant, polyvinyl chloride plastic compound of the plastisol D-11A brand with a thickness of 1-2 mm was applied to the lower surface of the body base, wheel arches and side members for noise insulation and protection against corrosion and abrasive wear on epoxy primer EF-083.
In case of damage to the D-11A plastisol coating without damaging the primer layer, clean the damaged areas from dirt, degrease and apply plastisol to the dry surface using an airless spray or a brush. Dry the plastisol at a temperature of 130°C for 30 minutes. Due to the significant complexity of heating the body coating to a high temperature and the need for complete disassembly of the car, it is permissible to restore the coating by applying BPM-1 anti-noise mastic, which can dry in natural conditions.
Before restoring the coating, place the car on a lift, carefully inspect the underbody and identify coating defects. Clean the underbody from dirt, remove rust with a spatula, sandpaper or rust converter according to the instructions for its use. Blow off the underbody with compressed air. Then place the car on a lift in the mastic application chamber and remove the wheels. Cover the drums and brake discs with protective covers, insulate the cardan transmission, mufflers, cables and other places that cannot be treated with mastic with thick paper and adhesive tape. Degrease the areas cleaned to the metal with a rag soaked in white spirit, spray or brush GF-073 primer on them and let it dry for 5-10 minutes. Then spray or manually apply (with a brush or spatula) bPM-1 mastic on defective areas with a layer 1-1.5 mm thick. The application of mastic to adjacent areas that are not damaged should be minimal. In the cold season, before use, the mastic is kept in a warm room until the temperature rises to at least 20°C. If the mastic is contaminated, dilute it with xylene, adding no more than 3%.
If the paintwork on the front panels is contaminated with mastic, clean it with a rag soaked in white spirit. Dry the mastic at a temperature of 18-20°C for at least 24 hours. To speed up drying, keep the coating at 100-110°C for 30 minutes.