




Contents: Doors ↓ Body hood ↓ Trunk lid ↓ Bumpers ↓ Glazing ↓ Windshield and headlight washers ↓ Seats ↓ Heating and ventilation of the…↓
The body parts are stamped from low-carbon cold-rolled sheet steel: for external panels, 0.7 mm thick; for front floor and lid - 0.9 mm; for front mudguards, rear wheel arches, side members, floor cross members - 1.0 mm; for heavily loaded parts (front side members, central pillars) — 1.5 mm. Various small parts are stamped from steel with a thickness of 0.8–2.5 mm.
Doors
The doors of the body consist of outer and inner panels. Upper parts of the doors (window openings) are made of steel profiled frames. The door hinges are attached to the body pillars with countersunk head screws, the movable hinge links are spot welded to the front end reinforcement of the door. The door on the hinges has height adjustment and in the transverse direction of the vehicle axis. The front doors (Fig. 271) have one sliding window, the rear doors have one sliding window and the second fixed window.
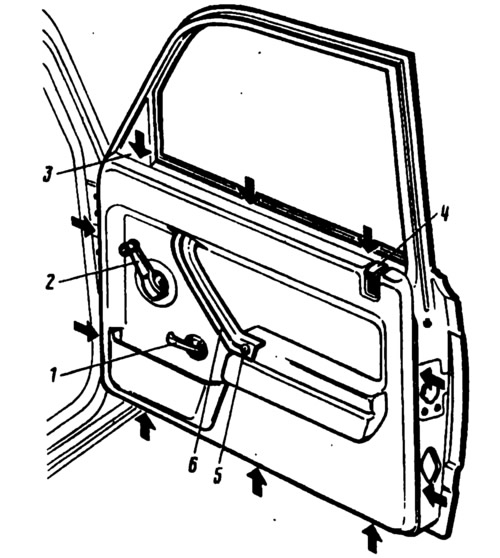
Fig. 271. View of the inside of the front door:
1 - inner door handle; 2 - window lift handle; 3 - window plug; 4 - door lock button; 5 - decorative plug; 6 - armrest handle. The arrows show the location of the door trim holders.
The front door lock has a lock switch on the outside. From the inside, the lock is locked by pressing the lock button 7 (Fig. 272). When the door is open, the locking device does not operate. From the inside, the door is opened by turning the inner drive handle towards you, regardless of the position of the lock button.
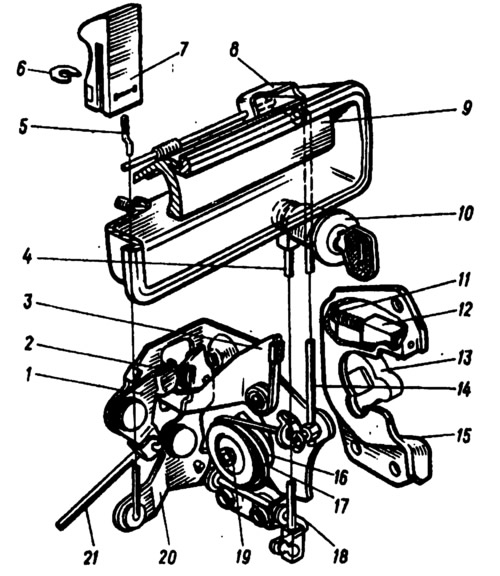
Fig. 272. Front left door lock:
1 - internal lock drive lever; 2 - locking lever spring; 3 - external drive lever: 4 - lock switch rod; 5 - lock button pull; 6 - bracket; 7 - lock button; 8 - leash; 9 - outer handle; 10 - lock switch; 11 - cracker spring: 12 - cracker; 13 - rotor: 14 - external drive rod; 15 - retainer body; 16 - ratchet; 17 - central roller spring; 28 - lock release roller; 19 - central roller; 20 - locking lever; 21 - inner drive rod.
The rear door lock, unlike the front door lock, does not have a switch and is locked only by the lock button. A locked lock cannot be opened with the inside handle until the lock button is raised up. The lock can be locked with the door closed and open (press the button and close the door). Otherwise, the design of the lock differs only slightly from the front door lock.
The front door window lifter (Fig. 273) has a cable drive, the mechanism 4 is secured to the inner door panel with three nuts. The window lifter cable 10 covers four rollers 11 and 13, secured to the door, and is wound onto a drum, the driven gear of which engages with the driving gear. The lowering window is secured with brackets 8 on two vertical sections of the cable. Tensioning is performed by tension roller 13.
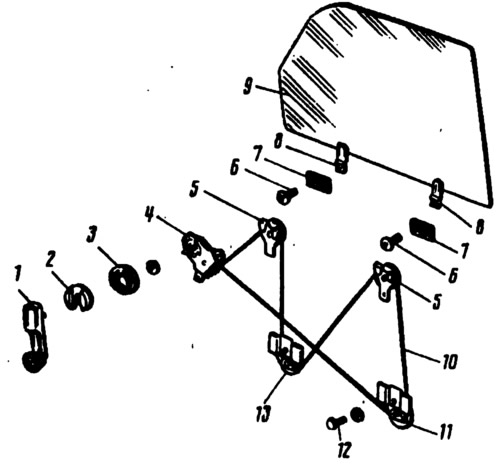
Fig. 273. Front window drive:
1 - window lift handle; 2 - handle lining; 3 - socket; 4 - window lift mechanism; 5 - brackets; 6 - screws; 7 - pressure plates; 8 - bracket for the drop glass; 9 - drop glass; 10 - cable; 11 - lower roller; 12 - bolt; 13 - tension roller.
The design of the rear window lifter differs slightly. The cable covers three rollers and has one vertical section.
Body hood
It consists of welded outer and inner panels. For additional rigidity, the inner panel is glued to the outer one. The hood is hung on the front edge of the body on hinges. The hinges are fastened to the crossbar of the front of the body and the hood to the hinges with bolts, allowing the position of the hood to be adjusted in the opening of the body.
Trunk lid
The lid has a structure similar to the hood. The fastening loops and the lid lock differ in design. The lid hinges have a torsion mechanism that makes it easier to open the lid and hold it in the open position. The trunk lid lock is locked with a key. The operation of the lock can be adjusted by moving the lock or the retainer to a new position due to the enlarged holes in the lock body and the retainer plate.
Bumpers
The front and rear bumpers are made from aluminum beams, which are bolted to the body brackets using tubular connectors.
Glazing
The windshield is curved, safe, made of two layers of polished glass 3 mm thick, glued together with a plastic film. The glass is held in the openings by a rubber seal.
The rear window and side windows are safe, tempered, polished. The rear window is electrically heated. The lowering door windows are glued to brackets that provide their lifting and lowering. The fixed door windows are held in the openings by rubber seals.
Windshield and headlight washers
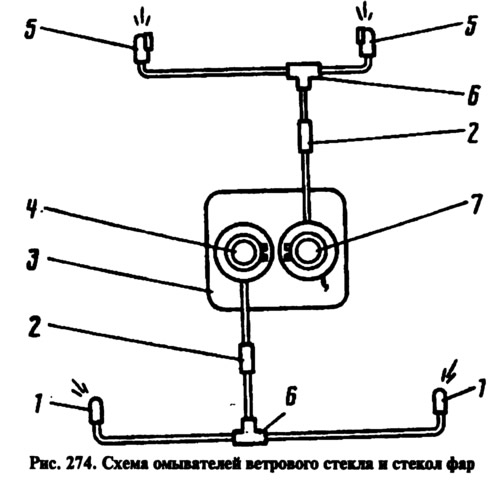
The washers consist of a supply tank 3 (Fig. 274), a pressure pump 7 for the windshield washer with an electric motor, a pressure pump 4 for the headlight glass washer with an electric motor, check valves 2, tees 6, and jets 1 and 5. When the electric motors are turned on, the pumps supply liquid under pressure from the supply tank through the jets to the glass.
Seats
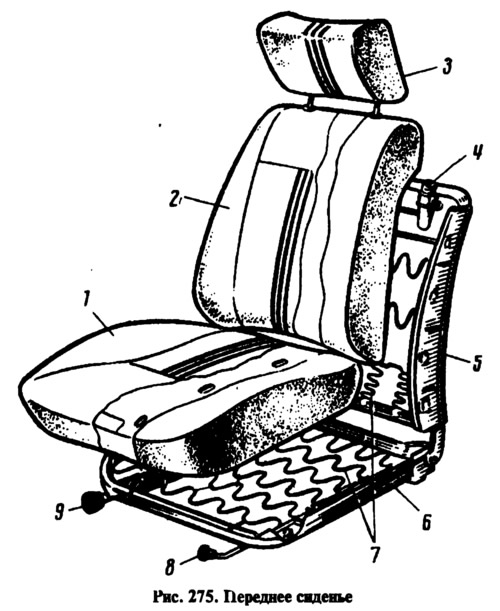
The front seats (Fig. 275) are separate, with individual adjustment of the seat position and backrest tilt using handles 8 and 9. Frames 5 and 6 are stamped from steel, springs 7 are attached to the frames. The frames of the cushion/s and backrest 2 are connected by hinges. Headrest 3, which can be adjusted in height, is installed in the guides 4 of the backrest 2. The seat is mounted on two runners. The runners consist of guides 1 (Fig. 276) and sliders 2, stamped from sheet steel. The inner guide has a lock 7. Handle 12 with latch 6 is installed on the inner slider. When the handle is released, the seat is fixed in a given position. To facilitate the movement of the seat, two rollers 3 with rubber rings 4 and a limiter 5 between the rollers are inserted into the runners. The backrest tilt mechanism is located on the outside of the seat. The rod 9 is attached to the backrest reinforcement 8 using a pin. The spring 10 serves to facilitate adjustment. Thanks to the screw thread on the rod, when the handle 11 is rotated, the rod smoothly changes the angle of the backrest.
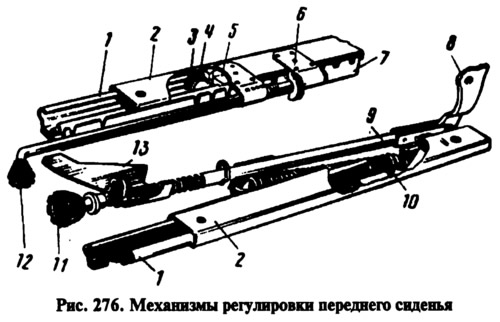
To quickly change the angle of the backrest, you can lift the handle and disengage it from bracket 13.
The rear seat is designed for three people. The seat cushion is fixed with two pins on the floor crossbar. The back of the rear seat is secured at the top with two strips that fit into the brackets on the rear shelf. At the bottom, the back is secured with tongues welded to the wheel arches. The tongues are bent into the brackets at the corners of the back frame.
Heating and ventilation of the passenger compartment
(The text is copied from the online resource: VAZbook.ru)
The car interior is heated by air heated in the heater radiator (Fig. 277), which is included in the engine cooling system parallel to the main radiator.
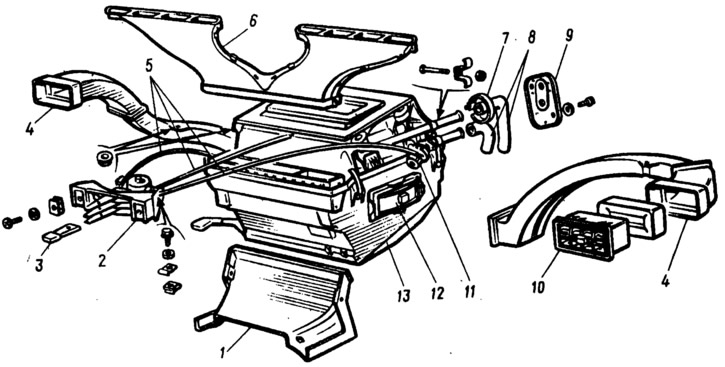
Fig. 277. Heater:
1 - internal ventilation air duct; 2 - control lever bracket; 3 - control lever handles; 4 - air duct for heating side window; 5 - flexible rods; 6 - Windshield heating air duct; 7 - tension clamp; 8 - rubber hoses; 9 - seal; 10 - side window heating nozzle; 11 - crane; 12 - side window heating air duct flap; 13 - air distribution cover.
The plastic radiator casing is attached with four nuts from below to the front shield reinforcement through a sealing gasket. In the upper part, the casing has an air intake cover that regulates the amount of air. A discharge pipe and a tap with an inlet pipe are attached to the radiator tank, which are connected to the cooling system with hoses.
The air that has passed through the heater radiator enters the guide casing and then into the fan casing. The electric fan is secured in the center of the plastic guide casing with spring holders. On the front wall of the fan casing on the inside there is a resistor (additional resistance). Connecting or disconnecting it from the electric fan power supply circuit with a three-position switch ensures low or high speed rotation of the fan impeller.
The heater is controlled by three handles on the instrument panel. Plastic handles 3 are fixed to the levers by projections stamped on the ends of the levers.