




Circuits for testing rectifier block diodes
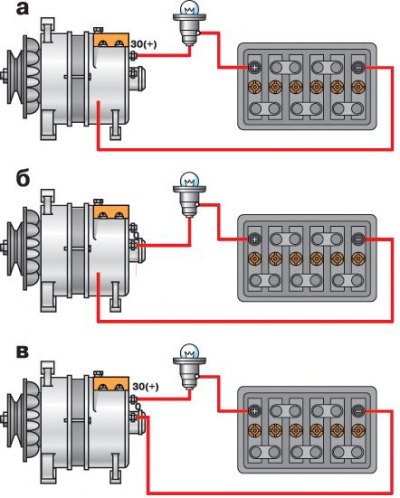
a - checking both "positive" and "negative" diodes simultaneously; b - checking "negative" diodes; in - checking "positive" diodes; 1 – battery; 2 – control lamp; 3 – generator; 4 – terminal "B" of the voltage regulator; 5 – wire of the common output of additional diodes
A working diode only passes current in one direction. A faulty one may not pass current at all (chain break), or pass current in both directions (short circuit).
If one of the diodes of the rectifier block is damaged, the entire rectifier block must be replaced.
A short circuit of the rectifier block diodes can be checked without removing the generator from the car, after disconnecting the wires from the battery and the generator. You can check with an ohmmeter or with a lamp (1–5 W, 12 V) and a battery, as shown in Fig. Schemes for checking the rectifier block diodes.
A break in the diodes without disassembling the generator can be detected either with an oscilloscope or when testing the generator on a bench by a significant decrease (by 20-30%) in the value of the output current compared to the nominal value. If the windings, additional diodes and voltage regulator of the generator are in good condition, and there is no short circuit in the diodes, then the reason for the decrease in the output current is a break in the diodes of the rectifier unit.
1. Before checking the generator 37.3701, you need to disconnect the terminal "B" (4 in Fig. Circuits for testing the diodes of the rectifier block) voltage regulator from the terminal "30" of the generator and the wire from the terminal "B" of the voltage regulator. For generators with a new voltage regulator (see Fig. Generator 37.3701, type "a") terminal "B" is missing and only the wire of terminal "B" needs to be disconnected.
2. First check if there is a short circuit in both the "positive" and "negative" diodes. To do this, connect the "plus" of the battery through the lamp to the "30" terminal of the generator, and the "minus" to the generator body (see Fig. Circuits for testing the rectifier block diodes, and). If the lamp is on, then the "negative" and "positive" diodes are short-circuited.
3. A short circuit of only the "negative" diodes can be checked by connecting the "plus" of the battery through a lamp to one of the rectifier unit mounting bolts, and the "minus" to the generator body (see fig. Circuits for testing the diodes of the rectifier block, b).
4. The lamp burning means a short circuit in one or more "negative" diodes. It should be remembered that in this case the lamp burning may also be a consequence of the stator winding short circuit on the generator housing. However, such a malfunction is less common than a short circuit of the diodes.
5. To check for a short circuit only in the "positive" diodes, connect the "plus" of the battery through a lamp to the "30" clamp of the generator, and the "minus" to one of the mounting bolts of the rectifier unit (see fig. Circuits for testing the diodes of the rectifier block, in). The lamp lighting up will indicate a short circuit in one or more "positive" diodes.
Attention! In order to simplify the fastening of the rectifier parts, three diodes have a "-" of the rectified voltage on the body. These diodes are "positive" and they are pressed into one plate of the rectifier block. The other three diodes - "negative" - have a "minus" of the rectified voltage on the body and are pressed into another plate of the rectifier block.